
Friday 31st May, 2024

… COMMUNITY BUILDING ACROSS THE MILES …
It’s been a whirlwind kind of five weeks for me, and I’m back home again in my Happy Place, The Sewing Gypsy Studio after travelling over 4000kms by road to visit family, friends and enjoy a 4 day Sewing Retreat up in Townsville, where I spent many of my years growing up. It got me thinking … hours of driving gives you lots of time to think!
How we build connections in life takes on many forms, and origins … and with the entrance of ‘Social Media’ platforms many years ago now, friendships and whole communities have been built around common interests, beliefs or passions … just to name a few.
I fondly remember a conversation many years ago with my dear friend Julia’s husband Geoff, who was telling me about Julia’s ‘pretend friends’ … she was following a blog about a lady/family who were renovating/building a beautiful home here in Brisbane. I’d never really ‘followed’ a blog before so … of course, I went home and checked it out. I read it from the beginning … and then, as there was a new post each week, I too, eagerly awaited its newsy, friendly chat, and beautiful photos … what a journey that family had – and a magnificent home! It seemed I’d gathered a new ‘pretend friend’ as well! Once you’ve ‘invested’ your time in a blog, it really does feel like you know that person … a ‘new friend’ indeed!
Julia and I met in Year 7 at school, both aged almost 12 … and there have been many, many years of beautiful friendship/family times shared …here we are at her home surrounded by most of our families (over 20 years ago!)… and then a ‘selfie’ about 12 years ago, together enjoying a little hike after a shared nephew’s wedding!


Social Media has exploded since those days, and there are now so many ways we can build our connections/communities. Instagram is one of my favourites for connecting with others, and is my go-to for sewing inspiration, or where to take my next roadtrip, or which cafe/museum/gallery to next try with my Cousin Jennifer. Sewing techniques are high on my interest list as you can imagine, and I truly admire those individuals who are constantly out there building interest in the industry and encouraging new sewists (and experienced ones) to try something new … or simply share what they are making. Competitions, swaps and sewalongs are fun too!
I recently joined in with Ryliss Bod’s Instagram #sewapril2024 competition (as a Sponsor) …… @ryliss_sewinganddesignschool … and this was the 8th year it has run! Daily winners are via People’s Choice voting, and there had been some fabulous entries all month.
There were 30 different daily themes, and every day I was inspired to put aside my blogging and turn my machines on for a ‘me sew’!! Alas, it was just samples and little ‘stuff’ that was made here in The Studio last month.
On April 4 I was one of the daily Sponsors … the theme being ‘Favourite Sewing Machine Attachment or Foot’ (I thought that ‘fitted well’ with me!) … and afterwards, I had the pleasure of posting off my little ‘prize package’ to the winner for the day, Katrin from Sweden! (I’ve been following her Insta Account for a long time now … @sagner_by_katrin (at times like one of my ‘Friends across the Miles’!) Her favourite ?? … she chose her binding attachments! LOVE mine too!! Coincidently, Binder #88 – May’s Accessory of the Month!
OK, I might have done a little sewing myself for this prize! I hope she liked my embroidered Buttonhole Necessity Pouch.


Oh … and whilst I was away, I entered into April 23rd’s theme …‘Something I sewed for another’ … ‘matchy-matchy outfits’ from over 35 years ago … and I was delighted to win Viewer’s Choice for the Day … and a lovely prize from @incompletestitches !


My granddaughter Ambah also got to wear Sally’s dress some 30 years later! Her smile says it all!
… Did You Know? …
Two Modes of Stitching
All but one of my machines has the ability to stitch in two modes. ‘Single Stitch’ Mode (all we have done to date) means when we select a stitch, it appears in our Stitch Altering Area and when we choose another stitch, the new stitch appears there. What if we wanted to enter a word for example … for example … SEW. We could go straight into the Alphabet section select a Font Style, and then select S … E … W … however, each time we select the letter, only that letter shows up … in multiples!


‘Combination Mode’ needs to be selected first, and that is the little ‘+’ sign in the Stitch Altering Area. It does just what it sounds like … combines stitches to sew out.


There are a lot of creative options available with Combination mode … and this week I wanted to mention it in simple terms, however much more is provided in your sewing machine manual, and I love the fact that it can be utilised for more than letters/words, and combining decorative stitch patterns.
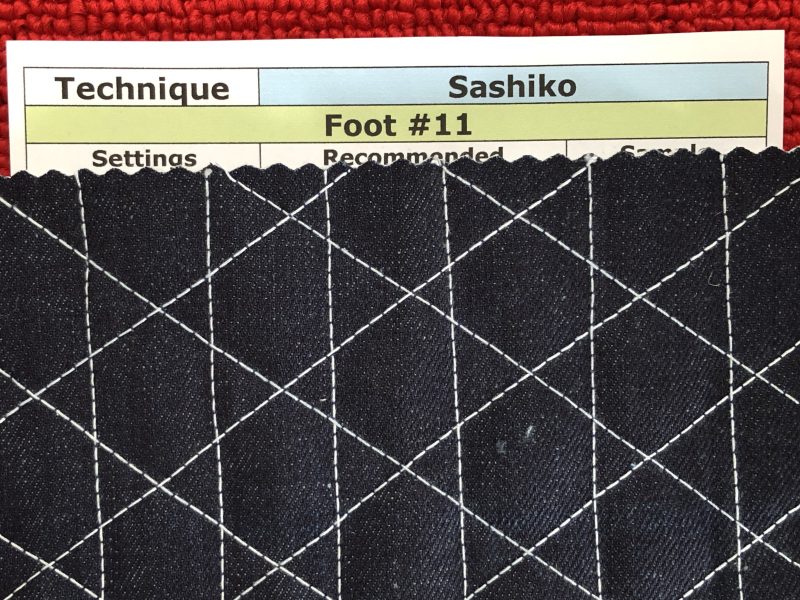
I did an extra Sashiko sample to put in with this week’s bundle, using a Stitch Combination to create a look-alike hand sewn stitch. Now there’s an easy place for me to find a reference to that technique at a later date.
In the ‘A Little Something Extra’ section further down, I’ll expand on this more.
… Behind the Scenes …
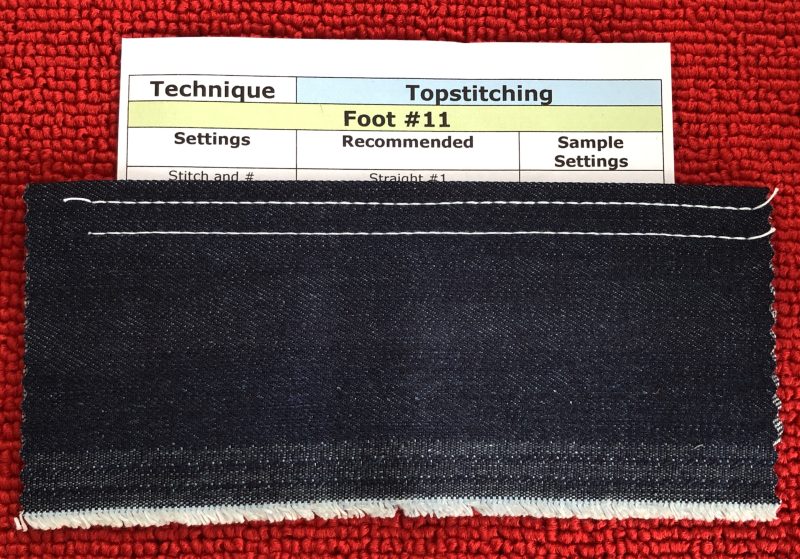
Cordonnet Foot #11
Have you ever wondered why Bernina has so many different feet available as options? Answers are found of course, in the Big Book of Feet! I love all the stories/reasons behind the research and development of all sewing machine related feet, accessories and general sewing tools. Understanding the ‘why’ pops up again!
This foot was designed for a particular stitching situation. Bernina collaborated with Mettler thread company to create a foot tailored for their product, Cordonnet, a polyester cord-like thread primarily used for topstitching.
When using either Foot #0 or #1, the sole of the foot rests on the thread and restricts its movement. Foot #11 was created with a deep 2mm groove on its sole, which guides the thread, and allows it to move freely under the foot. There’s more info in the Big Book of Feet, so read along as we stitch out this week’s samples.
A Topstitching Needle which features a larger eye situated higher on the shaft to correctly position the heavy upper thread with the bobbin thread is required with thicker threads such as Cordonnet. Originally Bernina-made needles with these specifications, were in fact called Cordonnet Needles.

Cordonnet Foot #11 comes as a single version only. It fits on machines right across the Bernina range. When using this foot, I change out to a 5.5mm Stitch plate, and select that plate in the Security Setting area.


Foot #11 had 5 different techniques to stitch out, as this foot is not just for ‘topstitching’.
… This Week’s Foot Highlights or Challenges …
‘Topstitching’ – Not my usual ‘go-to’ foot for topstitching, however this is what it was originally designed for. I used Wonderfil Spagetti Thread (12 wt), and yes it’s a favourite thread of mine! … along with a Topstitch #100/16 needle … my B790PRO‘s needle threader handled the job beautifully! … I reduced my top tension to 4.5 to get a better looking stitch (as I had 50wt thread on my bobbin), SL 4, Needle Position +5, guided the right hand side of the foot along the folded edge, and changed out to a 5.5mm stitch plate.
‘Embellished Lace’ – I raided my lace trim stash and found some lovely embroidered organza trim, and appliquéd this onto some pretty spotted netting I had. The Vilene 541 on the back helped keep the stitching stabilised – I did cut away the excess organza, so what you see in the photo is the stabiliser I did not wash away before taking the photo. I love this technique and the foot guided the Wonderfil Spagetti 12wt thread along as I sewed. I even got out another couple of pieces and stitched up a jug cover … just have to add beads on the corners. I found the full metal foot hard to see where I was going, and I really do prefer foot #39 for this technique, even though it does not have the groove underneath.

‘Couching’ – I stitched down a few different threads, found 8 ply yarn was just a bit too thick, and used a couple of stitches, preferring in the end simple Zigzag Stitch #2.

‘Covered Wire’ – I used 26g wire that I had in my overlocker teaching kit … I usually cover wire with an overlocked rolled hem. When using this technique on the sewing machine however, a few things to remember here – Hold your thread tails to start – and hold the wire down lightly near the front of the foot as you are sewing … and DON’T use your scissors to cut the wire! I use Braid Scissors … and have a pair sitting in my storage setup near my overlockers.

‘Sashiko’ – this is a favourite technique of mine, however I do it differently than this foot asked me to do it.* See end of post for more info. I used Wonderful Spagetti (12wt) again in the needle, and had navy all purpose thread wound on the bobbin. I increased my top tension to 5, and stitched with length 4mm. The navy shows then as a ‘break’ in the white stitches.
… A Little Something Extra …
Another Sashiko Technique
As mentioned earlier, I have another Sashiko Technique by machine that like to use … and for this one, I prefer Open Embroidery Foot #20D. It has an open toe as the name suggests, which makes it easier to see my drawn guidelines. We’ll get to that foot, in just a few more weeks, however I thought as we were stitching a sashiko sample this week, I’d share the following information now.
For Sashiko, I like the traditional look of Navy fabric with white stitching (yes … denim works here too, although the stitches don’t show up as well!) … I set up my machine with 50/60wt cotton thread through the needle, colour matched to my fabric. I wound my bobbin with same weight white cotton thread.

Next step is to program my machine with a specific Stitch Combination … and I’ll include a link to an archived issue of Bernina’s ‘Through The Needle’ Publication from back in 2011, when I initially played with this technique on my Bernina 830LE, loved that machine!
Photo 1 – first stitch is highlighted on right hand side of Stitch Altering Area … tension 10.0 and stitch length changed to 0.50
Photo 2 – second stitch is highlighted on right hand side of Stitch Altering Area … tension 10.0 and stitch length changed to 0.50
Photo 3 – third stitch is highlighted on right hand side of Stitch Altering Area … tension 10.0 and stitch length changed to 0.50
Photo 4 – fourth stitch is highlighted on right hand side of Stitch Altering Area – stitch length is changed to 3.50 and Long Stitch function engaged


Here is a link … go to page 8 for the Sashiko article … and as a bonus on Pg 30 there’s an Entredeaux project using last week’s Edgestitch Foot #10
… and a Tool Tip …
Cutting wire or fishing line using your best scissors is surely something you wouldn’t think of!! I have quite the collection of scissors/cutting tools in The Studio, and when wire or fishing line is involved, I reach ONLY for my little Fishing Braid Scissors. They sit happily in my Tool Caddy next to my L890 and I have a pair also in my Overlocker Teaching Bag.


For a pair of these, you’ll have to head to BCF or some other fishing store!
… A Little Reminder …
Bernina Academy
It’s certainly getting really exciting now that classes have been released for Bernina Academy 2024. I was honoured to be asked to teach alongside some amazing Australian and Overseas Tutors as part of Team Bernina. Here’s the link for class descriptions and bookings for the wonderful Bernina event.
Bernina’s Foot of the Month May 2024 *

is the Binder Foot #95/#95C along with Binder Attachment #88 (for unfolded bias tape – available in three sizes for tape widths of 28mm, 32mm, and 38mm) – 20% off – contact your preferred Bernina Dealer for this fabulous offer. I love to add binding to garments, home decor items and small quilted pieces. I’ll be covering this foot/accessory later in the Blog.
*Australia and New Zealand Promotion Only – ends … 31st May, 2024 … that’s TODAY!!
Chat again next Friday,


