Friday February 16, 2024

… LET’S START AT THE VERY BEGINNING …
Firstly, let me thank you ALL for the wonderful response to my first Blog post on Monday. It was humbling to receive so many messages of support and encouragement – you never know how things will be received until you put it out there. New beginnings are sometimes scary, overwhelming, exciting, fun and unpredictable, and usually all of these on a continuous loop, and it’s with that ‘cocktail’ of feelings, I’m sitting here again in The Sewing Gypsy Studio today.
The Studio, by the way, is a true ‘work in progress’, both inside and out, however, I’ll share more about it, and some photos of ‘my happy place’ in later posts. Outside, there are still pathways being dug, retaining walls to be built, paving to go down, a new patio roof to erect and painting to be done. Inside, I’m all set up, and apart from the Bernina machines, there are fabulous workbenches, cutting tables, cupboards, and multiple shelves full of all the sewing ‘stuff’. I’m surrounded by piles of things I’ve either gathered for inspiration, projects I’m working on, fabrics and threads that need to be put away, and boxes to still unpack and sort from moving three years ago. I’m sure you can picture all that! It’s my biggest W.I.P. (work in progress)
Wise Words of the Week: “Do not wait until the conditions are perfect to begin. Beginning makes the conditions perfect” – Alan Cohen


… Knowledge is Key …
There’s a lot to chat about this week, (as there were 17 samples to sew!) … so bear with me, it might take a little longer to read … promise they won’t be all this long! Each time I post about a foot, I’ll add in some information that will grow your understanding and knowledge of not only the foot that we talk about, but your machine in general.
Why do some feet have letters after the number, and what is the difference?
Feet with no letter after the number, are for Bernina machines with a maximum stitch width of 5.5mm, and you can use them on machines with 9mm maximum stitch width, however you will be limited to a 5.5mm stitch width.
Feet with the letter ‘C’ after the number, which stands for coded, are for Bernina machines with a maximum stitch width of 9mm. The feet have a sensor * on them that works with the electronics of the machine, engaging the wider stitch width. They also have a larger sole * to fit the wider feed dog. (*Exception … Foot #2A and Foot #16 have a wider sole, but no sensor, and have a maximum stitch width of 5.5mm)
Feet with the letter ‘D’ after the number, which stands for dual, are designed to work with Bernina machines that have the Dual Feed feature. This assists feeding all layers of fabric at the same rate.
Bernina feet have a variety of indentations, openings, markings and guides depending on what the foot is designed to do. There’s some great information at the front of the Big Book of Feet explaining in detail these features. As we sew along together, I’ll explain them further to help you understand exactly WHY you’d want the foot in your collection.

… Starting from Scratch …
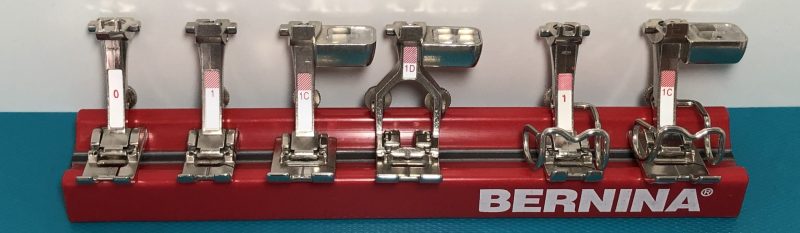
Zigzag Foot #0 and Reverse Pattern Foot #1/#1C/#1D
In my earlier days of sewing with a Bernina, when machines had a maximum stitch width of 5.5mm, new machines like my first one, a Bernina 1230, came with a Foot #0. For many years now, new Bernina Machines come with a Foot #1, or #1C and #1D – depending on which model you have. Foot #0 is still available of course, however all the techniques and settings for Foot #0 in the Big Book of Feet, can be successfully stitched out with Foot #1/#1C/#1D. See ‘Foot’note at end of post.
… Just One Foot At A Time …
or two this week!
Yesterday, I delved into my stash of fabrics, threads, needles, machines and assorted ‘sewing stuff’ and generally made another big, lovely ‘mess’, as I began this journey to share some of my passion for all those Bernina machines, feet and accessories in here.
Foot #0 had 11 different techniques to stitch out, and Foot #1/#1C/#1D had 6 different techniques to stitch out! Here’s some photos of samples for Foot #0, and quick roundup of how they all went …


… This Week’s Highlights or Challenges …
It was so great to reacquaint myself with Foot #0, which honestly I haven’t used much in years. Heirloom sewing was big in the 80’s (40+ years ago!) and most of my fine sewing was done with this foot. It has a smooth, flat sole with only a slight indentation underneath, so has great contact with the feed dog of the machine. It is designed for forward motion stitches only, and a length set to 1.5mm or longer – check out the Practical Stitches in your machine stitch menu. I did do so a couple of ‘comparison samples’, using either the #0 or #1 foot on the same technique and found very little, if no difference. All the Foot #0 samples were sewn on my Bernina B435 machine, as it has a maximum stitch width of 5.5mm, and the foot is designed for these models of machines. All the Foot #1D samples were stitched out on the Bernina B790PRO, as these feet were designed for a machine with a maximum stitch width of 9mm.
Some machines features /benefits I’m loving this last week, were the ‘History of Stitches’ (B790PRO) – switching from one sample to the next means easy recall of the settings and, Needle Selection in both machines – limits breakages, and in the case of the B790PRO some auto threading not allowed e.g. twin/wing etc (no, the button wasn’t broken – I’d just forgotten to change back from Wing to Microtex!).
For those sewing along, a couple of ‘hints and tips’ – don’t stress about having exactly the fabrics included in the book – IMPROVISE! I didn’t have tricot, (sure to be some in a box that’s not unpacked as I used to make lingerie!), so I used thin t-shirting – similar weight which worked great!
When doing Pinstitch with Foot #1/#1C/#1D make sure your fabric has a good amount of body – my first sample just looked awful – way too light! I also added some lace with the ‘Lace edging Technique’ from Foot #0 samples, and then pinstitched down the edge to make it look like Entredeaux. Changing the length then to 4, and needle position far right, I aligned the raw edge with the foot, and pinstitched some ‘holes for crocheting’ – suitable for up to about a size 1.50mm crochet hook (yes my hooks came out to test – so even bigger mess this week!)


My biggest challenge this week was ‘Hand Look Quilting Stitch … and I know I’m not the only one who experiences this. I finished my sample by using Decobob 80wt (by Wonderfil) on top, 40wt variegated cotton thread on the bottom, and my Red Bobbin Case in … a lot of test stitching for this one … it’s all part of the learning.

I add the Finger Guard (#99) to Foot #1 when my Grandson Leo sews on my sweet little Simply Red 215, or the B435 (he likes this one the most – it’s like extra ‘screen time’ for him haha). It can be added to a variety of feet of course, utilising the set screw and hole at the back of the foot. Best on 5.5mm feet, but will work on some 9mm feet.


… A Little Something Extra …
I cut back all my samples to 6” x 4” or less, and you may have noticed there is a printed out Technique Sheet on top of each of them, noting the Technique name, Foot number used, and a blank area to add the settings that I’d used. I had entered all the recommended settings as per the Big Book of Feet before I printed them out, and I will add anything else I thought was important to remember, in the note section, e.g. changing Security Settings for twin/triple needles etc. It’s all on a small piece of paper with each sample at the moment. That’s tomorrow’s task.
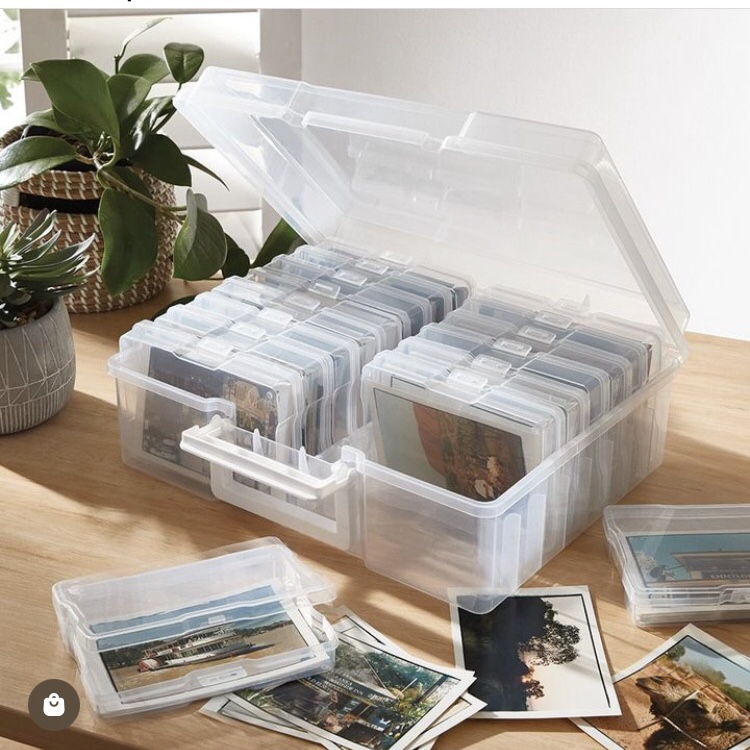
If you’d like a Blank PDF Template of the Technique Sheet I created, please request a copy via an email, using the Form on the Contact Page of the website. You can complete them electronically of course, or print them out, fill them in by hand and attach to your samples. I have a set of photo storage boxes (hence the 6” x 4” size), in which I am going to keep all my samples. Mine are like the clear ones, but coloured ones are available at various places. You could also use A5 clip up clear folders.

… Hello? Who’s out there? …
Reading is another of my ‘life pleasures’, and I lose myself in many a book, feeling as though I’m living a part of the story myself. I’m wondering just who will be reading this, and maybe sewing along with me on a weekly basis, as it’s quite an ‘alone’ thing this blogging task. I’d love it if you would share your little sewing feet stories along the way, or let me know if there’s anything in particular you’d like me to include in the Blog. Again, simply email me via the Contact page, or a comment on my Instagram page .. @sewing_gypsy
Bernina’s Foot of the Month February 2024 *

is #10/#10C/#10D Edgestitch Foot – 20% off – contact your preferred Bernina Dealer for this fabulous offer. This Foot was the first extra one I bought to use on my Bernina 1230, way back in 1984. It’s a true Foot Hero!! I’ll be covering this foot later in the Blog.
*Australia and New Zealand Promotion Only – ends 29 February 2024
Chat again Friday,

‘Foot’ note:
Optional Feet to use for any sewing techniques in the Blog, are noted in the Accessory & Technique Index at the back of the ‘Big Book of Feet’ – a fabulous cross reference for you to use. To gather fabric for example, Feet #0, #1 #3/#3C, #6, #16 and Attachment #86 can all be used.