There’s something especially comforting about this time of year, as the gentle arrival of autumn brings cooler temperatures – the perfect excuse to spend my daytime hours in the studio. This past week has been all about settling into that seasonal rhythm—cup of tea in hand and a satisfying amount of sorting and organising underway. Still lots more to do!
I’ve been diving into my fabric shelves, rediscovering forgotten treasures, pairing yarns with future crochet projects, and finally bringing some order to my ever-growing collection of patterns. There’s a quiet joy in revisiting these materials, each one holding the promise of something new to create.
Easter also brought a lovely chance to pause and spend time with family down the Gold Coast. On Monday, we shared a relaxed and very tasty lunch, made extra special by Jack’s wonderful BBQ skills – even had a Smoked Mexican Dip! Next was a short visit from my brother Trev, who arrived on Tuesday afternoon from Townsville. It’s always a treat to spend time together, even if only briefly.
All in all, it’s been a week of warmth, creativity, and connection—just the kind of beginning that sets the tone for the projects ahead … and there’s quite a few piled up on the cutting tables!
... The ‘Piecemaker’ ...
Patchwork Piecing and Quilting with your Overlocker
This week’s first patchwork technique is Half Square Triangles. Starting with two 6 ½” squares (one light and one dark) I placed them right sides together, drew a line across the diagonal on the light fabric from one corner to the other, then drew a line either side of this one ¼” away.
Next I set the L890 up for a 2-Thread Chain Stitch #16 (RC) … knife disengaged … and with my new #C28 Clear Overstitch Foot on, aligned the right needle mark on the foot with the right hand outside drawn line, and stitched.
Sewing from the same starting edge as before, and with the knife now engaged, I lined up the right needle mark on the foot with the left hand outside drawn line, and stitched, cutting between the two stitched lines as I went along. This now created two half square triangles.
To finish off the sample, I opened up and pressed the seam allowances to the dark side.
The second patchwork technique is No Waste Flying Geese. I cut one large 6 ¼” square (light) and four smaller 3 3/8” squares (dark) . Step one was drawing a line across the diagonal on all the light fabric squares from one corner to the other, then drawing another a line either side of this one ¼” away. Same as we did before.
Lay two of these smaller blocks on top of the larger block, right sides together, with the smaller squares in the top right corner and bottom left corners of the larger block… drawn lines matching up. Here is my block before I stitched it.
Next we stitch as before, first row on the right hand line with 2-Thread Chain Stitch #16 blade disengaged, next on the left hand line with the blade engaged (cutting apart the two blocks)
Press the small triangles out (seams to the dark) and place a third square down, then stitch as before with the knife cutting between the two lines of stitching. Repeat for the remaining unit – you will now have four flying geese units.
This week’s patchwork block is the Bowtie Block. This block starts with cutting two 6 ½” dark squares, two 3 ½” dark squares, and two 6 ½” light squares. Mark one diagonal on each of the two small dark squares, and place one right sides together on each of the large light squares. Match the bottom corners, raw edges together and stitch as before with the blade engaged, 2-Thread Chain Stitch #16 aligning the right needle mark on the foot with the marked line. The blade is engaged for this step so that the small corners will be cut off. Unfold the corner and press flat.
Stitch together like a Four Patch – here are my four pieces to be sewn together. These will be sewn as two rows of two blocks. Complete the Bow Tie Block by stitching the two rows together, alternating them so that the two triangles meet in the centre of the block. Using the right hand side of the #C28 Foot gives you a perfect ¼” seam. I LOVE THIS NEW FOOT!
... Through, Over and Under ...
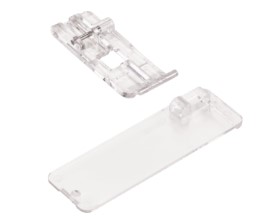
#C17 Cording Foot
The cording foot can be used to overlock over a variety of materials, including cords, yarns, and fine wire or fishing line. Pair it with a rolled hem for finer cords, or use it with a narrow hem for thicker yarns/fabrics to create either a decorative finish or added structure along the edge of your project.
The cord is inserted through the guide at the front, over the centre sections and then to the back under the foot, sitting in a groove to guide it. Pull an extra length of cord to the back of the presser foot. Ensure the cord can glide without resistance.
The 2- or 3-Thread Rolled Hem stitch is ideal to enclose the cord etc, or for thicker cords use a 3-Thread Overlock Stitch Narrow (RN).
For a consistent fabric feed, adjust the differential feed accordingly.
To create a waved seam in the diagonal grain on stretch fabric, gently stretch the material both in front of and behind the presser foot. Avoid interfering with the fabric feed while the needle is stitching, as this helps maintain even stitch formation.
For extra wave in the seam, leave additional cord at the end, then stretch the seam until you achieve the desired effect.
Foot #C17 accommodates cords up to 2mm in diameter.
Here is a link to the Bernina International video for this foot.
Bernina L450 and L460 – foot to use for this technique is the Cording Foot – cords up to 1mm in diameter.
There is no Cording Foot available for the Bernette Funlock 44 or the Airlock 64.
Bernette Funlock 40 Series (b42, b48) and Airlock 60 Series (b62 and b68), machines with Coverstitch and Chain mode – foot is called the Cording Foot – which can accommodate cords up to 2mm in diameter. This foot can also be used to create and insert piping. Recently there was a great article on We All Sew using this foot. Here’s a link to the article …
‘Stabilising Seams’ – When joining a shoulder seam, overlocking across the fabric’s stretch, can sometimes lead to rippling or distortion. The simplest solution is to adjust the differential feed, though extra stabilisation may also be beneficial. One approach is to incorporate a narrow ribbon or twill tape into the seam, taking care not to pull on it, as this can cause gathering. In some cases, adding a heavier thread, such as pearl cotton, within the overlocking stitch provides sufficient support, and this can easily be applied with the assistance of the Cording Foot. For additional stability, press the overlocked seams to one side and edgestitch to garment to secure.
The same approach applies when finishing a hem edge, which is often not cut entirely on the straight grain. If a turned-and-stitched hem needs to maintain stretch—such as for children’s pant legs or fitted tops—use elastic cord in the stitch with a cording foot.
Woven sample – 3-Thread Narrow Seam Stitch #7 all Default settings … used Pearl #8 thread in the Cording Foot.
Stretch sample – 3-Thread Overlock Narrow Stitch #4 all Default settings … used 1.5mm hat elastic in the Cording Foot.
‘Decorative Seams/Mock Piping’ – I’ve used this technique with two different stitches, as the samples were on Denim, and you can leave them as a finished edge or apply them to another fabric as ‘Mock Piping’.
Using a 3-Thread Rolled Hem Stitch #8, SL 1.0 and woolly nylon in the Upper Looper, the edge of the denim did roll slightly and the shorter stitch length meant the thread covered the edge beautifully. The filler used was Rattail Cord in the Cording Foot. This is a lovely finished edge, and it can now be stitched down direct onto a flat piece of fabric, as Mock Piping. I use Bernina Foot #23 on my sewing machine and the channel underneath the presser foot glides beautifully over this edge. The result is a ‘piped’ seam on denim with only two layers of fabric instead of 4 as you would have with standard piping (two layers of denim and two layers of piping fabric)
Using a 3-Thread Overlock Wide Stitch #3, and quite a few changes I achieved a wider finish, more fabric in the stitch, and an edge finish ideal for a heavier look.
With variegated machine embroidery thread in the upper looper, the finished settings were SL1.2, CW 5.5, LL 7.0 and Roll Hem Lever at ‘R’. On my trial piece of white homespun fabric it rolled at LL 6.0, however knowing the denim would react different I increased that to 7.0 – Once the filler Rattail cord was added in the Cording Foot, it became a lot wider as well. With Woolly nylon in the Upper Looper, I decreased the stitch length to 1.0 and increased the Lower Looper tension to 7.5
I did do another edge as well with the Woolly Nylon – SL 1.0, CW 5.5 – rest of setting were default. For the wider finish, use Bernina Foot #12C on the sewing machine to stitch the ‘Mock Piped Edge’ onto another piece of fabric, and the channel underneath the presser foot glides beautifully over this edge.
‘Thread Covered Cord’ – These finished samples are ideal for use as button loops (especially the elastic one!), waist tie side holders/belt loops in a garment and for couching down decoratively with your sewing machine.
I used 3-Thread Rolled Hem Stitch #8 with all Default settings. It would have been ideal to use all red threads to disguise the needle thread, which I had left Green. Hold the cord at the back as it is created to assist it to stitch evenly over the filler cord. The elastic is an ideal sample to use the Woolly Nylon thread as well. The other filler used in the Cording Foot was again Rattail cord. Both of these glide smoothly through the foot.
‘Decorative Edges’ – Wavy ‘Lettuce Edge’ – 3-Thread Rolled Hem Stitch #8 SL 1.5, CW 6.0, DF 1.0 LL 6.5 rest Default – Overlocking thread x 3 – #8 Perle Thread in the Cording Foot – Stretch front and back of fabric as it’s stitched. Tried the Picot Stitch #30 as well on bottom edge but did not give as good coverage on the edge.
‘Fishing Line edges’ – Picot Stitch #30 SL 2.5, CW 6.0, DF 1.0, LL 6.0 – rest of settings Default. Woolly nylon thread in Upper Looper and 10KG Fishing Line in the Cording Foot. Picot Stitch gives a nice open finish to the edge. Cut excess fishing line with Braid Cutters – great little set of snips!
‘Wire Edge Ribbon’ – 3-Thread Rolled Hem Stitch #8 – SL 1.0, CW 6.0, DF 1.0 LL 6.5 – rest Default … Woolly Nylon thread in Upper Looper and 26 Gauge wire in the Cording Foot. Overlocking chain with wire in works well for ‘curly’ trims – wind around a pencil and slip off. Cut excess wire with Wire Cutters – another great little set of snips for your tool box!
‘Lace Rosette’ – Picot Stitch #30 SL 2.5, CW 6.0, DF 1.0, LL 6.0 – rest of settings Default. 3 x Overlocking Threads on machine, combined with #10 Crochet Cotton for the Lace sample, and #8 Pearl Cotton in the Cording Foot for the fabric. Picot Stitch gives a nice open finish to the edge, easy to pull up the gathers. I made one with fabric also, bit like stitching over cord threaded through the hole in the front of a Bernina #6/#39 foot on your sewing machine. I forgot to mention earlier, that I find the cut off bin in front of the overlocker the perfect place to put your cords etc when using this foot.
... A Little Something Extra ...
Foot User Manuals
On the Bernina Website, you can download a User Manual for the Cording Foot #C17.
is the Overlocker Cording Foot, used e.g. for sewing thin cord, wire, fishline, perle yarn or fine yarn into a rolled hem. Ideal for reinforced edges, decorative ruffles and shapeable knitted bands. Get a 20% discount at your preferred BERNINA dealer during the whole month!
*Australia and New Zealand Promotion Only – ends … 30th April, 2026 …
… as well as some fabulous pricing on selected machines and overlockers, there’s 20% off accessories for April!