This week in the Studio has been all about play—digging into a growing stash of trims that have been patiently waiting for their moment. From soft cords to decorative ribbon, beads, sequins and shiny crystals, it’s been one of those weeks where experimenting feels just as satisfying as finishing. There’s something about having plenty of options laid out that sparks creativity in the best way.
I’ve also been thinking back to a quilt I finished in January for Leo’s 11th birthday, inspired by the world of Silksong. Leo chose the fabrics from out of my stash, leaning into rich colours and subtle contrasts to echo that moody, adventurous feel, which hint at the game’s “delicate balance between beauty and danger”. And yes, I Googled that phrase – I have no idea what the game is about! We searched the Internet for the pictures he wanted featured on the blocks – I then copied them onto Inkjet Fabric Sheets before adding borders. It’s one of those makes that still feels a little bit magical—personal, cosy, and full of story. He packed it up and took it on the Cruise the next day!
And now, after putting away all the samples I stitched, everything set up and ready to go, I’m looking forward to a little bit of Easter Bunny fun with some embroidery projects—just the kind of lighthearted stitching that feels perfect for this time of year.
Here’s to a week ahead of creative play and projects that mean something.
But first, I’m off today for a fun-filled trip up the Sunshine Coast for a B990 weekend at Kimz Sewing and Patchwork in Warana. More about that next week … and photos if I remember to take any while I’m teaching!
... Did You Know? ...
Threads for Overlockers
There are countless thread options available for overlocking and coverstitch machines, and I definitely have my favourites… along with a few that really test my patience.
Some are specifically for use in the needles, others are meant just for the loopers, and some can be used in both.
When it comes to getting the most out of your overlocker or coverstitch machine, thread choice matters more than many sewists realise. The right thread doesn’t just improve the look of your stitches—it affects stretch, durability, and how smoothly your machine runs.
For overlockers, polyester thread is the go-to choice. It’s strong, slightly stretchy, and handles high-speed stitching well without breaking. Because overlock stitches wrap around the fabric edge, you’ll use multiple cones at once—so good-quality, lint-free thread is worth the investment. Some brands I prefer for their reliability and quality are Mettler Seracor and Maxi-lock Threads. I have a set of what I refer to as my ‘Blender Threads’ which come in handy on a variety of colours of fabrics – very versatile.
Woolly nylon (also called textured thread) is another favourite, for the loopers. It expands to fill the stitch, giving you soft, full coverage that’s perfect for knits, activewear, and seams that sit against the skin. Newer onto the market, is a polyester version that does not melt when an iron is used. I love Wonderfil Softloc, and it comes in a beautiful range of solid colours, and a variegated line as well.
Cotton thread is less commonly used in overlockers because it has minimal stretch and can break more easily under tension. However, it can still work for stable woven fabrics if you’re after a matte, natural finish.
For coverstitch machines, thread choice depends on both function and finish. Polyester remains a reliable all-rounder for needle threads, providing strength and flexibility for hems that need to stretch. In the looper, woolly nylon/polyester really shines again—it creates that soft, professional underside you see on ready-to-wear garments and helps prevent tunnelling.
If you want a decorative touch, consider using heavier threads or even specialty threads like metallics—but keep them to the loopers – or use needles as recommended by your machine manual, and always test first. I use Wonderfil Spagetti or Fruitti (both 12wt) a lot in the needles and both loopers in overlock mode, as you can run with Topstitch 90 Needles there. In coverstitch/chain mode you need to use ELx705 needles as I talked about previously, so I run those threads in the chain looper.
For decorative stitching with multiple reels of thread in the one path (thread blending), and stacked rows of stitches, I use the Thread Fusion Tool, marketed by Gail Patrice/Yellen in the US. I bought the larger one when it first came out – a totally great investment.
I am not aware of any Bernina Dealer who sells them in Australia, so here is a link to Gail’s Website.
A final tip: consistency matters. Mixing vastly different thread weights or qualities can lead to tension issues. When in doubt, stick to threads designed for high-speed sewing and test your setup on scrap fabric before starting your project.
Choosing the right thread might seem like a small detail, but it can make the difference between a homemade finish and a polished, professional result.
... Let’s Add Some Trims ...
#C15 Beading and Sequin Foot
Strings of Beads, sequins, heavy cords and ribbons can be attached to fabrics using the Beading and Sequin foot. The ‘strings’ are placed in the groove on the top of the foot, and out under another groove in the back of the foot. Beads and sequins up to 6mm can be attached using this foot.
The beads can be placed on either the hem edge of the fabric, or to a folded edge anywhere on the fabric. Several different stitches can be used to attach the trims, and further on you can read how I have used Rolled Hem, Picot Stitch, 3-Thread Overlocking and 2-Thread Flatlocking options in my samples.
Foot #C15 was used to stitch out samples applying all the fun stuff … Beads, ribbon, cord and sequin
Here is a link to the Bernina International video for this foot.
Bernina L450 and L460 – foot to use for this technique is the Multi Purpose Foot.
Bernette Funlock 40 Series (b42, b44, b48) and Airlock 60 Series (b62, b64 and b68) – foot is called the Beading and Sequin Foot.
... This Week’s Foot Highlights or Challenges ...
As I was sampling this week, I used different weights of thread, different trims to attach to the fabric, as well as a variety of stitches to get a good result.
Whenever you are adding trims like these samples, bring a length of the trim out to the back of the foot, secure the trim with a few stitches made with the handwheel, and hold excess at back as you start to stitch. Always stitch slowly.
Abbreviations used as usual – SW Stitch Width – SL Stitch Length – CW Cutting Width – DF Differential Feed – LN Left Needle – RN Right Needle
‘3mm Beads with Rolled Hem’ –I have a roll of this trim, and as it has a variety of colours in it, it’s often the one I choose to create a beaded edge. It is approximately 3mm wide.
Sample 1 … Roll Hem Stitch #8 – SL 3, CW 6, DF 1, Tensions All Default, Roll Hem Selection Lever to R. It did pucker up a bit and I thought the back needed to roll a bit more … so on Sample 2 I made two changes …
Sample 2 … Roll Hem Stitch #8 – SL 3, CW 6, DF increased to 1.5,increased Tension on LL to 7.0, Roll Hem Selection Lever to R. A much flatter finish, with a nicer roll at the back.
Superior Threads Mono Poly in needle and both loopers. A thread cradle was needed to airthread the loopers, as it feels like very fine fishing line. It’s a bit hard to see in the photos but gives a great finish as it is clear – no need to match thread to fabric. I use this thread a lot when I want a very fine edge with body!
‘3mm Beads with Picot Stitch’ – I do like this stitch and use it often on raw edges of finer fabrics. Same trim as before.
Sample 1 … Picot Stitch #30 – SL 3, CW 6, DF 1, Tensions All Default, Roll Hem Selection Lever to R. I thought the back needed to roll a bit more … so on Sample 2 I made just one change …
Sample 2 … Picot Stitch #30 – SL 3, CW 6, DF 1, increased Tension on LL to 7.0, Roll Hem Selection Lever to R.
*** Changed threads to Invisafil 100wt by Wonderfil Threads in needle and both loopers. Airthreaded the loopers. This is a very fine thread.
‘SS12 Crystals with 3-Thread Overlock Wide’ – I’d usually use the Sewing machine to stitch this trim on, however it worked really well with the Overlocker.
3-Thread Overlock Wide – Stitch #3 – SL 3, CW 7, DF 1, Tensions Default for LN and UL, Increase tension on LL to 6.0, and … Roll Hem Selection Lever to R. I used this stitch like a wide Picot Stitch with the LN, as the trim was too wide to use Picot Stitch or a Rolled Hem with the RN. Not what I’d planned when I printed up my little technique sheets, but I was very pleased with the finish!
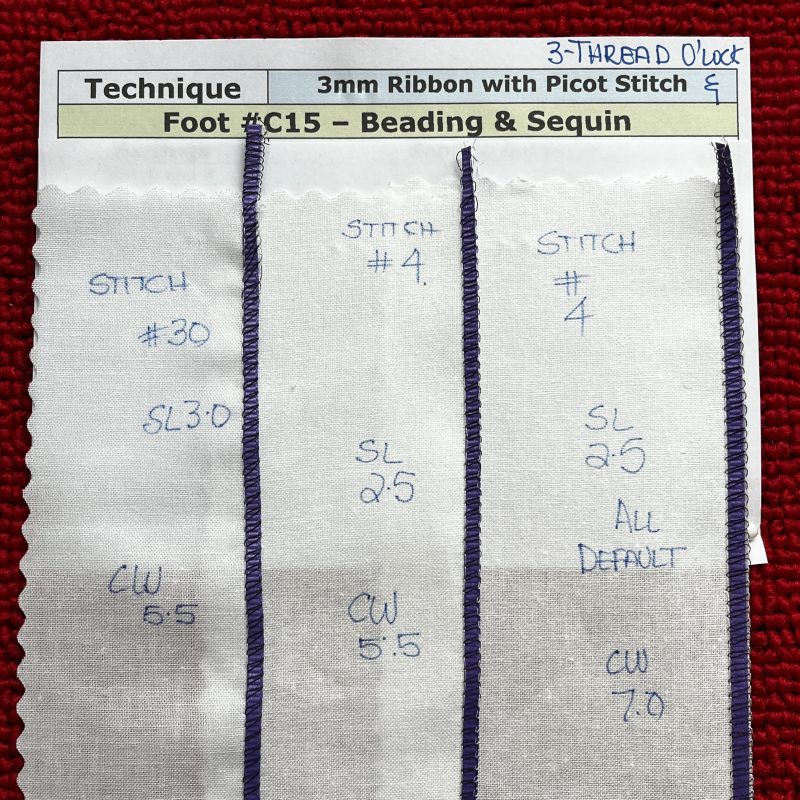
‘3mm Ribbon with Picot Stitch and 3-Thread Overlock Narrow’ –
Sample 1 … Same stitch I used to sew on the beaded trim, however now had the Invisafil on the machine
Picot Stitch #30 – SL 3, CW 5.5, DF 1, Tensions All Default, Roll Hem Selection Lever to R. … Oops forgot to engage the Roll Hem lever, so sample does not roll – that’s when I thought about changing the stitch … so
Sample 2 … Changed to 3-Thread Overlock Narrow Stitch #4 – SL 2.5, CW 5.5, DF 1. The needle did catch the ribbon at times.
Sample 3 … same settings as before except CW 7.0 I liked this finish as the ribbon is totally encased in the stitch.
‘3mm Cord with 3-Thread Overlock Narrow’ – This rayon cord has the most gorgeous colours in it and gives a really fun edge on children’s clothes. Again, I usually use a cording foot on my Sewing machine to add this trim, however wanted to try it with the overlocker this week. It was a little wide for the Picot Edge stitch, which I initially thought of using.
Sample 1 … 3-Thread Overlock Narrow Stitch #4 – SL3.0, CW7, UL default and LL increased to 6 – thought it gave a flatter finish without having to engage the Roll Hem lever.
Sample 2 … shows my first trial with LL at default of 4.
Next lot of Samples were using the Flatlock stitches, and the Invisafil Thread I had on the machine was giving me grief with the wide version of this stitch. The L890 would stitch ok on a single later but was inconsistent on two layers … missing stitches, and sometimes not making a stitch at all.
It was very frustrating to say the least, and I tried all sorts of fixes. I managed to finish off only one sample with the Invisafil threads. I did one row of narrow flatlocking to apply some pearls in the centre of a sample and switched back to the Picot Stitch to add a row to the edge.
‘3mm Pearls with Picot Stitch and 3-Thread Flatlock Narrow’ – The row of pearls in the Centre were attached with 3-Thread Flatlock Narrow Stitch #6 – SL3.0 CW 6.5, UL and LL Default. The row on the edge was stitched with Picot Stitch #30 – SL 3.0, CW 6.5, UL 4.5 and LL 6.0
I decided after taking a coffee break that I needed to change my threads over to regular overlocking threads, and see how that went. Success at last – I’ll persevere with those other threads another day. Onwards I went … and decided to trial both 3-Thread and 2-Thread Flatlocks – the 2-Thread is my favourite. Here’s my trial samples – Blue thread on top is 3-Thread Flatlock and red thread on top is 2-Thread Flatlock (with Upper Looper Converter in place). I am a firm believer in test stitch outs!
‘3mm Ribbon with 2-Thread Flatlock Narrow’ – I made two samples with this – one having a folded edge and one with cut edges, like joining two pieces of fabric together. Both samples were Flatlock Stitch Narrow #12 SL 4.5 (I wanted to see a lot of the ribbon – looks sort of like it was woven in the stitches) CW6, rest were default settings.
‘3mm Cord with 2-Thread Flatlock Narrow’ – I made two samples with this – one having a folded edge and one with cut edges, like joining two pieces of fabric together. Both samples were Flatlock Stitch Narrow #12 SL 4.5 CW6, rest were default settings.
‘4mm Pearls with 2-Thread Flatlock Narrow’ – I attached two lengths of pearls with this sample – Both were Flatlock Stitch Narrow #12 SL 4.5 – one at CW 6 and one at CW 7. With matching threads to fabric, possibly CW 6 is a better finish and sits flatter.
‘6mm Beads with 2-Thread Flatlock Wide’ – This is the widest trim that Bernina recommends for this foot, so I chose some glass beads that were quite heavy as well. They are actually Christmas bead garlands – yes, I know … black is a ‘different’ choice for Christmas! They were only $1 for 8m after Christmas, a couple of years ago. Knew they’d come in handy at some time. Surprisingly they stitched on quite well – 2-Thread Flatlock Wide Stitch #11 SL 4.5 (Max) LL 5.0 and CW 7 on the first one and CW 9 on the second one … I thought it might need the widest stitch due to such a big bead, however the CW 7 does sit flatter.
‘6mm Sequins with 2-Thread Flatlock Wide’ – I’ve always found sequins easy and fun to attach with the overlocker. Just remember they have a ‘nap’ and should always run smoothly towards you. Simply run your finger down the length to work this out. When you have finished stitching them on, pull the sequins towards the nap to hide the threads. I used 2-Thread Flatlock Wide Stitch #11 SL 4.5, CW 7 and LL 5.0
A big week of stitchouts, with a serve of frustration as well, but I did say I’d post all my Highlights and Challenges as I stitched through all these Overlocker accessories.
... A Little Something Extra ...
Foot User Manuals
On the Bernina Website, you can download a User Manual for Foot #C15.
... Bernina Academy 2026 Class Bookings Now Open! ...
Bookings for all classes opened this week – tickets are limited so take a look at what’s on offer … I’m soooo looking forward to more fun on the B990 with Connie Fanders and of course, the L890 with Pam Maschie! t’s going to be a HUGE week down there.