It’s been another wonderfully full week, the kind that flies by in a blur of fabric, thread, and creativity.
Last weekend was a definite highlight—two fantastic days spent at Kimz Sewing and Patchwork in Warana, teaching Bernina B990 classes. The ladies used their laptop simulators to learn about the magical operating system both in sewing and embroidery, finishing off with stitching out an allover quilting design, created from a Jumbo Stitch. They went home with a kit to make up a zipper bag to store a notebook. Here’s my sample … I forgot to take photos … again!
There’s something so energising about sharing skills, ideas, and inspiration with fellow sewing enthusiasts, and this group made it especially memorable. Thanks again Kim, Christine, Jenny, Karen and Pip.
In between the busyness, I’ve also been quietly working on a few special Easter sewing projects for my littlest grandchildren—so here’s a little peek! I couldn’t resist sharing a photo of these sweet makes. The embroidery design is from cutestitchdesign.com
I also squeezed in a fun little make for myself last week—a Bernli zippered pouch for my mouse, created from a Bernina software tutorial. It’s always nice to sneak in a quick project just for fun!
... The ‘Piecemaker’ ...
Patchwork Piecing and Quilting with your Overlocker
From this week onwards, I’m going to start adding in samples of patchwork blocks and techniques as detailed in the Bernina Big Book of Serger Quilting. I love using my overlocker to piece with and truly enjoyed stitching together the Amanda Murphy Quilt, ‘Bloom and Grow’ about 12 months ago now.
It is a great project for anyone new to overlocking, eager to learn new techniques and who wants to get more out of their machine than just finishing off the edges of fabrics. Patterns and extra feet required to finish the quilt, can be purchased/ordered through your preferred Bernina Dealer.
So to begin this segment, it was Strip Piecing. I stitched together some strips, recut them into segments, and pieced those together to form a simple Four Patch Block.
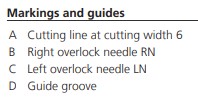
The key to piecing on the overlocker is to get an accurate ¼” seam – I used a 4-Thread Overlock stitch, cutting width 6, and used the Right Seam guide to ensure the correct seam allowance.
Next, block was using 4 seperate squares joined together, and I then added some borders to finish off with a Framed Four Patch. All the details are in the Bernina Big Book of Serger Quilting – Pages 125 to 127.
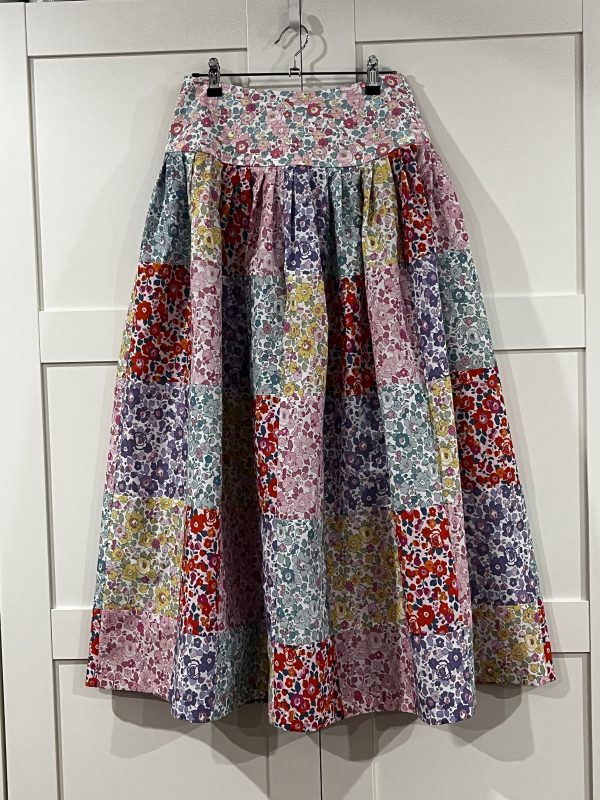
I recently made a skirt using beautiful Liberty Fabrics for Marion, from The Quilters Angel in Toowoomba. The skirt was fully pieced on the overlocker, making the inside seams so neat.
... Triple Treat ...
#C16S, C16L and XL Piping Feet
A piping foot helps you achieve beautifully neat piped or corded seams and can also be used for inserting zippers. For the Bernina L8 Series, there are three piping feet available—the key difference between them is the size of the groove, which guides either the filler cord or zipper teeth as you stitch.
Once attached, the piping or cord which is enclosed in a bias strip of fabric, sits neatly in the groove of the foot, allowing the machine to sew using a narrow 3-thread overlock, trimming off the excess. Then the piping is inserted between two fabric layers, a second row of stitching—typically a 4-thread overlock—secures everything firmly, ensuring the piping sits snugly at the edge, and the previous row of stitching does not show in the finished seam.
A flatlock stitch can also be used when inserting a zipper along the edge of the fabric.
Foot #C16S accommodates cords up to 3mm in diameter, and is used for inserting #3 Size Zippers.
Foot #C16L accommodates cords up to 5mm in diameter, and is used for inserting #5 Size Zippers.
XL Piping Foot (No number) accommodates cords with a diameter of 6mm, 8mm and 10mm. There is a height compensating tool attached to the foot which is adjusted depending on the diameter of the cord being guided through
Here is a link to the Bernina International video for these feet. First the C16S and C16L …
Bernina L850 and L860 – feet are coded #L16S and #L16L. XL Piping also can be used on these machines.
Bernina L450 and L460 – foot to use for this technique is the Multi Purpose Foot.
Bernette Funlock 40 Series (b44, b48) and Airlock 60 Series (b64 and b68) – foot is called the Piping Foot – one size only which can accommodate cords up to 3mm in diameter
... This Week’s Foot Highlights or Challenges ...
‘Creating 3mm Piping’ – Foot Used #C16S – cut a strip of bias, and enclose a cord – Stitch down with the cord in the channel under the foot, raw edges to the right, excess will be trimmed off. I used a piece of 2.5mm Venetian Blind Cord as the filler. The cord will be quite loose in the seam.
My Settings: Stitch #4 3-Thread Overlock Narrow (RN) SL 2.5 CW 6, DF1 Default Tensions. This is detailed in both Big Book of Serging and Big Book of Serger Quilting.
‘Inserting 3mm Piping in seam’ – Foot Used #C16S – Place piping made in previous step between two layers of fabric. Stitch down with the cord in the channel under the foot, raw edges to the right.
My Settings: Stitch #1 4-Thread Overlock (LN,RN) SL 2.5 CW 7, DF1 Default Tensions. The cord will be now snug in the seam.
‘Creating 5mm Piping’ – Foot Used #C16L – cut a strip of bias, and enclose a cord – Stitch down with the cord in the channel under the foot, raw edges to the right, excess will be trimmed off. I used a piece of Cotton Piping Cord as the filler. The cord will be quite loose in the seam.
‘Inserting 5mm Piping in seam’ – Foot Used #C16L – Place piping made in previous step between two layers of fabric. Stitch down with the cord in the channel under the foot, raw edges to the right.
My Settings: Stitch #1 4-Thread Overlock (LN,RN) SL 2.5 CW 7, DF1 Default Tensions. The cord will be now snug in the seam.
‘Inserting #3 Zipper with Overlock’ – Foot Used #C16S – Ensure your zipper is at least 2” longer at each end to allow stitching in. Place zipper and fabric right sides together, raw edges to the right and zipper coil underneath the groove in the foot. Stitch down.
My Settings: Left side sample – Stitch #1 4-Thread Overlock (LN,RN) SL 2.5 CW 9, DF1 Default Tensions. This stitch was fine for this lightweight fabric. I stitched the Right hand side with Stitch #4 3-Thread Overlock Narrow (RN) SL 2.5 CW 9, DF1 Default Tensions. This would be ideal if you had heavier fabric, ensuring the zipper could run freely. Also ideal if you wanted to feature the coloured zipper.
‘Inserting #5 Zipper with Overlock’ – Foot Used #C16L – Ensure your zipper is at least 2” longer at each end to allow stitching in. Place zipper and fabric right sides together, raw edges to the right and zipper coil underneath the groove in the foot. Stitch down.
My Settings: Left side sample – Stitch #1 4-Thread Overlock (LN,RN) SL 2.5 CW 9, DF1 Default Tensions. This stitch was fine for this lightweight fabric. I stitched the Right hand side with Stitch #4 3-Thread Overlock Narrow (RN) SL 2.5 CW 9, DF1 Default Tensions. This would be ideal if you had heavier fabric, ensuring the zipper could run freely. Also ideal if you wanted to feature the coloured zipper.
‘Inserting #3 Zipper with 2-Thread Flatlock Narrow’ – Foot Used #C16S – I had 12wt Spagetti Thread in the Topstitch #90 Needle and Lower Looper. Upper Looper Convertor Engaged. Ensure your zipper is at least 2” longer at each end to allow stitching in. Place zipper and fabric wrong sides together, raw edges to the right and zipper coil underneath the groove in the foot. Stitch down slowly, always holding the decorative thread at the back when you begin to stitch.
My Settings: Stitch #6 2-Thread Flatlock Narrow, (RN) SL 2.5 CW 8, DF1 Default Tensions. I like this stitch for the #3 zippers, especially with the loop side on top.
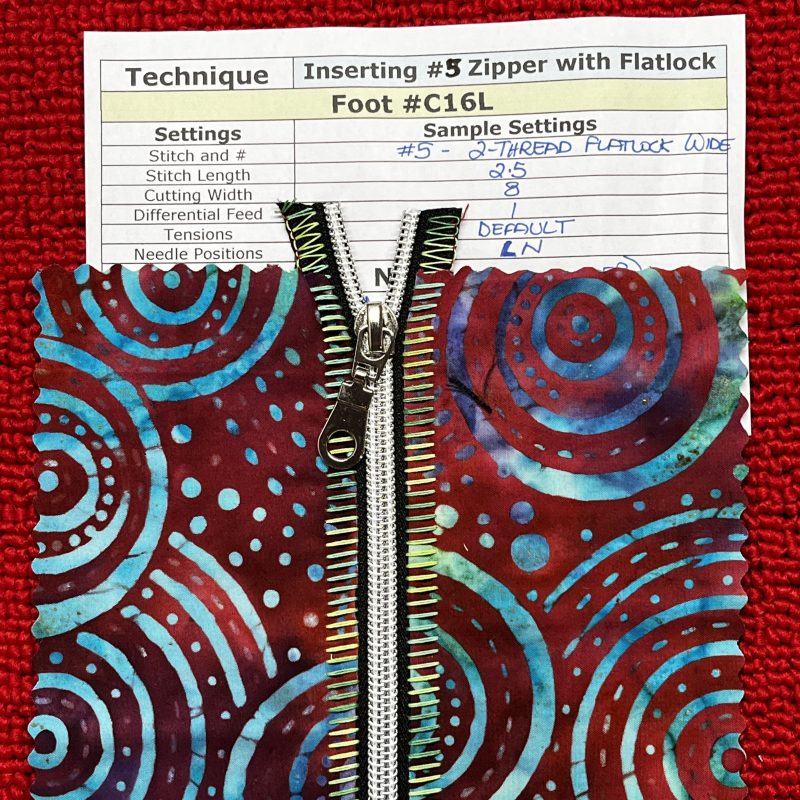
‘Inserting #5 Zipper with 2-Thread Flatlock Wide’ – Foot Used #C16L – I had 12wt Spagetti Thread in the Topstitch #90 Needle and Lower Looper. Upper Looper Convertor Engaged. Ensure your zipper is at least 2” longer at each end to allow stitching in. Placing the zipper and fabric with either wrong sides or right sides together, and either the zipper on top or underneath gives different finishes.
Same as before, keep raw edges to the right and zipper coil underneath the groove in the foot. Stitch down. On the ladder side, after stitching I use a fine #11 knitting needle to ease the fabric flat for a nicer finish.
Right Sides together (Fabric and Zipper) – Zipper on top – gives ladder on fabric. (Sample on left below)
Right Sides together (Fabric and Zipper) – Zipper underneath – gives ladder on zipper. (Sample on right below)
Wrong Sides together (Fabric and Zipper) – Zipper underneath – gives loops on fabric. (Sample on left below)
Wrong Sides together (Fabric and Zipper) – Zipper on top – gives loops on zipper. (Sample on right below)
Sounds confusing? … I keep samples to refer to each time I do this!! Different finishes really make it interesting! Decorative yarns and ribbons can be threaded through the ladders for a really fancy finish.
Now back to the rest of the samples …
‘Creating XL Piping’ – Foot Used XL Piping Foot – cut a strip of bias, and enclose a cord – Adjust the height compensating tool of the guide groove to suit the cord size. All details are on the Instruction Leaflet. I used the setting in the middle for 8mm cord. Stitch down with the cord in the channel under the foot, raw edges to the right, excess will be trimmed off. I used a piece of thick cotton piping cord as the filler. The cord will be quite loose in the seam.
‘Inserting XL Piping in seam’ – Foot Used XL Piping Foot – Place piping made in previous step between two layers of fabric. Stitch down with the cord in the channel under the foot, raw edges to the right.
My Settings: Stitch #1 4-Thread Overlock (LN,RN) SL 2.5 CW 7, DF1 Default Tensions. The cord will be now snug in the seam.
I had some premade cord on a trim, and used the XL Piping foot to apply it between two layers of fabric, however the stitches were not close enough to the cord for my liking. This is best stitched on a sewing machine.
‘Shirred Piping’ – Foot Used #C16L – cut a strip of bias, and lay the top end of the cord in the centre, stitch to secure with a sewing machine. Fold over the strip to enclose the cord – Change DF setting to max of 2, and SL to max of 4.5 to gather the bias fabric. Stitch down with the cord in the channel under the foot, raw edges to the right, excess will be trimmed off. I used a piece of Cotton Piping Cord as the filler. The cord will be quite loose in the seam. Pull on the cord and gather up manually to give a shirred/gathered trim.
‘Inserting Shirred Piping in seam’ – Foot Used #C16L – Place piping made in previous step between two layers of fabric. Stitch down with the cord in the channel under the foot, raw edges to the right. I could have used the XL Piping foot for this step, as when it is gathered it really is more than 5mm in diameter.
My Settings: Stitch #1 4-Thread Overlock (LN,RN) SL 2.5 CW 7, DF1 Default Tensions. The cord will be now snug in the seam.
A lot of samples this week, but piping and adding zippers by overlocker is one of my favourite techniques. There are lots of other things I could have added, given more time – curves and corners for example, joining piping, etc etc. The Big Book of Serging has some fabulous hints and tips included for you to reference. Both the Bernina International Blog and the Bernina America’s We All Sew Blog have many articles to guide you on piping techniques. Check them out!
... A Little Something Extra ...
Foot User Manuals
On the Bernina Website, you can download a User Manual for the Piping Feet #C16S, C16L and the XL Piping Foot.
is the Overlocker Cording Foot, used e.g. for sewing thin cord, wire, fishline, perle yarn or fine yarn into a rolled hem. Ideal for reinforced edges, decorative ruffles and shapeable knitted bands. Get a 20% discount at your preferred BERNINA dealer during the whole month!
*Australia and New Zealand Promotion Only – ends … 30th April, 2026 …
***Bernina’s Sew Into Autumn Sale***
… as well as some fabulous pricing on selected machines and overlockers, there’s 20% off accessories for April!