So … after a two week break, guess it’s time to update everyone as to what has been happening in the life of The Sewing Gypsy. Lots! So a little bit longer read this time … I was quite busy sewing and packing for my big roadtrip to Townsville, stitching up last minute things as always. I decided to embroider one of my denim jackets to take along, and I used a Bernina Freestanding lace design on the centre back (with a few ‘tweaks’ as always). Then above it, I stitched the design of a group of sewing machine feet I’ve used often, and added a little ‘tag line’ near the bottom band. I had planned on embroidering something on the front, but decided it would take less time to pin on a few badges ! Haha Next, was a shower cap to go with my Bathrobe that I’d made last year.
Packing up as always, is a daunting task for me … it’s always “what don’t I take”!! … Seems not much was added to that list !
Then … two days driving … and 1700kms later … Mt. Stuart came into view, and I knew I was back in Townsville! I’m enjoying a ‘Tropical Break’ away here … and believe me … it’s been TROPICAL!!
Most nights have seen temperatures of 21° (yep … aircon essential!) and daytime highs of over 30° … perfect weather for early morning or evening beach walks, catching up with family, longtime friends from school and previous jobs … and lots of good coffee/coffee shops with some new friends!! Well … let me just say … family, new friends and coffee have been fabulous … and lots more catchups planned! However, I’ve yet to dig my toes in the sand at the beach … this weekend’s goal!
Sewing machines have been busy kicking goals though. I spent four lovely days, along with my dear friend Sandy, on Magnetic Island when I first arrived, at the Journey Cut Create Retreat with Kathryn from Just Country Crafts here in Townsville, (and about 40 other keen sewists!), and I finished my ruffled chairmat, a couple of fun, little ‘goodie bag’ retreat projects (Sewing Machine Mug Mat and a Santa Decoration) and had a lot of fun! … ps … WAY too hot for a denim jacket (except in the airconditioned sewing room!) … and didn’t use my shower cap … oh well …
… and then back to Mum’s to set up in her sewing room for a few weeks. My trusty B750 was the first one onto the bench … a little bit of mending for Mum and then embroidery tasks to complete …
Since then I’ve managed to ‘almost finish’ a Zero Waste Top I’ve been eager to make since December last year – most amazing origami style pleats front and back
… cut out and glue baste 60+ ½” hexies for a fun necklace I’ve been itching to make for a while now
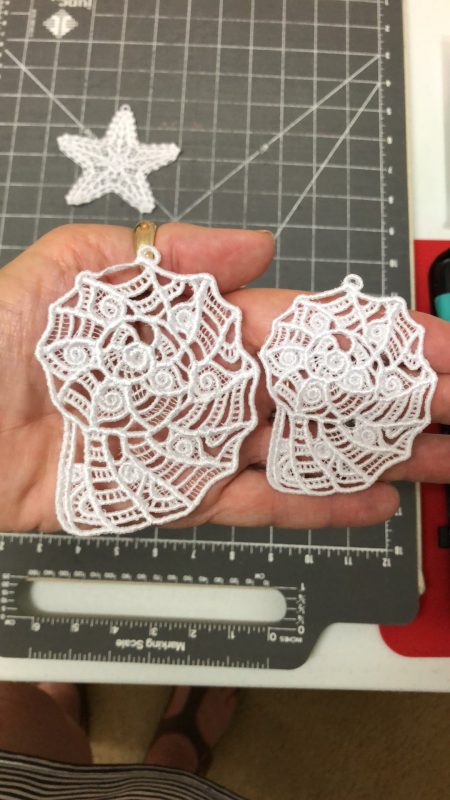
… embroidered Freestanding Lace Shells for my youngest daughter Gemma’s Christmas Tree (finished 12 in total)
… prepared samples and teach a full day of Bernina fun (Ruffling and Overlocker/Coverstitch Accessories) for Kathryn and the girls at Just Country Crafts (required a rejig of Mum’s sewing room with again the L890 in place)
… attend the Burdekin Craft Spectacular down in Home Hill, which is about an hour south of here (the High Tea trolley with all the ladies’ baking was truly spectacular too!) … too busy chatting and enjoying myself to take photos! … but here’s some pics of Kathryn’s stand just after they finished setting up .. lovely as always!
… and just yesterday afternoon, I made 18 bibs and 7 Burp Cloths for my dear little Grandniece and her ‘cousin’ (my Niece Naomi and her friend Bree had babies 9 days apart), both just 10 weeks old or so, and I insisted on lots of cuddles of Edie and Grae first! (and that’s Edie in the first photo ‘enjoying’ the swing I made her.)
Today is Blog writing catch up day for me (and I’m at the Townsville Library taking advantage of good wifi service and airconditioning!) … maybe this afternoon I’ll finish that top … ? Only day so far I’ve had a ‘free afternoon’ … and it’s looking very cloudy and windy outside … not ideal for the ‘toes in the sand’ moment I needed.
I guess there’s always tomorrow …
... Did You Know ...
Stitch Count and Keeping Up-to-Date
At the end of every month, I have my little notebook handy to record the stitch count on my machines. I do this routinely , as it also reminds me to check if there have been any updates released by Bernina for my machines.
I also write down details of ‘things’ I’ve been stitching throughout the month, simply as a little reminder usually of when I made ‘stuff’. I photograph a lot of the processes as I go, and finding photos on my phone/iPad afterwards is sometimes a nightmare!! – I still haven’t devised a workable system for those.
Both the stitch count of your machine and Firmware Version information can be found in the SETUP section of your machines.
(The photos above shows the B790PRO Simulator that I use on my Laptop, and the Version there reads 43.00.07 …)
… I see that the latest Firmware Version is 43.00.14 (Marked in Yellow) – I would then check my own actual machine and perform an update if required. Keeping my machine up to date means I have the latest operating system features, and any ‘known bugs’ will have been addressed by Bernina.
Details of how to perform an update and what is addressed in the update, is also available on that same Support Page – Firmware Download Instructions and Firmware Release Notes. (Marked in Green) If you are not sure/confident on how to do this, contact your preferred dealer for support.
This page also has the link for you to download the Simulator onto a laptop or desktop. (Marked in Red) It’s a great resource for learning how to use your machine’s operating system. Lots of help details on screen.
There is a Support Tab for most models of Bernina – just search through for your machine.
... Top of My Recommended Foot List ...
Edgestitch Foot #10/#10C/#10D
This week, my favourite, and most recommended foot came out of my little tray under my acrylic table, to star in the ‘largest amount of stitchouts of one foot’ in the Big Book of Feet … 18 techniques! Be prepared for a mammoth read in the next section!
As my passion for sewing stemmed from making clothes for myself, I loved all the different techniques this foot helped me to master. I love an individual touch on garments I make, and this foot truly is remarkable!
Options available for the foot – It’s available in a regular version suitable for all models, a ‘C’ version for models with a 9mm maximum stitch width, and a ‘D’ version designed for models equipped with the BerninaDual Feed function. It has a metal blade, against which the fabric can be placed to guide stitching, which is shorter than the blade on the Blindstitch Foot #5. (See ‘Foot’note)
Foot #10/#10C/#10D had18 differenttechniques to stitch out, including using both straight and zigzag settings.
... This Week’s Foot Highlights or Challenges ...
AHUGEweek of stitching, and writing up of each technique, so I’ll aim to keep it brief …
‘Edgestitch’ – I ‘edgestitched’ a strap of sorts – remember to sew both sides in same direction to avoid skewing of strap – Used -2 and +2 Needle Positions. (- is to the left and + is to the right)
‘Stitch-in-the-Ditch’ – it’s an often used technique here in The Studio –it’s how I machine sew my bindings on. Used Needle Position +1 to get up closer to the edge.
‘Understitching’ – again, often used! Understitching facings etc is a ‘must’ when constructing a garment. Used Needle Position +2.
‘Attaching Ribbon’ – Stitch both sides of ribbon in same direction – so -2 and +2 for Needle Positions stitched nicely on the edge.
‘Corded Edges’ – I used Rattail cord for the edge, Zigzag SW 2 and SL 1 Needle Position Centre – love this technique
‘Edge-to-Edge Seams’ – I bound the edges first, then butted together SW 4 SL 2 to add it as a feature. Would use a narrower setting if wanting to conceal the finish more. Needle Position Centre – fabric sits either side of the blade.
‘Single Needle Tucks’ – tucks/pleats are one of my favourite garment features! I used SL 2.5 and Needle position -3 to give a nice depth tuck.
‘Cross Tucks’ – similar settings to above, just changed SL to 3
‘Twisted Tucks’ – these are fun too, I made the distance 1 ½” between markings SL 3 Needle position -4 to give deeper tucks to make them more prominent.
‘Machine Swip Stitch’ – fabulous technique for edges, when choosing not to roll hem with overlocker! SW 2 SL 1 Needle Position -1
‘Narrow Hem’ – great technique when not using a dedicated Hemmer Foot – SL 2.5 Needle Position -2
‘Narrow Curved Hem’ – again an option to doing an overlocked roll hem – Row 1 Zigzag SW 2.5 SL 1.5 Needle Position -2 … Row 2 Straight SL 2.5 Needle Position -3
‘Lace Edging’ – helps to spray starch the lace first … Row 1 Zigzag SW 2.5 SL 1.5 and Needle Position -2 … Row 2 Straight SL 3 Needle Position -2
‘Lace Insertion’ – again, remember to sew both sides in the same direction. I used high contrast thread on the sample – in ‘real life’ would be matching to lace, and therefore almost ‘invisible’, yet a strong insertion seam.
‘Lace Trimmed Tucks’ – this is such a nice technique and I’ve used this many times. Doesn’t take up much fabric in the fold, so o need to length the pattern piece to allow for it, unless you are doing multiple rows of course!
‘Entredeaux’ – I add the ‘ladder part’ between two pieces of fabric instead of another piece of lace SW 4 and SL 1.3 – I’ve used this technique on a blouse and love it for a trim between two pieces of the garment e.g. sleeve to armhole, or yoke/princess lines of a bodice.
‘Tricot Bound Edges’ – I used to use tricot strips to bind seams many years ago, however since prefer to use my overlocker for inside garments mostly, I now use this technique to add fold over elastic to edges of garments, like armholes, necklines etc. It’s a great product!!
‘Hong Kong Seam Finish’ – such a tried and true couture finish for inside a garment – sits flatter than a regular bound seam.
... Features/Functions I’m loving this week ...
I have my machines set with Needle Down function engaged as my preferred setting – and when edgestitching and adding trims like this week involved, this feature helps to stop fabric/trims from shifting when you are constantly stopping and starting. It’s like having a pin in place, every time you pause! Simply tap the icon on your screen and it will change to either Needle Down … or Needle Up … easy to change back anytime!
The Laser Light function on my B790PRO meant it would show me exactly where I was going to stitch, so I could alter my Needle Position to be in exactly the right spot…. and of course my knee lever got a workout this week too! Going around curves, and having to lift and reposition the foot, meant the Laser Light, needle down function and freehand system was a great team! Can’t imagine sewing without these … and now … even my overlockers have knee levers and Needleup/down via the screen/foot control … just waiting on a laser light function! Haha
... A Little Something Extra ...
More Inspiration via an eBook
This week’s eBook I’d like to share with you is the ‘Everyday Heirloom Sewing’ eBook … which has some more details re some techniques covered by the Big Book of Feet.
Here is a link to the ‘Just SEW It Everyday Heirloom Sewing’ eBook …
Well, it’s getting VERY close now to the class details and bookings being released for Bernina Academy 2024, which will be held in Sydney from 25th to 28th September. I’m really getting excited, as I was thrilled to have been asked to teach for the four days, showcasing the fabulous Bernina L890 Overlocker/Coverstitch Machine.
Sign up to the Newsletter to stay up-to-date with all the information as it’s released.
is the Binder Attachment #88 and Binder Foot #95/95C – 20% off – contact your preferred Bernina Dealer for this fabulous offer. … and it comes in three different sizes!! I’ll be covering this amazing attachment/foot later in the Blog.
*Australia and New Zealand Promotion Only – ends … 31st May, 2024 …
In the meantime, here’s a link for information regarding this attachment/foot.
The centre blade on Edgestitching Foot #10, does not extend back through the centre of the foot, so, unlike Foot #5, all 11 needle positions (9mm max stitch width machines) or5 needle positions (5.5mm Max stitch width machines) can be used.