Spring cleaning and sorting through the Studio, appears to be more than a ‘one season long’ task … and as it’s now midway through Summer, I’m thinking it will be Spring again before I even get half of what I’ve got on my list ticked off! There are just too many fun things up here in the Studio that distract me, and I’ve resolved to myself, that this will be the year I finally have less in here, and well sorted. I am not a big fan of New Year Resolutions, so let’s just refer to this as my 2025 Challenge … My Happy Place Reset 🙂
Of course, along with a sort out, this year there’s the balance of the Bernina Big Book of Feet Challenge (16 more blog posts after this one!), sewing some new clothes for myself and others, a pile of mending, lots of new project ideas to write up (and some even started) and some classes to teach along the way.
So, that being said, the year ahead will be a very busy and hopefully, a productive time. At least I have a written plan, otherwise I’d be flitting from one task to another, and getting nowhere. Now I need to finalise some dates in my diary for roadtrips, retreats and classes to teach. For those who have been requesting dates for a few in store classes, I’m getting there … a new diary bought, pencil sharpened .. and a rubber handy! – so far, so good!
As the dates are locked in, I’ll let you all know where I’ll be travelling to, which stores I’ll be teaching at and what classes will be offered so that you can book into a class or two whilst I’m in that particular area. My road trips this year will be a combination of lots of ‘me time’ and some teaching time again.
Retirement ?? What retirement!!!! … just a LIFE RESET it seems … there’s so much more Bernina and sewing fun to share!
Sunday morning edit: as I’m late posting all this due to a ‘tech issue’ – updating of WordPress … arghhhhhhh!!!! … here’s my view out the window .. yes, raining up here again!!! Need an umbrella to get up to The Studio – this is what ‘Bernina BBOF Dedication’ looks like today!! Smaller marked area is approximately where I am – dashed area is what’s coming this way!!
... ‘Gathering’ at the Studio ...
This week it was so lovely to have friends visit me at the Studio from Gympie, some 200kms away. Sarah and Ray arrived to pick up my Bernina B750QEE that she had bought, as a backup embroidery machine for her business. It was so lovely to see them after such a long time, and very special to spend time chatting up in the Studio. Even had a little play and look at my new B990!
My 2025 road trips north are sure to take a detour to their beautiful property at Gympie, so it won’t be as long between catch-ups! I’m looking forward to seeing Sarah’s Studio also, as she’s progressed from a small room in the house when I visited last, to her own custom built, specialised workspace. Ray’s a handy guy with the tools – building things around their home, as well as establishing sensational gardens!
Sarah makes THE most incredible plush characters, also writes tutorials on them, and I’ve mentioned her work here before, so here’s a link to her website, and a couple of her creations – what a talent! Sarah says … “If you can imagine it, chances are I can make it!”
Now, as it is still school holidays, both Ambah and Leo, are enjoying ‘down time’ around the house and outside, outings to library, movies and catching up with other family members and friends. Leo celebrated his 10th birthday on Sunday and has been very occupied putting together one of his gifts this week – a MegaCyborg 5. (Science Toy – STEM Experiment)
Now three of the ‘required tools’ on the list were a small Phillips head screwdriver, a pair of diagonal cutters, and some long nosed pliers. He ‘creatively’ was using the end point of some scissors as the screwdriver when I saw him struggling to get the screw in … my solution was to take him for a visit up to The Studio – and delving into my little stash of ‘Other Tools’ for him to use. However on walking into The Studio I decided I’d first show him my newest sewing machine, the Bernina B990(my BIG purchase from last year!!) – he’s right into technology … so here’s a couple of pics of what he created on the embroidery screen – Leo’s Cub Patrol symbol * is the Flamingo!
*Both Leo and Ambah, who is a Venturer Scout, enjoy Scouts each week, camps and other fun outdoor adventures.
He found, created and edited everything himself, with just a very short amount of tuition – he had a lot of fun! He was amazed with the laser light, and camera – loved seeing his finger on the screen! Haha
If a 10 year old can bring a design in, rotate, resize, flip, add lettering, duplicate a design, change the thread colour in the design for stitching out, and save the design all within about 15 minutes … I’d better make sure I hide the Studio key!
... Sparkly Fun ...
CrystalWork Foot #48 and CrystalWork Tool
This is the second ‘tool’ from the DesignWork family of accessories (3 in all) – previously I blogged about the CutWork Tool, where designs can be cut out, along with attaching Foot #44C and this week along with CrystalWork Foot #48 is the CrystalWork Tool, where you can design motif stencils for patterns made from rhinestones! A Punch Stamp is used instead of the needle in the machine.
When purchasing the tool, you will receive the CrystalWork Foot #48, one punch stamp container, four punch stamps in various sizes and four die plates to match these sizes. Crystals with heat-activated glue on the back will need to be purchased separately. Crystal sizes SS06 (approx 2mm), SS10 (approx 2.8mm), SS12 (approx 3mm) and SS16 (approx 3.8mm) can be used.
I must mention here that the DesignWorks Software is not absolutely necessaryto use the individual tools on a Bernina that can embroider and is compatible with DesignWorks. Some machines will have designs built into them, and there are some ‘ready-made’ files available through OESD that can be used unchanged without software. E.g. Bernina Edition #82014.
Here are some of the designs built into my B590E (and my B790PRO has some as well.) The Breadcrumbs across the top tell you where I have accessed them – You can tell it is a CrystalWork Design easily by choosing the ‘thread colour’ tab – it will indicate the size of the crystal/punch stamps for the design, instead of thread colours. (Picture shows SS6)
Please note that you CANNOT resize these designs – the options are ‘greyed out’ on the Edit screen. (Picture also shows Cut Plate selected – the container is positioned into the hole – and Midi Hoop – one of my favourite hoops!)
Options available for the foot – It’s available in one version only suitable for use with the CrystalWork Tool, and Bernina machines that can embroider and are compatible with DesignWorks.
Foot #48 hadone sampleto create, with part of that being punching the Template, followed by applying/ironing the design to fabric. There were comprehensive and easy to follow instructions in the Bernina Big Book of Feet, as well as in the instruction leaflet supplied with the accessory.
Sunday edit: went ahead and made two more samples on Friday – explain more about that later.
... This Week’s Foot Highlights or Challenges ...
Machine Set up – Container with die plate attaches to Stitch plate, corresponding Die punch inserted in needle clamp, Foot #48 attached to machine and here how it all looks again … and a second photo of the container after punching ready to be emptied. The machine prompts you when it is time to empty – DO NOT IGNORE THIS STEP!
Hoop up with baking paper (looks odd as it’s upside down!), place template backing (green) onto the hooped paper. A little video to show you it working … only took 15 seconds or so to punch out!
Peel off finished template from backing, stick on to a thick cardboard base – sprinkle over crystals and set them all up the right way.
Place clear transfer film over the crystals, smooth firmly into place, peel back the clear topping – the template is now ’empty’ and the crystal design ready to iron onto the fabric.
Iron with a dry iron and then peel back clear topping – can be reused, just pop it onto its backing to keep sticky.
Here’s my finished sample – it is OESD Design # 82014-45 (from Bernina Edition #82014 – one my most used collections I think!)
I did just the letter ‘R’ and pressed onto black fabric to put in with my Blog post samples. Can’t just file away those sparky Bernina letters – think a little bag project might be on its way! Maybe a pencil case to add to this year’s Diary front?
Main challenge this week was finding the best type of ‘stabiliser’ in the hoop prior to punching the design. I tried one layer of Glad Bake – they suggested Reynolds Freezer Paper (there is some rolled up somewhere here in The Studio) … for the first BERNINA sample, peeling the backing from my template material and sticking it directly to the Glad Bake as I’ve mentioned above. I think it slipped slightly in the hoop, but it was very easy to peel off before sticking to some heavy cardboard. Must look for my Freezer paper …
Second BERNINA sample I made, I hooped up some tearaway stabiliser I had, and again stuck the template material directly to it. It didn’t shift this time as it was a heavier weight than the Glad Bake. However, it did not peel off as easily as before.
Third and last sample, – a new design FLEUR-DE-LIS – I hooped up some tearway stabiliser, peeled the backing from my template material and stuck it to a same size piece of Glad Bake – then taped both of these onto the stabiliser. ‘Team work’ with the stabiliser and Glad Bake … worked a treat!
Here’s a short little sped-up video of the CrystalWork Foot#48 and CrystalWork Tool in action, and you can see the ‘hooping method’ I used – does show it pausing about the 20 sec mark – machine stopped to remind me to empty the container!! I restarted it as I knew it didn’t have much more to go … was filled right to the top when I’d finished … listen to your machine people!!
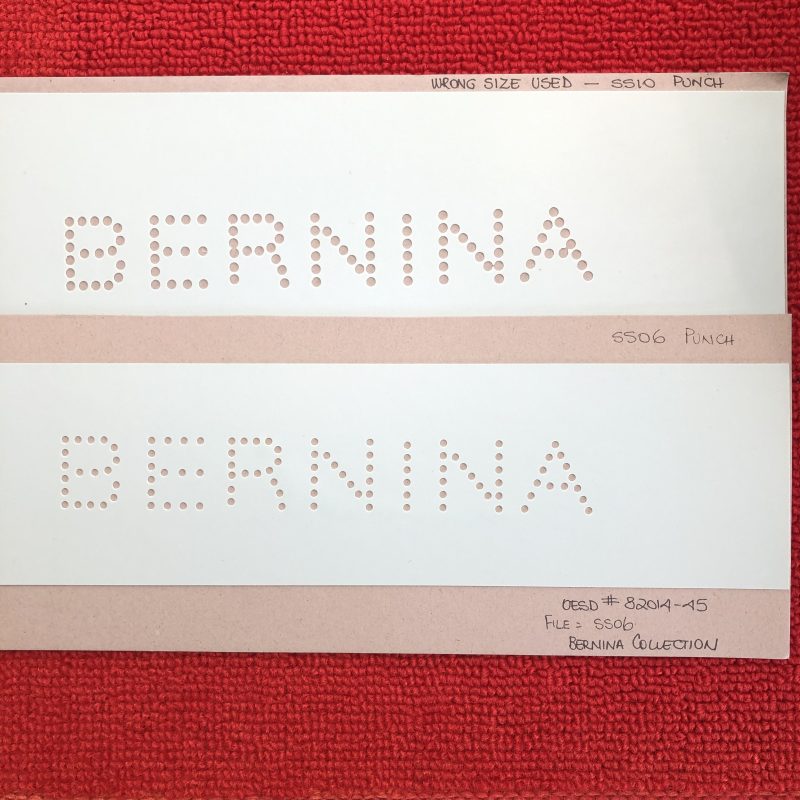
Oh and remember to check what sizecrystals you need, what size the design is digitised for, (you will find that info in the thread colour area of the design) and which die plate/punch you have on the machine. The first sample pictured below was digitised for SS6 and I had SS10 die plate and punch in. I wondered why it looked uneven! See how close some of the holes are on the downward stroke of the letter ‘R’? Here are the two samples I finished up with for comparison – the templates tell the story of what went wrong when using the incorrect size punch … the finished ironed on crystals with the corresponding template? Well, not really noticeable at all! More info to follow …
Sunday edit: So, what happened on Friday? I remade a new template (BERNINA) using the correct SS06 die plate and SS06 punch, which the pattern TOLD ME TO DO, however only had SS10 Crystals – so it was a challenge to get them to sit in the holes – but I have a LOT of patience when it comes to these types of tasks. I might have since bought some SS06 Crystals 🙂
To finish off this week’s samples and fun, I then made the Fleur-de-lis template which you saw in the video above, a design digitised for SS10 Crystals the size I have… oh they just fell into place on the template! Amazing how using the ‘right tools’ changes the outcome! This design was one I had on an OESD Companion CD to Sepia Petals Design #82001 made especially for Bernina many years ago – I could not find it online for purchase, sorry.
Finishing off this segment with a little bit of TRIVIA!
Does the design look familiar? The Fleur-de-lis was the original shape/design for badges given out by Robert Baden-Powell, the founder of Scouting at a Scout Camp around 1907. Then in 1909 a ‘Registered Design’ was created, that included two five-pointed stars in the wings. The stars were added to make the design unique and protect it from being copied for commercial gain. (Google helped me with this)
I love the symbolism in the Scout Badge, and all the values represented that are being instilled in my grandchildren in their extra-curricular Scout activities. I do get to sew on LOTS of achievement badges too!
... A Little Something Extra ...
Want to see a lot more in pictures?
There’s a very informative blog post on We All Sew (from March last year) … with a free design to download if you have the CrystalWork Tool and Foot #48. Here’s a link to it …
is Foot #29C for easy free-motion quilting, outline and stipple quilting and for the whole month of January is 20% off – contact your preferred Bernina Dealer for this fabulous offer.
*Australia and New Zealand Promotion Only – ends 1st February 2025 …
I’ve covered this foot back in September and if you want to revisit it, I’ll add a link to that post.