Friday 03 January, 2025

... LOOKING BACK ON 2024 ...

It is that time of the year, when I total up all the stitches I’ve done this past year … and my little black notebook has recorded 1,764,042 stitches this year – not a great deal in the grand scheme of things I initially thought, as I spent a lot of Studio time stitching samples, and writing up the 36 posts so far for my Bernina Big Book of Feet Challenge. I keep a track of what I sew in here also – nice to look back on at the end of each month.  I find a lot of satisfaction reading over what I achieved and who I sewed items for – nice memories for me … skip over them all below if it’s too much to read – I’ve documented them all here for me … for later on.

I stitched up quite a few different things this year and here’s a roundup of them all.

January – Studio – Mending (new sheet base for Ambah’s zip on bed sheet), PortaCot carry bag for Gemma, 10 Balloon Ball covers, Charli Wrap Dress for my dear friend Marion, and a sweet little Sunday Best dress for her granddaughter Lucy (Tilda Celebration Day), Pinafore jumpsuit and 5 pairs of Georgie Shorts for my grandson Bobby for Daycare.

February – Studio – 3 more Balloon Ball covers for Party giveaways (Bobby turned 1!)

March – Studio – A needle wallet for an Instagram swap, Scout badges added to shirts, Class samples for Bernina Academy on the L890, and the first lot of samples for my Big Book of Feet Challenge (Feet #0 to #10)

April – Studio – 4 embroidery stitchouts for a Buttonhole Cutter pouch I was gifting to a lady in Sweden as a competition prize on Instagram, (and a final pouch sewn with the best one), 36 Cord Tags embroidered for a Townsville Retreat for myself and giveaways, Embroidered back of a denim jacket for myself, went up to Townsville for a Retreat with Just Country Crafts … made a ruffled chair pad at the Retreat as well as a Mug Rug in the hoop and back at Mum’s afterwards, stitched up all the pleated areas for a Zero Waste pleated top (not finished yet)

May – Townsville – embroidered 12 free standing lace shells for daughter Gemma’s Christmas tree, made 18 bibs and 7 burp cloths for my niece Naomi and her friend Bree up in Townsville whilst I was there, and made 24 pattern weights with magnets for myself.  Mum’s sewing room was well used!

June – Studio – Quilted Slippers for my granddaughter Ambah (were too small though), Hoodie dress for Ambah, replaced a front zip and made alterations for a better fit on a motorcycle jacket for my neighbour Neil (who constructed all the workbenches in The Studio a few years ago now), 2 pair of flannelette PJ pants for me, and made and embroidered 2 Minky pram blankets for Marion’s newest little granddaughter Layla.

July – Studio – Bernina Academy sample folder inserts on L890, Scout badges stitched on shirts, and BBOF Challenge samples

August – hmmm – nothing recorded? Maybe I didn’t make anything?  Or forgot to write them down!

September – Studio – garments for myself (2 x Tamiko Pants, 2 x Itch to Stitch Bellview Jeans -one pair had machine embroidered pockets, front of legs and bottom at hem, 4 x Joti Duster Coats, 2 x copy of Ready to wear Sleeveless tops, 1 Sadie Tunic  and 4 more sets of Bernina Academy Project samples (4 x Sample Folders and 4 x Project pouches) – I then went to Sydney to teach the classes – a BIG MONTH!

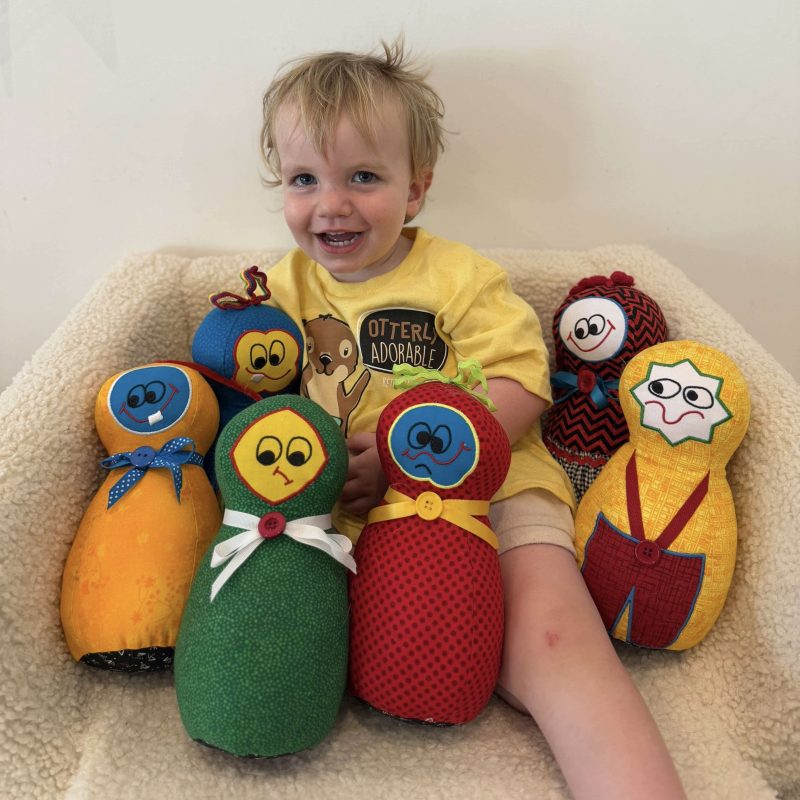
October – Studio – Mending (towel edges, luggage cover straps and clips to be replaced, start skittles for Bobby’s Christmas gift, Blog samples of course and 2 outdoor canvas swings for Naomi’s friend Bree’s little one Grae (I had made one last year for Naomi’s little girl EJ – Edith Joan), and one for a friend of Gemma’s little boy Jett.

November – Studio – Blog samples x 4, Mending and embroidered a Rudolph’s drink mat for Bobby (Sweet Pea Design in the hoop – first project on my new B990 … fun!)

December – Studio and in House (it rained a lot!) – Mending (hemmed two knit tops and put picot edges on 2 scarves for my cousin Jennifer, restitched a king size doona cover for a friend), Blog samples for 44, 45 and 46, Four Christmas stockings pieced and three of the cuffs embroidered for Gemma’s family, 3 denim toiletry bags for my older three grandchildren Ambah, Lucas and Leo, and finished the Skittles for Bobby.

How did I ever fit in going to work!!!!  Here’s some pics of the Christmas gift sewing … first group of photos are Ambah and Leo and their denim quilted toiletry bags … Ambah loves anything black so tiny spots inside for her – Leo is quite the math and science wizz so equations on his fabric print … 

Next is Lucas with his denim quilted toiletry bag – he is a very talented hiphop dancer, and loves music!  Oh and all their gifts had Kylie and the Machine labels on them!  Pattern was Zip-N-Grip by SewYours – I made it straight from the pattern instructions and only extra I did was the plaid style quilting on the outer pieces with Wonderfil Frutti 12wt varigated threads in the needle and bobbin also.  All sewn from my stash, except the square hardware for the handles, and Kylie from Kaela’s Patch express posted those to me.

And then there was fun loving little Bobby (nearly 2) … I made him Skittles!  All sewn from my stash again.  He has quite the style playing with them!  The front skittle looks a little afraid!! Watch the video to see how he plays …  I’m sure he’ll ‘refine his technique’ as he gets older!

Love his style – even when opening a present – brings us all so much joy!

... The Studio Update ...

We are still awaiting the patio roof panels to arrive, so any ‘updating’ was done inside.  There’s been more rain of course which would have held up outside work anyway.  It is that time of the year here in Queensland, the wet season!  Showers again today as I‘m writing this, and even though it is a bit cooler (27° max expected today) the airconditioner is running, as no patio roof or eaves on the Studio mean no open windows today.  I’m really looking forward to having wide open windows, and fresh air in here again soon.  My little Desert Rose has bloomed this week, so I brought it over to The Studio to enjoy.

In the meantime, I thought I’d introduce a new segment here below … read along as to what’s been happening inside this week … 

... How I Made This ...

Is it ‘up/recycling’, ‘making do’, ‘hacking’ or just ‘mindful creativity’?

Let me set the scene for how this project came about … Somedays here in the Sewing Gypsy Studio it is a mess!!  There are assorted size  piles of fabric, notions, notebooks, threads, stabilisers, scissors, rulers and even machines NOT in their usual ‘places’.  I find it very distracting and literally ‘stunts’ my creativity!  I aim to clear up and clean up before I leave here each night – but sometimes, oh well, I’m sure you’ll relate to these photos of how just a small section of  the Studio was this morning when I opened the door …

My dear Mum used to tell me that to keep an orderly house, it was to have a place for everythingand keep everything in its place! Good advice I’m sure you have all heard over the years, and perhaps passed on to your own children/grandchildren.

Great name for a bag … and back in 2016, I made one … ByAnnie Place for Everything … was great for travelling around Australia!  I also have the Place for Everything 2.0 pattern ready to make up as well, as I need more space to put my travelling tools.

The Studio of course, has limited space, and seemingly unlimited ‘stuff’, so finding a place for everything/solution for the most efficient way of keeping it in order, and everything easily accessed is challenging.   So many things are labelled, sorted and organised into like supply areas.  But what happens when something new arrives, and won’t fit into that area?  That’s the issue I had last month on the arrival of my new Bernina B990 machine and embroidery module!  The module would not fit in an Ikea Pax Cabinet drawer – it was just 15mm too wide!  (I have both the 5 and 7 Series modules in one drawer.)

So, every ‘project’ usually starts off as a need in my Studio, progresses to a possibility, and then the wheels and cogs in my head start whirring louder.  Finally I get a solution that hopefully means remaking or altering a current item into something ‘new and more useful’ for my Happy Place, instead of going out to buy anything more!

So the new machine sat on the workbench, with embroidery module connected, until I worked through the possibilities, and came up with a solution.  Of course, it could have stayed that way to sew as there was plenty of room to do that, however with the future possibility of a clear Acrylic Quilting Table (hint hint Bernina – we NEED one as it is essential to have a large flat area for Ruler Work!) I needed to address the module storage issue.  Here’s the machine on the bench with the module … and now as it is today, with the module ‘parked away’.

The Need – A sturdy shelf to hold the weight would be essential (remember the overfilled fabric drawers? – didn’t want that happening again!) … I envisaged a slide-out tray to detract from dragging the module out of its place (it has rubber feet underneath) and enough room to have it covered and dust free.  I have a pull out drawer in my Pax wardrobe in my bedroom, and had thought of installing one of those, however would have meant a trip to IKEA!  The module has its own dust cover so that was at least sorted.

The Possibility – I had a bottom shelf in one IKEA Pax wardrobe unit that I had not yet added the rails to run a metal basket on.  There was random ‘stuff’ in the basket that needed to be sorted, so this area then became a possibility, mind you not the most ideal as it was low to the ground and I’d have to practice ‘safe lifting posture’ when bringing it out to use.  I measured the unit and the depth of the shelf … a great fit with just millimetres to spare. I’m still deciding whether to put doors on these units yet, so allowing for the future addition of those, this was an important factor. 

The Solution – Everything I used I had on hand … no shopping trips needed!  I used two bamboo LÄMPLIG cutting boards from Ikea (I had three in the Studio which I use when laminating my Calendars for my Vintage Style Baskets) 53cm x 46cm $12.00 each according to their website (photo on right below) … I’ll buy some more when I go to Ikea another time … oh, and TARGET and KMART both have one very similar (surprise, surprise!)  50cm x 40cm $16.00 each (photo on left below) – note: these would not have been deep enough at 50cm for the 9 Series Module, and how I was going to make the tray. Although if you have a 5 or 7 Series Module and wanted to do this little project, the Target and Kmart ones would be large enough.

Next was double sided tape to hold them both together. 

They simply sit atop each other, with the lip up at the front where the module will sit flush against …

… and with the lip up at the back to create extra length to place some foam protectors for the ‘module to machine connectors’.  This was cut from a piece of packaging I had kept from something else, and held into place by double sided tape again.

Lastly, I added a piece of IKEA Komplement drawer mat ($10) to the top and bottom of the new ‘sliding base’.  This drawer mat was underneath the wire basket to protect the base of the cupboard before.  It has a smooth side and a marked side with gripper dots.  (Photo with scissors from IKEA Website)

I taped it down again with double sided tape, on the gripper dot side, as I wanted it to slide easily.

Here’s the finished ‘Docking Station’ … looks a bit like the SS Enterprise in there!

The Need – I realise not for everyone reading along, as we all have different machines and areas in which we use/store them.

The Possibility – maybe just a temporary position here in The Studio, as I’d like it at waist height if possible, and only one area that would be sturdy enough and the right height – but would have meant a lot of rearranging of ‘stuff’ – perhaps for another time – watch this space!  Still in possibility thinking mode …

The Solution – working for the time being – module is covered and dustfree, safely stored away from being knocked or having to be constantly shifted from one place to another, I have more sewing room at the left of the machine again, and some space next to the module for longer rolls of stabilizers/vinyls etc… and it was low cost, efficient and very practical!

Cost of the solution – Double Sided Tape from Kmart $4, two boards from IKEA $24 and IKEA drawer mat $10 – total $38 – and all in my stash here in The Studio!  (I’m sure a trip to IKEA for some replacement cutting boards will be needed before I make any more baskets!)

... Did You Know? ...

How to ‘Resize’ your Templates for Storage

I’ve been a lover of organising things for most of my life, and find the most obscure ways of doing things some times.  Often it is out of that NEED I spoke about before that the ideas come.  Now, over the years I have used Template Plastic, or Templastic as it is often referred to as, to trace and cut out pattern shapes if I am wanting to use the same ‘shape’ a few times.  When I started Bobby’s skittles, I made templates for the each of the pieces, and once I was finished, I filed them away with the pattern in an A4 document sleeve, placed inside the Bernina Inspirations Issue 2014 Special Hobbies – then into the magazine file where all the other issues are kept.  Now if ever I want to make them again, everything is ready to go.  My dear friend Sandy from Two Close Friends on Instagram kindly digitised the faces for me, which made them a lot easier to make up.

When I was making the Christmas stockings, again I cut out the templates from the pattern (Waves and Wild Christmas Stocking – a free design – link at bottom of this section) so that I could draw around them once I had stitched the shapes together into a larger piece … and I found those numbered pins a real treasure with these stockings to keep track of which rows went where … and then quilted it.  I usually draw around the templastic shape on the wrong side of the fabric, and then add a seam allowance as I cut it out.  I find the drawn line is then ideal as my stitching line. Great when you have curvy shapes to stitch.  However, I wanted to ensure I had placed the pattern exactly where I wanted it on the quilted piece (bit like fussy cutting – templastic is translucent), so I chalk marked the line on the right side this time.  It easily brushed off later.

After everything was cut, pieced, quilted, recut, 3 of the cuffs embroidered,  those three lined and made up … I had the extra one to keep for later, and the templates to put away with the pattern. I have a three ring Christmas Binder and it holds A4 size clear document holders or folders.  However, the templastic shape was too big for this folder.  Easiest solution was to cut the templastic in two places, stitch back together with a small zig zag, SL 2 SW2, fold on these stitched lines and pop into the folder.   I have a Jeans 100 needle in a separate needle packet marked just for these types of tasks.  Templastic is a bit tough on your needle points as you can imagine!

So using this idea, you can stitch together smaller off cuts of templastic you may have, and ‘Frankenstein’ them together before you trace off a new larger shape – use up your leftovers!!  Here’s the link for the free Christmas Stocking pattern, which is a great size! … thanks Waves and Wild!

... Nifty Little Attachment ...

Spanish Hemstitching Attachment #47

I love this attachment and have used it quite a bit over the years.  It is used to create the look of hand-sewn faggoting entirely by machine, and it is ideal for joining two finished edges together, decoratively.  These edges could be corded, faced, a ribbon edge, a rolled overlocker edge and even a simple turned under edge.  I find some lightweight fusible interfacing helps keep the rows of fabric straight, and I only press it onto the areas that are not stitched, in other words not the turned under seam allowance.

The stitches are then sewn over a space, creating a lacy look.  A narrow decorative cord can be added between the two pieces for a more filled-in look. 

Here’s a simple zip up bag I made many years ago, featuring some lacy open seams, and others with Rattail cord as a filler.  I keep one of my boxed up attachments in there, the packaging has changed over the years, along with samples ready to demonstrate, and it was very handy this week to open it up and see all those strips prepped ready for me to stitch!  What a win for me!  There was another piece all completed for a second bag, along with another set of this attachment, I store in a small waterproof hard case I bought in Kmart fishing section many years ago.  It fits the instruction book and the fastening plate, and a small Jumbo Bobbin tube holds the guides, screwdriver and screw in it. Easy for me to use when demonstrating.

Used along with Open Toe Embroidery Foot #20/#20C/#20D, it consists of a fastening plate, screw and screwdriver, as well as four spacers or guides.

Options available for the foot – two of the guides are for 5.5mm maximum stitch width machines and two are for 9mm maximum stitch width machines.  Each pair has one attachment for finer fabric and one for heavier fabrics.  You can utilise the smaller stitch channel/gap of the 5.5mm guides when using a narrower width stitch of 5.5 on the 9mm machines.  A great instruction booklet comes with the attachment.

Attachment #47 had two techniques to stitch out, one with an open gap, and one filled in with cording.  I did a sample stitchout of several stitches as well.

... This Week’s Foot Highlights or Challenges ...

 ‘Spanish Hemstitch’  – a couple of tips here when using these guides, whether they are the ones for finer or heavier fabrics – same applies.

  1. Bring up bobbin thread, and hold your threads at the back when you start as you may be stitching without fabric underneath.
  2. Open decorative stitches that move in a forward direction seem to work better.
  3. The needle points need to land in the fabric edges on either side of the spacers, so maximum stitch width at all times.
  4. Try these stitches, top row – #626, #1330, #709, bottom row  – #723, #422 and I liked Stitch #702, with a SW6 and the narrow insert – smaller gap.
  5. For both my sample I used Stitch #725 – pictured below the sample stitchout.

‘Corded Spanish Hemstitch’ –   use cording up to 2mm in width – hold both threads and cording at back to start.  I’ve used Rattail Cord in my sample, however Presencia Cords, stranded threads, Perle Cottons and fine ribbon work really well.  I encourage you to have a play with a variety of filler cords and yarns.

The instruction booklet that comes with the attachment has a photo of a hemstitched bag, and here is the link to it – an ideal project to get you started.

... A Little Something Extra ...

Heirloom Sewing Technique Revamped

A beautiful finish is assured with the precision of the Spanish Hemstitching Attachment – and if you haven’t already downloaded this eBook, I recommend it to you.  I added details of this one when we did Edgestitching Foot #10 way back in May, 2024 …

... and a Tool Tip ...

You might have noticed in one of the photos of the templates I had my Pattern Notcher laying on top – love this tool! I use it whenever I am drafting my own patterns, or even tracing out templates and need to make marks for alignment.  They are not that expensive, and as I bought mine a really long time ago it has proven its worth many times over!  I have seen them recently promoted on the Sewing Gem Instagram page – here’s a link to the product on their website – an on-line only business situated here in Brisbane. 

... A Little Reminder ...

Bernina’s Accessory of the Month January 2025 *

 is Foot #29C for easy free-motion quilting, outline and stipple quilting and for the whole month of January is  20% off – contact your preferred Bernina Dealer for this fabulous offer.

*Australia and New Zealand Promotion Only – ends 1st February 2025 …

I’ve covered this foot back in September and if you want to revisit it, I’ll add a link to that post as well.

Chat again next Friday,

Scroll to Top