Two weeks ago I posted off a little Needle Wallet I made as part of the #needlecaseswap2024cc on Instagram with Christine Cohrs (@once_upon_a_quilt) … and truly, I love these kind of things, but I don’t often ‘step up to the plate’ and join in … mainly due to the fact I leave everything to the last minute, thinking ‘there’s plenty of time to do that!’ Well, I finished it four weeks ago … (insert gasp here!) … but still left it until the last minute to post – just making the cuttoff!! I have been busy getting blog posts written ahead of time, due to me going on my road trip … as well as still finishing samples/notes for teaching on the Retreat (and afterwards in Townsville) … didn’t figure all that into the ‘love to join in’ response I gave Christine … anyone else relate to this?
Takes me ages to decide on what design I’m making, the ‘feel’ of the recipient’s Instagram feed (we were all given our secret person’s details weeks ago), and what fabrics to use … I do have quite a stash, which makes it even harder! I wanted to add something ‘handmade’ to it, as it was a Madeira Applique machine one, and hardly a hand stitch in it. Here’s the finished Needlecase … front, back and inside.
I’ve made a few like this over the years, as it is the ‘sample style’ for a class I used to teach on Madeira Applique by Machine, using washaway stabiliser. To keep it closed, I cover large clips/press studs with fabric. My Grandmother showed me how to do this many, many years ago!
Some versions I’ve made had machine embroidered designs on the little flap, some had feature buttons there, and others had little Thread Flowers on it. I’ve made a few flowers as samples I keep in a zip up bag.
These flowers are not my original design/idea … I just love making them! … A link to the Bernina Australia Project sheet is below if you’d like to make some Thread Flowers … or tassels!
I used Darning Foot #9, which is this week’s foot, to freemotion stitch the centre of the flower.
... Did You Know? ...
Machine Stitch Plates
I’ve mentioned now in nearly all of these posts, about changing out my machine’s Stitch Plates, depending on which foot I am using. So I thought I’d add a little more to your knowledge base, and talk about how to recognise which plate is which. It’s quite easy by just looking at the ‘needle opening’ once you understand what they are for, but each of the plates are actually colour coded as well.
If you are following along with your own Bernina Big Book of Feet, go to page 234 (of the 2020 Edition of the book), and there is a full description of each of the plates there. In short, the codes are as follows:
Needle Punch Plate = Yellow (Two versions available – CB Hook system, 5.5mm machines with a large round hole, and Rotary Hook System, 9mm machines with three small holes)
Combo Stitch Plate = Orange and Yellow (Combination of Straight Stitch Plate, CutWork Plate and Needle Punch Plate – CB Needle Punch Set)
Dual Needle Plate = Purple (Rotary Hook System with 9mm Machines for use with non-coded feet i.e. 5.5mm max stitch width)
The 9mm Stitch Plate is not Colour Coded.
… Some older plates may not be colour coded as well …
When using Bernina models featuring a security function, it is necessary to choose the correct plate on the screen every time it is changed. The machine is then aware of the limitations and this prevents the needle from hitting the plate.
... Spring Loaded Mending Marvel ...
Darning Foot #9
Originally designed for freehand mending, Darning Foot #9 can also be used for a wide variety of other freemotion techniques. However in this post, I will cover just what the Big Book of Feet has stitched out with this foot. This was the only foot I used for any freestyle stitching for many years, until Bernina brought out specialised, optional feet for other techniques such as Freemotion Couching, Echo and Rulerwork Quilting to name just a few.
Darning Foot #9 comes as a single version only. It fits on machines right across the Bernina range. The important feature of this foot is that it actually does not sit on the feed dog at any time, therefore allowing you to move the fabric freely underneath, however to ensure that there is no ‘flagging’ or lifting of the fabric, the vertical spring action of the foot holds the fabric down as the needle rises out of the foot.
The needle area allows a maximum stitch width of 5.5mm, so when using this foot with a zigzag stitch, I change out to a 5.5mm Stitch plate and select that plate in the Security Setting area. If I am using a straight stitch only, I change out to a Straight Stitch plate and select that plate in the Security Setting area. (as per the photo above)
Foot #9 hadjust 1technique to stitch out, but one I use frequently here in The Sewing Gypsy Studio.
... This Week’s Foot Highlights or Challenges ...
‘Darning’ – such an easy ‘Challenge’ task this week with only the one sample – and I used Straight Stitch #1, with Feed Dog lowered as per the instructions.
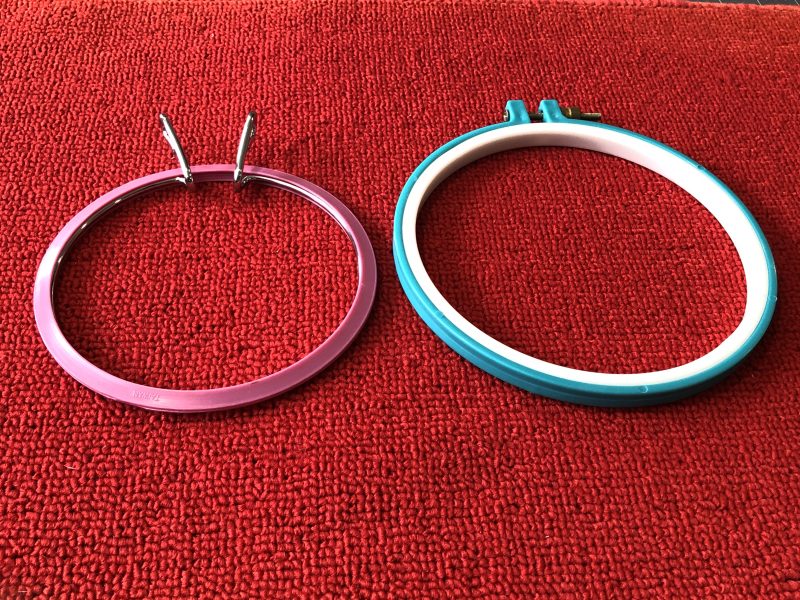
I used the BerninaHosieryDarning Ring that I have had for many years, (I’m not sure if they are still available?) and stitched out the sample on the Bernina 435. The attachment no longer comes with any new machines, and will fit the 3 and 4 Series models only. It has an ‘arm’ that secures it to the flat bed of the machine, and as the 5, 7 and 8 Series Machines have a larger flat bed of course, the hole in that is too far away to enable stitching in the little hoop.
Well, that’s the benefit of having several machines to choose from here in The Studio. You could also use a ‘third party’ hoop, in other words a little spring loaded one, or a screw adjustable wooden one. (They do come smaller than these ones in the photo) It won’t be as easy to use as it’s not connected to the machine … maybe Bernina might need to make us all a new one for our ‘big throat’ machines?
Remember to stabilise your work if there is a larger hole to be covered, or add a piece of fabric to the underneath to reinforce the mend further.
... A Little Something Extra ...
More Freemotion Ideas
As I mentioned in the first part of this Blog Post, there are many other techniques that you could do whilst using Darning Foot #9, or the other freemotion feet in the Bernina range. Stitching up an Art Journal will give you plenty opportunities to skill up on these techniques, or just read up on some of the other Freemotion Feet available.
Here’s a link to another eBook for your collection …