It’s Monday evening 11:30pm as I write this, it has just started to rain again, and I don’t have a lot of sewing news to put in this week’s blog post as I’ve been busy getting sorted for a few days of fun ahead as my dear friend Kathryn Bowman is visiting from Townsville. Kathryn owns Just Country Crafts in Townsville (huge rain and flooding up there last week!) and is flying down tomorrow for us to spend a couple of days together before we head to some Bernina Training on Thursday. Next week hopefully I’ll have some photos to share of our little ‘outings’ I have planned.
I’ve been madly getting some dressmaking completed, blog samples stitched, and somehow found myself having a ‘big play on my B990’ using Freemotion Couching Foot #43. Here’s my machine set up whilst I’m here in the Studio typing this up. If only I could just do ONE thing at a time!!
I have also been doing some preparation today for another ‘batch’ of scrub tops I need to sew for my daughter Gemma, who works in the NICU at the Gold Coast University Hospital. Prewashing fabrics, drying, pressing and folding up ready for cutting out is always my first step. These are next week’s fabrics all prepared ready to go – Winnie the Pooh, Very Hungry Caterpiller and Fairy Bread!
... Did You Know? ...
Preparation Matters
When I buy new fabrics for garment making, and longer lengths for patchwork (not pre-cuts), I always prewash them before cutting out. This is my process – overlock the raw ends (if over 2 metres I generally overlock them together so they don’t twist up as much in the wash), wash on a short cycle with detergent and a colour catcher, dry in the dryer (sometimes I hang them out on the clothesline), and then press carefully whilst they are still slightly damp.
Pressing with the warp grain of the fabric (long length) is essential so that you do not stretch the fabric out of shape. I have a Laurastar Ironing System, and it has saved me so much time since I bought it late last year.
My method of pressing involves a ‘steam pass’ first, and then a ‘dry pass’ on the way back so that the fabric is not left damp when folded it away. (Actually, this is as recommended by Laurastar.)
The Laurastar makes it easy as I engage the steam with my thumb on the handle button for one way – then lift off my thumb and dry iron it on the way back. Now if you don’t have a system like this – here’s how I used to do it with my Oliso Pro Iron. You can adapt it for whatever brand of iron you have, some will be easier to switch over from steam to dry, than others
Layout your length of fabric with the selvedges on the left and right hand sides of the ironing board. Start pressing with the steam engaged moving up and across from right to left – flick with your index over to the dry setting for the pass on the way back. Thumb then flicks it back to steam setting for the next pass. Rearrange your length of fabric, and continue.
Here are the progress photos – before pressing – after the steam pass – and then lastly, finished after the dry pass.
To store, I fold the fabric in four lengthwise, and then using a piece of corflute, fold them ready to put away. Does all this preparation make a difference? Well I measured four pieces of fabric this week before washing, and again after drying and pressing.
So … as you can see no ‘% shrinkage formula’ works for all of them – so I just prewash everything and sew it up from there!
... Wheel of Wonder ...
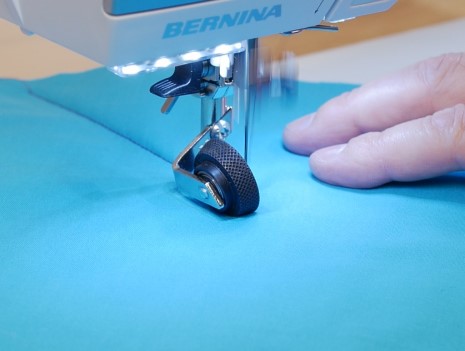
Leather Roller Foot #55
Unlike all of the other Bernina presser in my ‘stash’, Leather Roller Foot #55 has no toes, sole, groove, openings or markings. It has instead an offset wheel attached to the left hand side of the shank, and only the very edge of the roller connects with the feed dog underneath when stitching, allowing great manoeuvrability, and no dragging or disfiguring of the surface, especially when stitching leather. When using this foot, the needle position needs to be as close to the roller as possible to ensure the best stitch, and beware, that needle has no ‘protection’ around it – be careful when your fingers are up close to the foot!
Whenever I use this foot, I am amazed at the result, and ease of use. In the last little while, I’ve reattached inside hat bands …
… added snap tape to toddler overalls …
… repaired press stud ends on a leather motorcycle jacket … and first round of stichng was straight, and then I used a narrow zigzag for added strength!
Then, just this week I mended some zip-on sheets of Ambah’s where the chunky zip tape had frayed and pulled away. I added some self made bias binding to restore the width of the zipper. This one job involved Feet #1D, #12C and #55 !
Options available for the foot – It’s available in one version only, suitable for all models.
Foot #55 had5 differenttechniques to stitch out.
... This Week’s Foot Highlights or Challenges ...
‘Sewing Leather’ – I had some leftover pieces of beautiful leather and seamed these together without any issue at all. Rolled the seam open with a Seam Roller. When I went to topstitch I found that I needed to reduce the Presser Foot Pressure to 25 to get a nice even consistent stitch. I used needle position -5.
‘Echo and Outline Quilting’ – a simple sample to stitch – used stitch length 4.0 with needle position -5 for the first row. When using the wheel as a guide for future rows, needle position on +5 meant the fabric ‘flagged’ a little, as it was not supported by anything on the right hand side of the needle.
‘Faux Free-Motion’ – I have used this technique often over many years, on small quilted projects, and I find it quite fun to stitch. Lowering the Presser Foot Pressure to 20 or even less allows smooth movement of the fabric under the foot, and lovely curves and circles.
‘Jumbo Trim’ – this was a very large piping insert trim I had and it sewed in quite well. Be careful with your fingers near the needle as there is no guard there at all! Second line of stitching to enclose the trim in a seam – Sewed this slowly as it would have been easy to accidently catch in the edge of the fabric and make a tuck in the seam – may have managed to do that!
‘Jumbo Piping’ – I set up machine as recommended, but did not get a very straight seam as it wanted to slip away from the piping. I did a second row to compare using Zipper Foot #4D (held onto the fabric way better and was a lot straighter!), although was not quite as close as the seam with Foot #55.
So, summing it all up, be careful with your fingers near the needle, and adjust the Presser Foot Pressure if necessary.
... A Little Something Extra ...
Again this week, I’ll share a couple of blog posts from We All Sew Blog that focus on this week’s featured foot. (Photos taken from the blog posts)
is the Overlocker Gathering Foot which makes attaching a gathered layer to a flat layer so very easy, or just gathering a single layer whilst neatening the edges at the same time – 20% off for the month of February – contact your preferred Bernina Dealer for this fabulous offer.
*Australia and New Zealand Promotion Only – ends 1st March 2025