I’m blessed to have my little ‘happy place’ – The Sewing Gypsy Studio – to spend time in, and it is delightful to hear the ‘rain on the tin roof’ as I sew/write – I just have to remember to bring an umbrella up with me when I leave the house … I did forget tonight …
Stormy skies, rain, and a deliverance of ‘hail’ earlier this week meant a lot of stopping and starting up here in The Studio, as well as the usual level of procrastination! However, that weather is nothing really out of the ordinary for this time of the year, here in South East Queensland.
Ben’s been busy finishing off part of the outdoor area (in the photos above), and yes it looks like a little putting green … because that what it is! Bocce, Croquet and a few other outdoor games are possibilities too. Lots of ‘Family Christmas Night’ gathering fun ahead.
So, I’ve started on the Christmas sewing … still not finished the ‘set’ I was embroidering, and I’ll wait until after gifting them all before I reveal exactly what I’ve got planned. Meantime … here’s a couple more sneaky in-progress shots …
I have always liked to sew late into the night, however as my work/life balance has changed, most of my sewing is now done in daylight hours. A couple of nights a week, I might pop back up into The Studio after dinner, but it’s usually only to finish off posting this blog. Tonight is one of those nights, so here goes for this week’s little chat …
... The Studio Update ...
Life’s been busy here at home, with Sally doing more sanding and washing down of the Studio outside, ready for painting very soon. I did help out between sewing tasks – I hand sanded the edges, and moved the ladders! A new spray painting ‘tool’ arrived this week in a big box – I’m getting excited for that ‘unboxing’!
Another little task got ‘ticked off’ my list this week and that was shortening the two blinds in The Studio. Only took 3 years to do! They are so much easier to open, close and raise now that I’ve removed lots of slats from the widest one, and only a few needed removing from the smaller one. I’ve now got TWO more items to add to my skillset, (not that I’m looking for a job, mind you) … as they were made differently – so off to Google I went for a tutorial!
... Did You Know? ...
Bernina Machine Simulators
What do you think about the ability to try a sewing machine virtually before buying … or virtually playing on one before your new one gets delivered?
The internet offers plenty of resources for sewing enthusiasts, from machine manuals and free patterns to expert advice and video tutorials.
This week, I want to talk about a resource unique to Bernina … downloadable simulators for both sewing machines, and some overlockers. For those who have Bernina Q Series longarm machines – Q16, Q20 and Q24 – there are Simulators available to download as well! In Bernina’s current range, only the B335 (a different operating system) and the L850 (no screen), do not have simulators. Some retired models still have simulators available to download ** See Footnote.
Here’s my home screen on my laptop … yes, I’ve got quite the collection! All the little red machines on the right hand side are different machine model simulators – some are for current sewing machines/overlockers, others are for retired models – and there’s even one for the Bernette B79! The oldest simulator there is the one I used for my beloved B830LE, ‘Big Red’ – from way back in 2012!
So simply put, Bernina Simulators are downloadable programs for your Windows based computer/tablet that allows you learn how to navigate your machine’s display, without being in front of an actual machine. . I have been using these for many years throughout Mastery Classes I have taught, in presentations within the stores I have worked in, and for assisting customers ‘remotely’ by phone. I don’t need a machine in front of me, I use the Simulators. Way before the days of Zoom meetings, these were my ‘magical resource’ to work with, as I discussed a customer’s machine query on the phone!
Machine Simulators, in my humble opinion, are so underutilized, but it is the case of ‘if you don’t know, you don’t know’! So, I’m going to encourage you this week to download, and explore the Simulator for your own machine. (Note: remember, for Windows Based devices only)
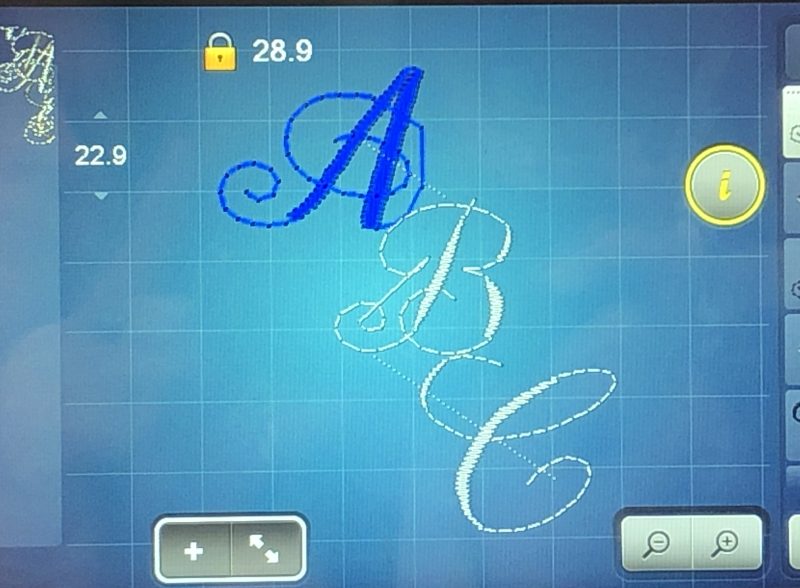
I have been playing LOTS with the B990 Simulator! In just a few minutes, you can experiment with stitch patterns on the simulator—adjusting stitch length, width, and controlling the foot pedal or start/stop button. The simulator mirrors the display of the actual machine, letting you see the needle position and watch stitches form in real-time.
You can switch between sewing and embroidery modes, explore presser feet options, and even lower the feed dogs. It’s a great alternative to instruction manuals, offering built-in tutorials and animated guides.
To access a machine’s simulator (and in this example and photos I will select the B990), first go to the Bernina Australia Webpage – Select the Machine tab across the top of the page – Select the B990
A new page will open and just under the pricing banner, there are several tabs. Select the Support tab.
This will take you to another page – Select the Support link – and below you will find the link to select the Simulator download. Download the Simulator from here, unzip the file and install the application. The latest Bernina Newsletter had a great article on the Simulators as well. Haven’t signed up yet for the Newsletter? I’ll add a link at end of the Blog …
This foot is only included and used with machines that have multi-directional stitching capabilities, that is the ability to move the fabric 360° with sideways, forward and backward motions. Current models are the B790PRO and B990. Several retired models with multi-directional capabilities use it as well.
The underside of the foot is bevelled around the edges of the needle opening, which allows stitches to pass from side to side as well as forwards and backwards. This is the only foot that delivers optimal results when sewing in multiple directions and should be used exclusively for these types of sewing tasks. The pre-programmed sideways motion stitches are marked with a compass icon in the lower right corner of the on-screen menu folders.
Options available for the foot – It is available in one version only.
Foot #40C had 6differentsamples to stitch out, including one my B790PRO was not suitable for, the Distortion Function. More about this one further on.
... This Week’s Foot Highlights or Challenges ...
These stitches were chosen from Sideways Motion Menus 201, 501, 801, 1001, 1201 and 1601 on my Bernina B790PRO (left hand photo). On the new B990 (right hand photo) there are three more folders of multi-directional stitches in Menus 1901, 2501 and 2701 – I can’t wait to actually stitch some of those out instead of just playing on the simulator!
‘Directional Large Motifs’ – ideally draw up a grid, or at least parallel lines to guide your stitches as they are sewn out. I like to draw three parallel lines and sew in between for the large motifs. Do not hold the fabric back, just keep ‘light finger tips’ on the fabric as it move through. Stitches trialled – #840 and #1210
‘Directional Single Stitches’ – after drawing up a grid, I chose stitch #752 (135°) and completed four rows – although the fabric was square under the needle, it stitched out on the noted angle – In the Big Book of Feet the notes say this is Stitch #644, however it was Stitch #752 on my machine.
‘Directional Stitch Combinations’ – again I drew up a grid for this sample, and chose stitch #656 at a 135° angle, and again stitch #656 but this time at a 225° angle.
‘Large Monograms’ – I found the stitches slow to move on the screen for placement where I wanted them, so used the Multi function knobs instead. Marginally faster, however, needed some patience with this sample at screen level, and when stitching out. I found my stitched out samples did not correspond with the letter positioning on the screen (they actually nestled very closely on the screen). Maybe I need to play a little more with this …
‘Distortion Function’ – not available on any of my current machines, however I have played with this when I owned an 8 Series machine. Looking forward to stitching out on the B990 when it arrives. Just a note here – the Bernina Mastering Workbook states this function is available on the B790PRO – it isn’t!
‘Stitch Designer Stitches’ – I’ve always loved playing with this function, and it does take up some time! I loved creating stitch patterns wider than the 9mm usual width, (see my stylized Flying Geese and Clamshell stitches I created) – but do remember to deselect the 9mm lock on the screen before you start!
I played around with ‘writing my name’ in the Bernina Software V8.2 that I’m currently using, then saved it onto a USB and stitched it out, capturing it in a little video as it sewed. If you’d like to play around with that, there is great instructions in the ‘Stitch Transfer’ eBook – more about that later as well.
... A Little Something Extra ...
Multi-Directional Stitching and Stitch Designer
This week, I’ve had time to sit and ‘rediscover’ some fabulous things on my machines, as it’s been quite some time since I’ve played with Foot #40C, and the feature of Sideways or Multi-directional stitching. As you may have deduced by now, I do love my Bernina feet, attachments and decorative stitches, and all the possibilities they bring to make something quite ‘bespoke’.
Multi directional stitching, as I’ve mentioned before, is only available on these current models – B790PRO and the new B990. However, it was a feature included on recently retired models B790PLUS and the B880PLUS. Several much earlier models had the capacity to do ‘sideways stitches’ as well.
For those with this advanced capability in their machines, I thought I’d add an eBook link with loads of hints and tips for using the Stitch Designer … and for those who don’t, you could download the simulator for either the B790PRO or the new B990 and read /play along as it may be something you may be considering in the purchase of your next Bernina.
Here is a link to the ‘Just DESIGN it Stitch Designer eBook’ …
The second eBook I want to mention is the ‘Stitch Transfer ebook’, and even though it states it is for the Bernina 880, there’s a lot of information in there re Machine, Software and Simulator Interplay … lots of fun!
Here is a link to the ‘Just DESIGN it Stitch Transfer eBook’ …
is Lapseam Foot# 71– 20% off – contact your preferred Bernina Dealer for this fabulous offer … and it’s not just for seaming! I’ll be covering this foot later in the Blog.
*Australia and New Zealand Promotion Only – ends … 30th November, 2024 …
‘Foot’note: Some retired models still have simulators available. For those I simply Google search the model e.g. ‘Bernina B820 Simulator’ … and you will find a result referencing ‘Support’ there for you to go and download the application.