If you recall some of the photos I’ve shared of signs up in The Studio, you’ll know I love a good quote! Here’s a few that surround me …
I’m constantly on the lookout for inspiration in my life, and came across these wise words a few weeks ago, so out came my trusty notebook and pencil, to jot them down.
“Balance is not something you find, it’s something you create” … Jana Kingsford
I wish I had a sign that said that, as it really resonated with me … as well as with my sewing!! It’s a balancing act at times, knowing just which project to focus on every time I come up into The Studio. There are some I need to start, some I need to finish … and lots I want to do!
A regular ‘need to start’ project is ‘Mending Monday’, happening weekly of course, and a few weeks ago now, amongst the tasks was shortening some sleeves on a nightie for Ambah. It was a stretch knit fabric, and of course the stretch ran around the sleeve bottoms, which creates a challenge to get the stitch looking good. I could have coverstitch hemmed it on my L890, but chose instead to use a sewing machine, just a quick job I was thinking. Well, my sample stitch-out was less than perfect shall we say … the stitch was all stretched out, unbalanced and messy!
Working through solving the issue, gave me the idea to share this feature on our Bernina machines that turned it back into a nice balanced stitch, yes … another topic to chat to you about. BALANCE is the subject this week, and how we go about ‘creating it’ on our beautiful Bernina machines, is all in the ‘Did You Know’ section.
... Did You Know? ...
Balance Function
The BALANCE function is for fine tuning the appearance of your stitch, and can be used anytime the stitch out result is not what you expected, which can be caused by unusual/difficult fabrics, or the way the thread is sewing on a particular fabric – in my case the stretchy knit fabric of Ambah’s nightie sleeves I needed to shorten, and hem.
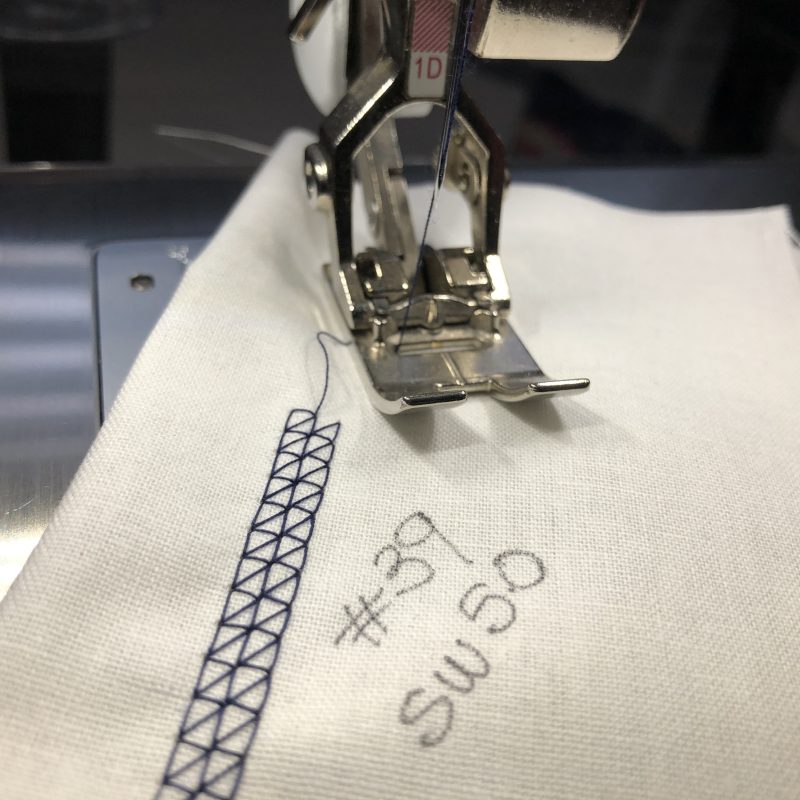
After choosing the stitch I wanted, Stitch #39 – aptly named ‘Coverstitch Effect’, I sewed out a sample on some woven cotton – Stitch Width 5.0
Then I did a test stitch-out on the knit fabric … yes, like I said earlier … stretched out, unbalanced and messy! (Close up pic below) It is SO important to test sew on the actual fabric you will be working on … always!!
‘Creating’ Balance
To adjust the stitch, select the ‘Information’ icon, then select ‘Balance’ …
Next, use the multi function knobs (or the plus or minus) to make the stitch on the right side of the screen, look like the stitch you’ve just sewn … and continue the test stitching to see the altered result …
The machine will compensate, or balance the stitch, so that it sews out perfectly on your fabric with your threads. The screen will then have the stitch with the correct balanced view shown. If it still doesn’t look balanced on your fabric, adjust the balance settings again.
Using the lower Multi Function Knob and changing the setting to -6 was just the right adjustment I needed, so I then hemmed up both sleeves, and later on trimmed off the excess fabric from behind.
After I had finished both sleeves, and before I cleared the stitch settings back to default, I resewed the stitch onto the woven cotton sample I had … you will see in the photo below how it is now actually distorted on that type of fabric, and that is because the stitch was balanced for the knit fabric!! The stitch setting alterations remain until the yellow framed icon in the balance display is touched or the machine is switched off – that’s the ‘Bernina Temporary Altered Memory’ – *See Footnote
The Balance function is available on ALL models of my machines … on-screen for the B435, B590, B750 and the B790PRO … and via a manual adjustment on the right hand side of the machine, for my little Simply Red 215.
... Another Clear Option ...
Clear Embroidery Foot #39/#39C
This week’s foot, has the same wedge-shaped indentation in the sole as Embroidery Foot #6 and Open Toe Embroidery Foot #20, which is ideal for satin stitching. It looks very much like Clear Foot #34 (a couple of posts back now), however that foot had indentations under the foot which were not deep enough for satin stitches, or dense designs. Clear Embroidery Foot #39/#39C has a bridge between the toes, which provides extra stabilisation for finer fabrics to prevent tunnelling when satin stitching. This adds up to extra stabilisation and a clear view for stitching. Vertical and horizontal red markings assist in alignment of your stitches.
Like Foot #6, it has a hole in the front of the foot, where narrow cord can be guided perfectly down the centre, for raised edges and corded appliqué. So, it is like a clear, composite version of Foot #6 and Foot #20, with added markings like Foot #34.
Options available for the foot – It’s available in a regular version suitable for models that have a maximum stitch width of 5.5mm and a ‘C’ version designed for those with a maximum stitch wide of 9mm.
Foot #39/#39C had2 differenttechniques to stitch out, which as a lover of decorative stitches, I really enjoyed. I have used both these techniques extensively in my earlier Bernina years, prior to machine embroidery modules and 9mm stitch width options.
... This Week’s Foot Highlights or Challenges ...
‘Snowflake Stitching’ – Two different ‘paths’ for the samples
Path A starts in the centre and stitches out. Cut thread and start from the centre for the next ‘spoke’. My combination was #1 (x3), #123, #401, #449
The Laser Function was great for the start points on each spoke.
Path B starts in the centre and stitches out – pivot and return on the same path for a heavier look to the stitches. Combination MUST be symmetrical – found it a bit heavy in the centre with the stitch that I had selected. My combination was #711, #1 (x3), #442, #1 (x3), #711
Notes for both techniques: Program Combination/Pattern Repeat x 1, Needle stop down, Securing Function, use Stop/Start button and stitch slowly.
Whilst in Combi Mode you can have an alternate view of your stitching area by touching on the Overview Combi Mode Icon, and a display with further functions appears. A little more advanced fun to explore!
... A Little Something Extra ...
Another addition to your Library of eBooks
This week’s suggestion for you is the ‘Stitch Manipulations’ eBook – which details the exercise of ‘Pivotal Stitches’ very well. It also expands more on Stitch Recipes, something I covered a few posts back.
Here is a link to the ‘Just SEW it Stitch Manipulations eBook’ …
as I write up this post, the new Foot of the Month is still to be announced on the Website, however I KNOW WHAT IT IS … and it’s a very versatile foot whether you are a garment sewist, or a patchworker! More details next week, or if you can’t wait until next Friday, pop onto the Bernina Australia (or Bernina New Zealand) website and look out for the announcement under the PROMOTIONS tab.
Remember ‘Bernina Temporary Altered Memory’? I posted about that along with Applique Foot #23, back in August. Anytime you want to look back at a particular topic, there is a ‘Search Function’ at the top of the webpage … simply type in the subject, and you’ll be guided to posts that include that topic.