Yesterday, I got to experience the recently released Bernina B990 with a little hands-on sample, which perfectly highlighted the new features and functions of this Top of the Line machine.
As this section is a really short chat this week, due to being a bit time-poor, (insert having lots of fun sewing, and time spent catching up with friends at the Craft and Quilt Fair), I’ll post more over the next few weeks … just be assured, it was truly ‘worth the wait’!! It WAS a ‘Big Day’ indeed!
... Did You Know? ...
Presser Foot Shanks
Bernina’s unique way of attaching sewing feet to the machine by wedging the cone design into place over the similarly shaped end of the presser foot bar, rather than with a screw, means they are simple to attach using one hand and no tools … okay, one handed after you’ve had a little bit of practice!
Most of the feet are metal and include the shank and sole in one piece. However, also available are three ‘shank only’ options.
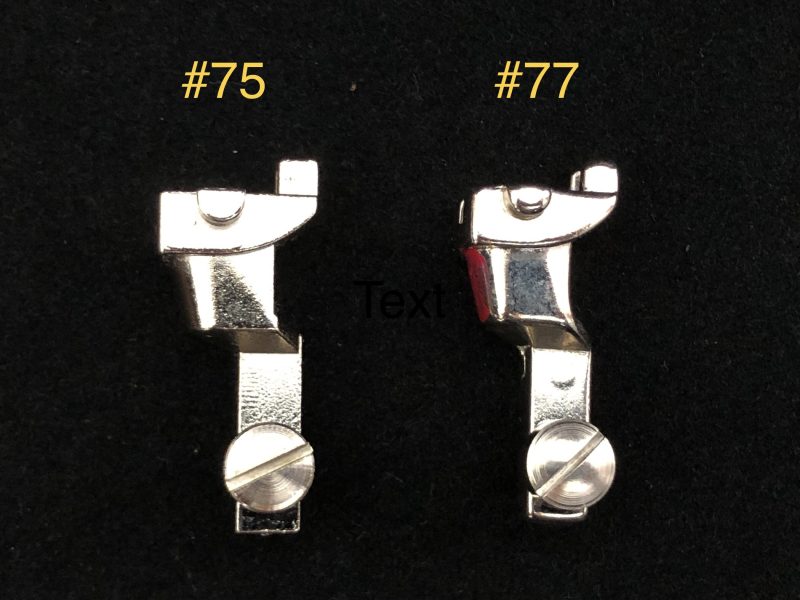
Adapter Standard #75 or ‘low shank’ adapter is used with, and included with Ruffler #86. It can also be used to attach some generic low shank presser feet to Bernina sewing machines … and yes I have tried and used some quite successfully over the years, having worked on ‘Sewing Club Day Projects’ within sewing machine stores that were multi-branded. I used to refer to them as my ‘Frankie’ Feet (referencing Frankenstein here!). The Shank Adapter #75 below has an ’off-brand’ cording foot attached with a screw, and the one on the right shows an ‘off-brand’ clip-on foot holder screwed to it … different brand machines have different sized foot holders suitable for use with their particular feet.
Adapter Short #77, formally called the ‘ruffler adapter’ is used with some older versions of Ruffler #86. It is slightly shorter than Adapter Shank #75.
The Clip on Presser Feet Shank, or Snap-on Sole Shank #78 which is included with some entry-level Berninas, eg Models 325 and 335, along with a selection of snap-on soles, can also be used on your Bernina machine along with some Bernette Snap-on soles.
I have an Adapter Shank #78 with a Bernette Invisible Zipper Foot attached, that I use for an option to Invisible Zipper Foot #35, which is this week’s foot from the The Big Book of Feet Challenge. The channels underneath the Bernette snap-on invisible zipper foot are a slightly different shape than on the Bernina #35 foot, and I switch between these two feet, depending on what brand of invisible zipper I use. (I need to change my needle position to +5 when I use this Bernette Foot)
I did a sample of the same brand of zipper I had in my stash here in The Studio, (Birch Polyester Invisible Zip) using the two different feet … can you notice the difference?
Comparing these two samples, the zipper stitched with the Bernette foot ran a lot smoother through the grooves (as they are a little wider) and stitched closer to the teeth, making it truely an ‘invisible zipper’. It’s always good to have an optional foot to try!
... Is it a Seam, or a Zipper? ...
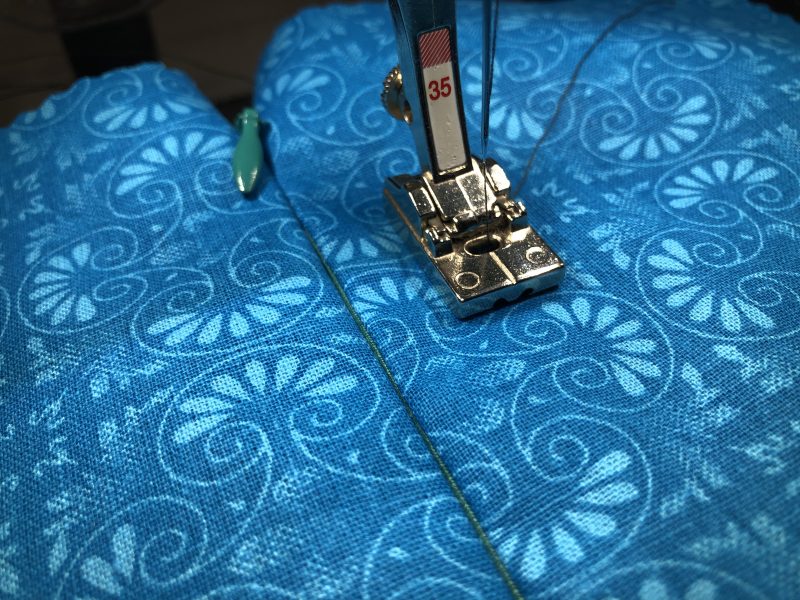
Invisible Zipper Foot #35
Love an invisible zipper in a garment – hard to tell sometimes whether it’s a seam … or there’s a zipper hiding away under there … that is, if you get it in right!
I’d been putting in invisible zippers for years, before Bernina released Foot #35 … and what a game changer it was! Here’s the setup I had before (sturdy, plastic and had multiple shank height parts to choose from) … and whilst it did work (in conjunction with my older Adapter #77), it was a bit sloppy/clunky … check out the price tag!!!
I searched high and low for an alternative and came across the little generic foot (bottom right of photo) which also attached to the adapter and was a little more secure.
Over the years I bought a second set of generic attachments thinking they may have been different (Birch Branded – though EXACTLY the same as the Unique brand) however, with more detailed instructions.
I believe it was sometime in the late 80’s/early 90’s (?) that Bernina’s Invisible Zipper Foot #35 became available, as I did have one for my Bernina 1230 machine.
The grooves in the sole of the foot are precisely placed so that Straight Stitch #1, with centre needle position, can be selected with no adjustment of the needle position necessary. The coils of the zipper run freely through the grooves as it is stitched to the fabric.
Options available for the foot – one version suitable for all models.
Foot #35 had one technique to stitch out, however I stitched two, (the second one with the Bernette Invisible Zipper Foot (attached to my Adapter Shank #78) as mentioned before in the ‘Did You Know’ Section.
... This Week’s Foot Highlights or Challenges ...
‘Invisible Zipper Insertion’ – as there was only one fairly obvious ‘technique’ this week, I thought I’d add my ‘Ten Tips’ I’ve gathered through reading lots of articles, and many ‘insertions’ of invisible zippers. But first, the photo of my stitchout …
Tip #1 – always buy a longer length invisible zipper than your pattern suggests – I usually add 5cm/2” to length
Tip #2 – overlock raw edges of zipper seam with a narrow three thread overlock.
Tip #3 – using a medium heat, press the length of the zipper if it has been folded/rolled – then lightly press the coils away from the tape edge.
Tip #4 – with right sides of fabric up, mark with chalk a letter ‘L’ on the left hand top opening of the article, and a letter ‘R’ on the right hand top opening. With right sides of zipper up, repeat the markings on the zipper tape tops.
Tip #5 – mark pattern pieces with ‘stitch to’ point for end of zipper.
Tip #6 – measure and mark your seam allowance on the wrong side of your article – or eyeball it – then press fusible interfacing strips to the seam allowance area where the zipper will be stitched, close to the overlocked edge. On hand I have long lengths of 5/8” wide strips of Vilene H200 fusible interfacing in black and white, prepped ready to go. These are cut from the length of the interfacing, so that there is very little stretch/movement in the strip.
Tip #7 – When attaching your foot to the machine, insert threaded needle into foot’s needle opening first, pull the thread through underneath, and then secure foot to the machine.
Tip #8 – now … all you have to remember is left, left, left … and right, right, right. Left hand edge of zipper, to left hand side of fabric piece, in left hand groove of the foot. Right hand edge of zipper, to right hand side of fabric piece, in right hand groove of the foot.
Tip #9 – stitch slowly, until you reach the ‘finishing mark’ and either reverse for a few stitches, or add programmed securing stitches at end.
Tip #10 – change now to Zipper Foot #4 and finish off the rest of the seam at base of zipper … and I trim off the excess zipper tape, and then stitch the tape edges back onto the seam allowances. Stops the zipper ends ‘flapping around’ inside your skirt etc, and makes closing the zipper a little smoother.
... A Little Something Extra ...
Bernina International Blog
There are lots of articles out there in either books or online, re techniques for sewing in Invisible Zippers. I’ve already shared a link to Bernia’s eBook – Zipper Applications, way back when we did Foot #4, however, will include it here again.
This week, take a look at a great detailed account of doing an invisible zipper on the ‘Bernina International Blog’ … I’ve tried this way too, however usually revert to my usual method described earlier.
is # 18 Button Sew On Foot – 20% off – contact your preferred Bernina Dealer for this fabulous offer. This is a fabulous foot that I’ve already covered in the Blog!
*Australia and New Zealand Promotion Only – ends … 31st October 2024 …