And just like that … It’s August! I don’t know about you, but I am constantly amazed at just how fast life goes the older you get! I can still remember as a young child thinking the days went so slow, and school holidays took FOREVER to arrive! Well, I’d decided a few months ago to take a little break away with some stitching friends, and as always had such a lot to pack into the time before I left, including a couple of full days teaching here in the Studio.
I’m writing this the night before I leave, and I still haven’t decided what to take to sew for 3 whole days! That will have to be a morning task now, as well as the clothes sorting and packing for me … winter means having to take a few more layers. This blog post will not write itself, and needs to be completed before I go!
I had a few little ‘niggly’ jobs hanging around on my mending list … new elastic in my ‘travelling shower cap’ … wanted it to sit flat as I added a bias binding casing first … don’t think I’ve EVER ironed a shower cap before!! … and then Kam Snaps added to my Bernina laptop and ruler bags (the magnetic clasp doesn’t stay closed).
Next task was basting guidelines for the bottom edge of some cotton drill tea towels I’d made, and two black and white cotton waffle ones I’d bought some time ago. I’ll be taking these along with me on Retreat, as I’m adding a crocheted trim, and this method works well for me to get the double crochet base stitches nice and even. I tried the ¼” tape on the side of one finger as I crocheted, but found it not as even. Here’s a photo of the basted edge, as well as some already finished, ready to post up to my dear Mum. (Those were from Kmart.)
Set machine up for Straight Stitch, length 4.0, Needle position -5 (far left) and Long Stitch Function engaged (actually increases the stitch length to 8!) … Foot #10D runs nicely along the folded edge.
I then backstitch by hand along the edge to form stitches to crochet into. This method is a lot easier than trying to poke a 3.00mm crochet hook through fabric!
I’m planning a small lap quilt with this edge, so the tea towels are just practice pieces.
... ‘Gathering’ at the Studio ...
It’s been a while since I’ve had any ‘visitors’ spend time with me in the Studio … sure there’s always ‘someone’ popping in to say hello … but this week I had two dear friends, Deb and Trish join me for a couple of days ‘playing’ with their fairly new Bernina L890 Overlock/Coverstitch Machines!
First task on the list was showing them how to update their machines. We chatted and stitched many samples, as they discovered new techniques, and played with all their extra feet. I shared any they did not have from my own stash.
It’s a truly amazing machine, and both girls have a new found confidence to explore it further, including some great embellishment techniques. I’m looking forward to teaching on the L890 at Bernina Academy in September, down in Sydney.
... Did You Know? ...
Bobbin Winder 'Cord'
Bring cut ends together, hold the length out straight, and up on an angle so it doesn’t wind ONTO the bobbin, and engage the bobbin winder lever. The threads will twist quickly … so keep an eye on them. Hold the cut ends so that they do not twist back on each other yet. Do not twist too tight.
Now halve the twisted length by making a loop over a finger, and bring the cut ends to the bobbin, keeping it taut, and allow it to twist back on itself, evenly. This takes a little practice. If it is uneven, simply extend it back out, and try again.
Cut threads from bobbin hole, and knot all together.
I like to use these cords for couching down and tassel loops. There are many other ways of using them. Perfect technique to try if you cannot find the right colour cords, just make your own from your thread/yarn stash!
... More than Just Braid ...
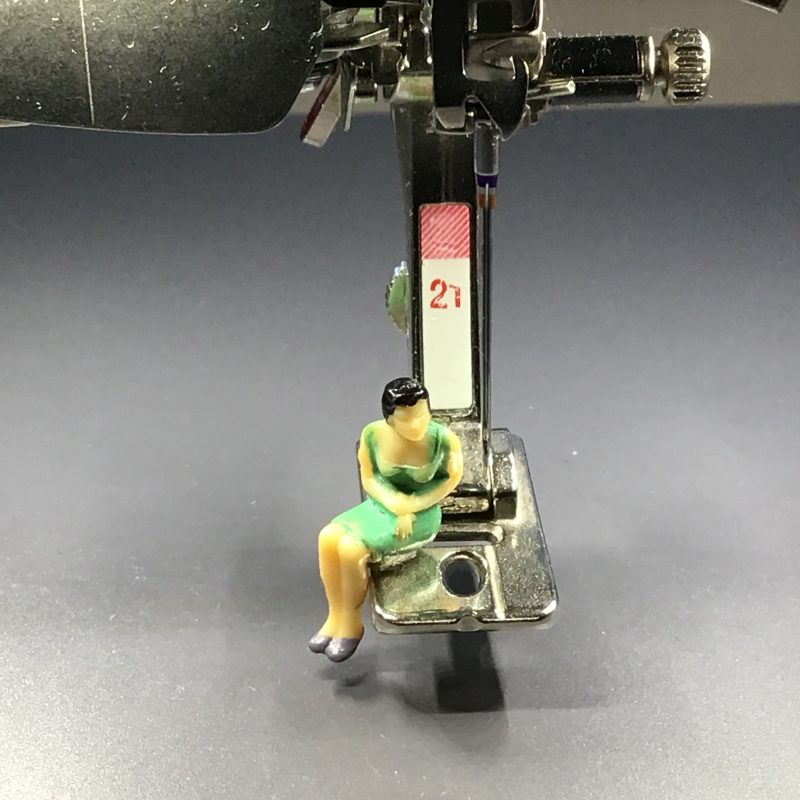
Braiding Foot #21
Braiding Foot #21 has a beveled hole at the front of the foot for cords and yarns up to 3 mm in diameter, so it is fairly easy to feed the cord or yarn through the hole. It has a ‘wall’ on the right hand side underneath, which helps keep the cord or yarn on course when couching, and the engraved line on top of the foot indicates the position on the ‘wall’. A shallow notch at the front edge indicates the centre of the foot.
I did mention previously that Bulky Overlock Foot #12C is a hybrid of Bulky Overlock Foot #12 and Braiding Foot #21. The hole in the top of the foot is the same as on Foot #21.
Braiding Foot #21 comes as a single version only.It fits on machines right across the Bernina range. When using this foot, I change out to a 5.5mm Stitch plate, and select that plate in the Security Setting area.
Foot #21 had4 differenttechniques to stitch out, as well as instructions for making a Custom Cord by zigzagging over yarn.
... This Week’s Foot Highlights or Challenges ...
‘Attaching Braid’ – foot glided easily over the metallic braid I’d chosen, and stitched it into place evenly. I stitched both edges in the same direction, using needle position -5 (far left) on the left hand side, and +5 (far right) on the right hand side.
‘Couching’– this is a particular favourite technique of mine to stitch, and I had a lot of ‘fun’ playing with different yarns, beads and cords. I used a Dental Floss Threader to get the yarns through the bevelled hole (it’s the blue loopy thing)
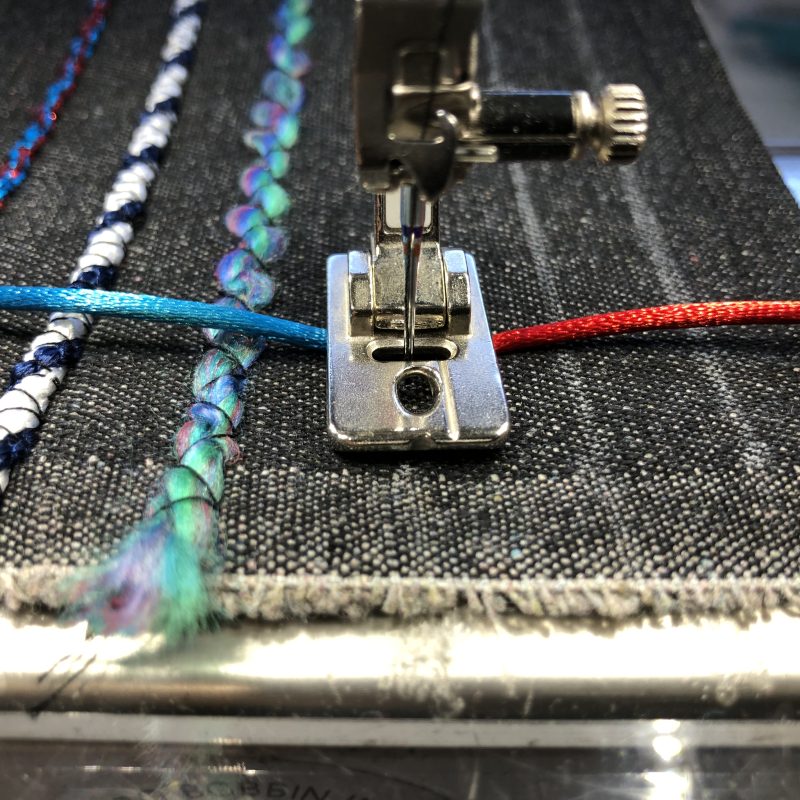
I stitched a row by ‘twisting’ some rattail cord around the needle to create a special trim. The wall underneath guided it along beautifully! Tie cords together before you start, and make two stitches between the coloured cords. (Stitch length 4) Lift presser foot with Knee Lifter, and bring the left hand cord (blue in the photo) around to the right in front of the needle and the red right hand cord around to the left in front of the needle – lower presser foot … make two stitches … repeat until you reach the end of the line.
‘Padded Satin Stitch’ – for this sample I used Bernina’s ‘built in’ satin stitch #1315 and changed the stitch width to 3.4, Stitch length was 0.3 (default setting) and stitched over rattail cord. It created a beautiful smooth stitched finish!
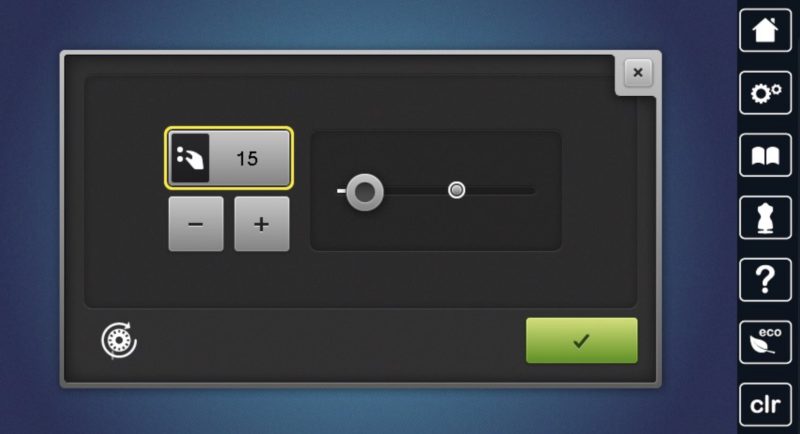
‘Elastic Casing’ – I used 4mm elastic, and Universal Stitch #15 as was suggested, and default settings. Elastic was held in firmly by the ‘stitch casing’, and was easy enough to pull up to create a good fit. I’ve used this at the wrist area in long sleeves, and found it very effective.
‘Custom Cord’ – as I have already mentioned, I made some ‘Bobbin Winder Cord’, which couched down lovely. The custom cord idea I’ve used for a fine strap on a little bag many years ago, and it was fun to make some cord this way again. I had four different coloured yarns, and it made quite a strong cord.
There are several different Bernina feet that are used for couching and each one of them have specific features that set them apart from the others. Have a play and find your favourite. There’s more to discover over the coming months.
... A Little Something Extra ...
There’s a lot of fun to be had playing with different feet, yarns and threads as you couch them to fabrics.
Here’s a link to another eBook for your collection …