When was the last time you sat down at your machine/s and just played? For me, as I’m no longer working fulltime, there’s hardly a week goes by that I’m not ‘indulging’ in this pastime, but for others it may have been quite a while, and I hope this blog has encouraged you to get those feet out and try a few new-to-you techniques perhaps.
Everyday sewing and mending usually does not stretch that creative streak, or scratch that ‘what if’ itch in us enough. I was sewing this week’s samples a while ago now (end of March actually) and as I am apt to do, scribbled a few notes in my sewing notebook as I went … and it got me thinking about all the notebooks or folders of ideas I have filled over the years since I started sewing. They are always a great source to return to, and I can see how my own ‘skill building’ journey has progressed. I often add drawings, or even small samples to have on hand when I next want to make the item, or use the idea or technique on something else. Almost 60 years of loving to sew, amounts to a lot of notes, in a lot of places!! I did start early, and my mother saved a hexagon English Paper pieced ‘flower’ I had made when I was 6!
One of the techniques for this week’s Foot #20 is Cutwork, and sometime ago now, I had found a folder in a box in the Studio, from around the mid 80’s to early 90’s, and in it there were designs for cutwork that I’d stitched, all those years ago. Would have been really handy to find it earlier! These days we just ‘Google’ it … and bingo! … there’s a design to stitch!
What a trip down memory lane that folder was … it even had my School Report Cards in it from Grade One … through to Grade 7! Perfect to show my Grandchildren, who this week received their report cards. It was quite entertaining for them to hear how their Nanni did at school all those years ago! Luckily I had good results haha.
... Did You Know? ...
Bernina Freehand System/Knee Lifter
The Bernina Free Hand System (FHS as it is often referred to) is such a fabulous feature that not only lifts the presser foot for you, but drops the feed dog at the same time, allowing a drag-free zone for placing your fabric under the presser foot to sew. Nothing gets caught, or catches as you slide it under … and your hands are free to guide your project.
There are several different knee lifters, so I have each of mine with labels on them. My 4, 5 and 7 Series sewing machines all use the ‘Long Length’ size, whilst the B215 uses the ‘Standard Length’. I also have a ‘Short Length’ knee lifter, which I bought when I used to have a Horn Sewing Cabinet (and a Bernina 440QE) – the machine lowered down on a platform for a larger flat area to sew, meaning the standard one was too long. This will now only fit the B215 here in the Studio, although I no longer have the cabinet. The knee lifter for both the L890 and L460 overlockers here in the Studio, use the same knee lifter that is supplied with the 8 Series sewing machines. Now you’ll understand why all the lifters are labelled!!
A retrofit kit is available for some models of Bernina machines that did not initially come with a knee lifter. I had one retrofitted to my little ‘Simply Red 215’, as well as purchasing a foot control with kick back function and a clear sew table for it. There’s just some optional accessories that are a must have for every machine!
My first ever Bernina 1230 had a knee lifter, and I quickly got so used to it, that now when I sew on someone else’s machine without one, my knee automatically goes over to the right to use one. It feels so weird when there’s nothing there!
Thankfully, all my machines and overlockers DO have knee lifters! Do you use yours?
... Our First Open Toe Foot! ...
Open Embroidery Foot #20/#20C/#20D
The area between the toes of this foot gives you a good view of where you’re sewing. This is really handy when sewing around appliqué shapes, especially at corners and curves. The large open area under the foot allows the decorative stitches to pass under without bunching up, and helps to guide ribbons, elastics or flat tapes.
It is not recommended to use this foot for straight stitching because the indentation under the foot, which was helpful for sewing around curves and corners, can lead to too much movement of the stitching area. This can result in irregular stitches.
Embroidery Foot #6 which we looked at many weeks ago now, has the same wedge-shaped indentation on the sole, however its front ‘bar’ blocks the view of the stitching area. Thankfully all those years ago, a new improved foot was developed! Ohh I still love #6 with that handy little hole at the front!!
Options available for the foot – It’s available in a regular version suitable for all models with 5.5mm maximum stitch width and above, a ‘C’ version for models with a 9mm maximum stitch width, and a ‘D’ version designed for models equipped with the BerninaDual Feed function.
Foot #20/#20C/#20D had8 differenttechniques to stitch out, including six different appliqué techniques.
... This Week’s Foot Highlights or Challenges ...
‘Satin Stitching’ – I used the recommended Zigzag Stitch #2 for the sample, SW 3.0, SL 0.35 and NP +5 (far right) as I like to line up the raw edge that I am appliquéing with the inside edge of the right hand toe. Then it’s just a matter of guiding the edge of the foot along the raw edge – no watching the needle! Do try out Stitch #1315 Bernina’s built in Appliqué Stitch – it’s usually my go-to for satin stitch appliqué.
‘Cutwork’ – I drew the design onto my white fabric, then placed a washaway stabiliser behind it. I used Vilene 541 which is a real favourite of mine. First row of stitching was Straight Stitch #1, L 2.5 and I had the needle finishing in the down position. This time I left the Needle Position at centre. The clear view of the stitching area made it so easy to follow the drawn lines of my design, and the laser was perfect for placement to start and end at the corners. The knee lifter got a real workout here. I used my smallest Duckbill scissors to trim away just the excess fabric which I had marked with an ‘x’, (and I forgot to take a photo of that, so I trimmed away one section of the washaway stabilizer after satin stitching, to get a photo with my sweet little duckbill scissors) then stitched over the straight stitching with the same Zigzag Stitch #2 settings SL 0.35 and SW 3.0 as before. Last step was to then wash away thestabiliser, leaving a nice Cutwork sample.
‘Blind Appliqué’ – I drew the circle design onto a piece of lightweight fusible interfacing, placed it fusible side to right side of the appliqué fabric, changed my Presser Foot Pressure to 20 which allows easier movement of the fabric under the foot, and stitched around the circle with a straight stitch L 2.5 – next, slash the interfacing, turn through and finger press the edges. I then press and fuse it to the background, place a piece of lightweight tearaway stabiliser underneath and continue on top to stitch with Blind Stitch #9 around the shape with a matching coloured thread. Carefully, tear away the stabilizer from the back, and leaving a margin of about ¼” cut out the backing fabric, and interfacing from the rear of your work to reduce the bulk. This is a favourite technique of mine, particularly as it gives a nice soft edge (almost like hand sewn needle-turn) and I have used it quite frequently over the years. I prefer this to the zigzag stitch around the shape, and using ‘invisible’ thread as mentioned in the Big Book of Feet.
‘Blanket Stitch Appliqué’ – Fusible appliqués like this one are great for a quick, easy finish using Vliesofix or a similar product. I used Blanket Stitch #1309 SL 2. SW 2.5 and NP +5 (far right) as I like to line up the raw edge that I am appliquéing with the inside edge of the right hand toe, as I said before. I placed light weight tearaway stabilizer at the back of my sample prior to stitching.
‘Decorative Stitch Appliqué’ – I used Vliesofix to fuse the appliqués to the background and then chose three different stitches to finish off the edges. Again as they were circles, I set my Presser Foot Pressure to 20.
Stitch #1332 (Feather Stitch – Pink Spot Fabric) – easy stitch to place and manoeuvre around the shape – SW 5.2 SL 3.2 – such a versatile stitch!
Stitch #1314 (Dual Double Blanket Stitch – Aqua Spot Fabric) – easy stitch to place and manoeuvre around the shape – SW 4.1 SL 2.8 … a real favourite stitch of mine!
Stitch #1329 (Decorative Quilt Stitch – Lime Green Fabric) – not a good choice of stitch for a small circle – difficult stitch to place and manoeuvre around the small shape – SW 6.0 SL 2.5 … I do love this stitch on a straight line though!
‘Shadow Appliqué’ – Again a favourite technique of mine, and I love the soft look that is created. For the purpose of photographing the sample, I stitched the outline with a darker thread and added some defining lines to the centre. It does look much nicer to stitch around the appliqué shape with the colour of the top fabric, I feel. I used Blanket Stitch #1309 SW 2.5 SL 2.5 NP +5 (far right) and then Triple Straight Stitch #6 for the inner stitching.
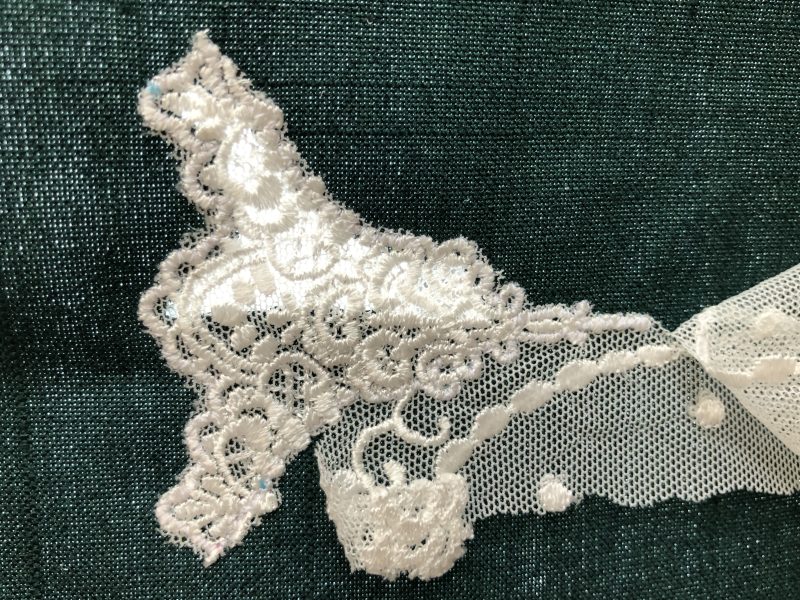
‘Appliquéd Lace’ – I love this technique, and I enjoyed sorting through my lace stash to find ‘just the right piece’ for the sample, some beautiful embroidered net lace. Zigzag Stitch #2, SW 1.5 SL 0.75 with Needle finishing down … and the Knee Lifter is the ‘hero’ when stitching edges like this!! I cut away the backing fabric and held it up to the light – sooo pretty!
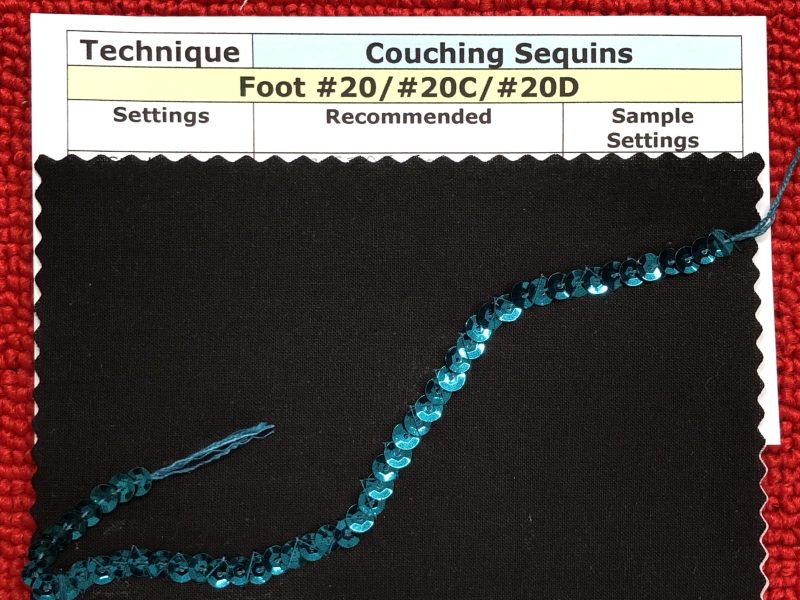
‘Couching Sequins’ – My first tip for this sample is find the ‘grain’ of the sequins, which is a bit like fabric ‘nap’. Rub them downwards and if they lay flat without resistance, that’s the direction you are going to sew them on. If they sit up and resist (see what happens in the first photo below), turn them around and sew from the other end. Next would be to draw a guide line to sew, and use a glue stick to temporarily hold them into place on your fabric. Then the fun begins … and the B790PRO has the best feature to help you get just the right stitch length and width … testing first with the LASER! Sorry about the scrappy bits underneath – I grabbed whatever was near the machine! Zigzag Stitch #2 … and oops! I forgot to note the final settings down … but it will depend on the size of your sequins of course. No matter … stitched on well!
... A Little Something Extra and A Reminder ...
Let’s revisit that eBook
It’s probably a good time now to revisit the Bernina eBook on Machine Appliqué … I introduced you to that one when I blogged about Embroidery Foot #6
is Applique Foot # 23 – 20% off – contact your preferred Bernina Dealer for this fabulous offer. … and it’s not just for appliqué … This little foot is a true hero in the Studio when it comes to making piping!! I’ll be covering this foot later in the Blog, in the meantime there’s a great little video on the Bernina Australia Facebook and Instagram pages!
*Australia and New Zealand Promotion Only – ends … 31st July 2024 …