The progress this week was a lot less productive than I had planned for! Some weeks are like that, and it’s how we react that really matters. I’ve come to realise over the years, that the gap between my planned expectations and what actually gets completed is widening greatly. However, at least I keep busy and have lots of stitching fun along the way.
I did have a couple of days ‘off sewing’ – celebrating my birthday on Wednesday and catching up with dear friends and family.
First project this week was preparations for stitching the Bloom and Grow Quilt, completely on my L890 Combination Overlocker/Coverstitch machine. As well as taking over the dining table, as I mentioned last week, I set up an ironing board in the kitchen as there was a lot of spray starching and pressing to do prior to cutting anything out.
It’s such a well written pattern booklet and having a fabric legend made it easy to get it all cut out, bagged up in fabric colours and then into Lesson Bags. A lot of work I know, but totally worth it! So far I’m up to Lesson 6 (helped along by watching a bit of the Golf) and will continue on tomorrow.
The family are enjoying their time away, and it is very quiet here at home most days. I did unpack my latest little purchase … The Littliest Gypsy … a Bernina B335 Simply Joyful – a micro version of my B990! This machine will replace my B215 Simply Red here in the Studio, which has just 11 stitches. Now I’ll have 625 stitches, which includes 3 different alphabets and automatic buttonholes, all in a machine with around about the same footprint. Quite the upgrade, and the knee lever and Kick Back Foot Control that I had added to the 215 when I purchased it, fits as well. Bonus!
I used her this week to stitch out the Ruffler samples. What a great little machine perfect for me to pop into the car for my fortnightly catchups with sewing friends, or a little roadtrip away. Weighing it at just under 8kgs it will be so easy to move around with me.
It’s now late Thursday night as I’m writing this – so best I focus on getting this post scheduled and ready for tomorrow.
... How I love a Ruffle! ...
Ruffler #86
This attachment is truly my most used over almost 45 years of owning sewing machines! My Mum had one for her vintage Singer as well, so I was introduced to ruffling very early on. Nothing much has changed in the design over all those years, proving just how great an attachment this is. I have even made and taught Ruffled Rugs! Lots of strips preruffled and stitched onto ticking.
When teaching this accessory I have a bundle of samples showing differences in stitch length and pleat frequency.
There are four main components to the Ruffler, a U-shaped arm, the blades, the adjusting lever and the adjusting screw. The U-shaped arm fits around the screw on the needle bar, one blade moves in and out to advance the fabric strip whilst the other protects it from the feed dog, the adjusting lever changes how far apart the pleats are and the screw adjusts the depth of each pleat. The Big Book of Feet explains it all very well. Simply put, the fabric is placed between the blades, and the lever and screw are adjusted to whatever finished type of ruffle you require.
Options available for the attachment – It’s available in a Standard Version suitable for all models and a 9mm Version designed for models obviously with a maximum stitch width of 9mm. The difference is the size of the U-Shaped arm that fits around the screw on the needle bar.
Attachment #86 had 4 differenttechniques to stitch out.
... This Week’s Foot Highlights or Challenges ...
‘Ruffling or Pleating a Single Layer’ – my preferred setting is SL 2.5 and the pleats set for every stitch – Setting 1. This took my 30” strip of fabric down to 10” of very dense ruffles.
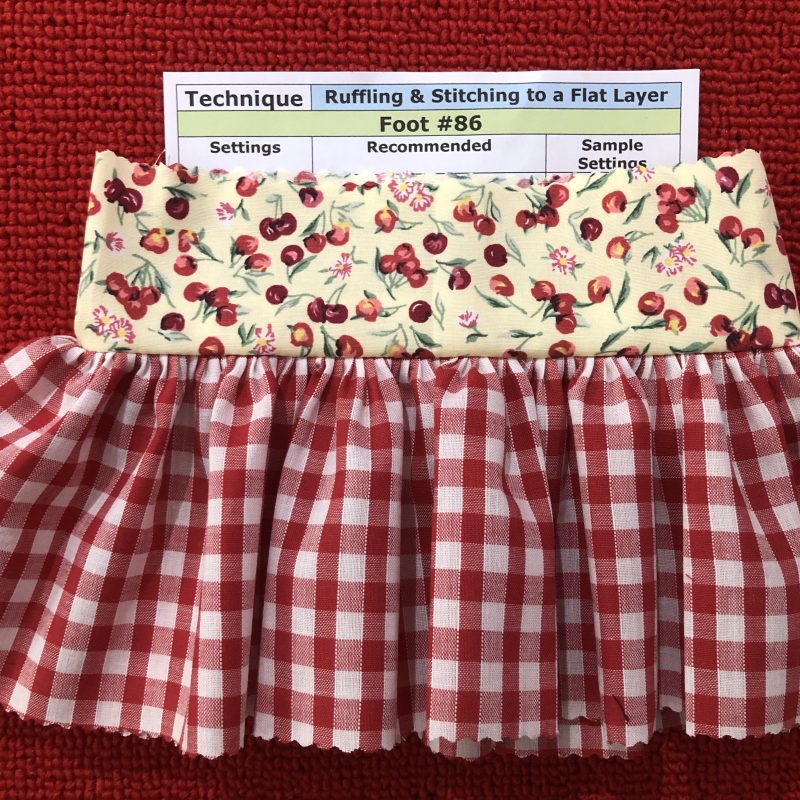
‘Ruffling and Stitching to a Flat Layer’ – The strip that remains flat after sewing is placed underneath the Ruffler and the piece to be gathered is placed as usual between the blades. Sew at a slower speed and guide both layers with their raw edges aligned.
‘Shirred Tucks’ – A little more challenging to get stitched as I had only about 1” between my rows of tucks and the fabric was a medium weight rather than a lightweight type. Used same setting as previous 2 samples SL 2.5 Pleats every stitch.
‘Ruching’ – I like this finish and this time used pleats set to every 6th stitch, and SL 2.5 again. It would have been better to increase the depth of the pleat to highlight the technique more.
Summary: I usually overlock the edges prior to ruffling, with either a three thread overlock stitch or rolled hem stitch.
It is such a time-saving attachment, and really very easy to master. Don’t be afraid to alter that adjusting screw to get a deeper pleat, and the screwdriver is even included with the accessory.
A spare spring is included in your package, however over the years I have never had to replace one. I do have mine taped to the inside of the box so that I don’t misplace it.
... A Little Something Extra ...
Accessory Spotlight
Another great educational offering from Bernina comes in the form of downloadable handouts, and this week- check out an Accessory Spotlight on the Ruffler Attachment #86.
is Reverse Pattern Foot with Clear Sole #34C: Get a 20% discount at your BERNINA dealer during the whole month – contact your preferred Bernina Dealer for this fabulous offer.
*Australia and New Zealand Promotion Only – ends 30th April, 2025 …
Visit your preferred Bernina Store from the 7th April until the 18th May to discover the wonderful range of machines and accessories on sale … and there’s 20% OFF BERNINA & bernette Accessories*
*Excludes all other brands, luggage bags, needles, bobbins, bobbin cases and spare parts. While stocks last.