This week I got rather organised and completed writing up the Blog earlier than I’ve done lately. So not a lot of ‘social ramblings’ to add since last week. I’ve got a few big days planned ahead for making another Laura Jacket for The Quilters Angel in Toowoomba – more beautiful florals but this time with a lovely brown check binding to accentuate the colours of the main fabrics. I’ll share a pic next week when it’s finished. Here’s the lovely bundle I’m about to cut into.
I’ve also got a roadtrip down to the Gold Coast to visit the Beierers – I might have a couple little parcels to take if I get some ‘me sewing’ time! There’s never enough of that around here! I’ve been itching to do a few more embroidered things on my B990 with the sock inserts – its ‘covered-up toe’ time for little Miss Summer I noticed in some recent photos. Oh, and there’s the pram liner and front bar cover I made a few weeks ago.
My little B335 will be along for the ride as well – Bobby’s Koala backpack needs mending, and when the straps broke, he told Gemma that “Nanni can fix it!” Love the confidence they all have in me!
... Did You Know? ...
3-Thread Overlocking Stitches
Well, I missed adding this on the first Friday of April, so best I include it this week, which is actually the LAST week of April! All this great information can be sourced from the Bernina Website, you just need to know where to look – so first up this week I’ll guide you to find all the information, including great pictures of the stitches on Bernina Australia.
The Bernina L890 machine has the most stitches built in – 29 of them in fact, so that’s the machine I’d reference to source information about this category of machine made stitches – both overlocking, coverstitch and chainstitch are there. First go to the Bernina link below, for the Bernina L890 Machine.
From that page you can select the ‘Features and Functions’ Tab.
Next, click on the ‘Stitch Variations’ Tab …
This month’s category is there … 3-Thread Stitches …
Click on the ‘i’ icon next to the stitch you want information on, e.g. 3-Thread Super Stretch Stitch … and a section opens with details on that stitch, including a photo of what it looks like …
All other current Bernina Models have the same information, accessed exactly the same way. If you have any other model (or even a different brand of machine), this information regarding the stitches is relevant.
So here’s a roundup of all that information for you, with a little bit of add-ons from me … and photos of my stitching samples.
Which Stitch When
An Overview … The 3-thread overlock stitch is a great choice for simple edge finishing or lightweight fabrics. The stitch uses only one needle—either the left or the right. This stitch is strong and has quite a bit of give for stretchy fabrics, but because of the use of only one needle, it has less bulk and thus less strength. A particular advantage to this stitch is that it can be used to sew a blind hem, hemming and finishing the raw edge at the same time.
3-Thread Super Stretch Stitch creates overlock seams for super stretchy and two-way-stretch fabrics used for gymnastic or swimwear. An especially soft stitch, ideal for lingerie and gymnastic wear, is achieved by using a texturized nylon thread, or you may know this thread as woolly polyester as well, in the looper (and even in the needles). Decorative threads are used to neaten and create reversible edges.
3-Thread Overlock is a balanced seam and also ideal for neatening edges, hems and facings, quicksewn edge finishing and effect seams.
Wide 3-Thread Overlock is suitable for strong woven fabrics, pile, furry materials or sturdy knits, for garments and decorative projects.
Narrow 3-Thread Overlock is suitable for fine to medium weight fabric neatening, t-shirts, children’s garments, lingerie and fine home textiles.
Snapshot of an Overlock Stitch: An overlock stitch can be made with 4, 3, or even 2 threads. In this stitch formation, the thread tensions arebalanced creating a strong seam that is ideal for construction and edge neatening.
3-Thread Flatlock is a flat, slightly stretchy seam that is sewn on the right side of the fabric and is especially ideal for creative overlock projects in combination with decorative threads. The wrong side of the stitch is known as “ladder stitch” and also used for decorations or base to weave tape or cord into the stitch. A narrow 3-Thread Flatlock is used in medium to light weight fabrics. A wide 3-Thread Flatlock is used in medium to heavy weight fabrics. Suitable for patchwork, apparel and sportswear and home textiles.
Snapshot of a Flatlock Stitch: By simply adjusting the tension settings for the needle and the lower looper (thereby creating an unbalanced stitch, you have a new stitch called a Flatlock. Because the needle thread is loose and the lower looper is tight, this stitch allows the two layers of fabric to pull away from one another and lay on top of each other.
The 3-Thread Narrow Seam is used for fine fabrics or see-through materials like silk, cotton or synthetic fabrics. It can be used for pintucks in heirloom projects and as a decorative fine edge finish, e.g. with two different shades of embroidery thread in the loopers. Suitable for inserting lace, light weight apparel, blouses, children’s garments, accessories.
Snapshot of the 3-Thread Narrow Seam: settings as per a 3-Thread Overlock Narrow, however the Roll Hem Lever is positioned at R, and the cutting width is set wider.
3-ThreadRolled Hem is an attractive and quickly sewn decorative edge finish, for example with embroidery thread in the loopers. The rolled hem can also be used for pintucks in heirloom projects. Suitable for accessories, ruffles, light weight outerwear, home textiles.
Snapshot of a Rolled Hem Stitch: The tension setting on the needle will be standard, and the lowerlooper tension setting will be tightened. A short stitch length is ideal.
3-Thread Picotstitch is an attractive and quickly sewn edge for light weight woven and knitted fabrics. Suitable for scarfs, bridal wear and ruffles, home textiles and decorative craft projects.
Snapshot of a Picot Stitch: Similar to the Rolled Hem, the tension setting on the needle and Upper Looper will be slightly lower than standard, and the lowerlooper tension setting will be tightened. Stitch length is longer than Rolled Hem.
... The ‘Piecemaker’ ...
Patchwork Piecing and Quilting with your Overlocker
This week’s first patchwork technique is Flatlock Piecing. (Refer BBOSQ Pg 107)
This is a technique that will be used in the Log Cabin Block this week. I will add the procedure again as I write up that block.
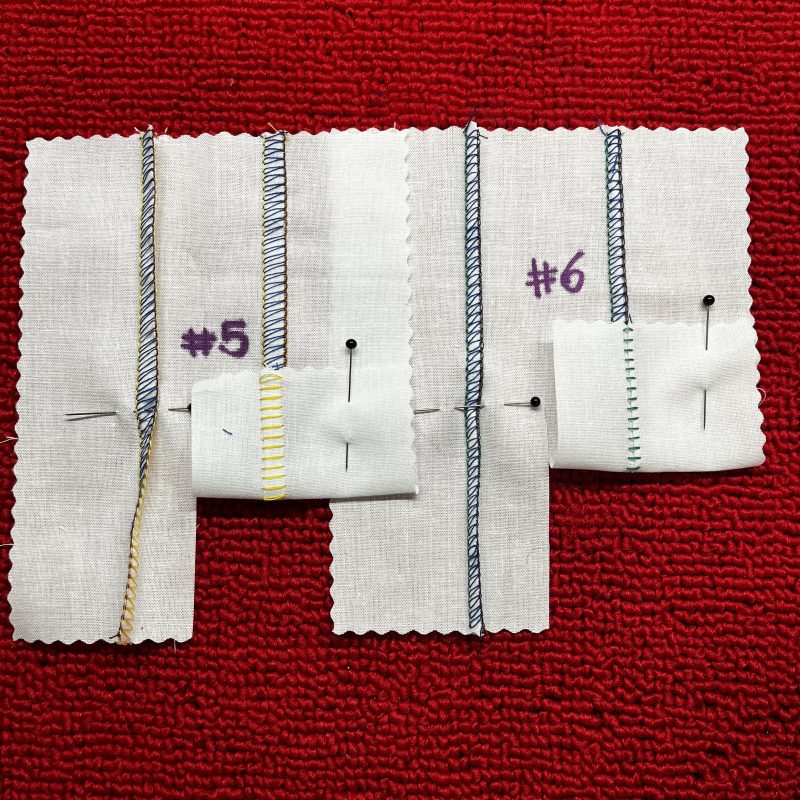
I stitched each of the samples with both right sides together and wrong sides together to show what difference it makes. Stitches used were 3-Thread Flatlock Wide (LN) and Narrow (RN), as well as 2-Thread Flatlock Wide (LN) and Narrow (RN)
Photo on the left below shows the 3-Thread Flatlock Wide seams – Stitch #5 – folded to show both sides. I used this to piece my Log Cabin Block this week.
Photo on the right shows 3-Thread Flatlock Narrow seams – Stitch #6
Photo on the left below shows the 2-Thread Flatlock Wide seams – Stitch #11 – folded to show both sides.
Photo on the right shows 2-Thread Flatlock Narrow seams – Stitch #12
Last photo is all the samples laid out together to show the different finishes.
The second patchwork technique is Improv Piecing. (Refer BBOSQ Pg 108)
This technique gives a very modern approach to patchwork piecing, although it is also like Crazy Patch Piecing. Random pieces of fabric are patched together, making it slightly larger than the desired unfinished block size. The overlocker will trim off any excess fabric at the seams as the block is stitched, as well as neatening the back of the block simultaneously.
Machine Setup: 4-Thread Overlock Stitch #1 SL 2.5 LN 5, CW 6 – rest are Default settings. Seracor Overlocking Thread in all thread paths. I tighten the LN thread to give a better firm seam that doesn’t pull apart and show the threads on the right side of the block.
Once the slightly larger block size is achieved, trim into the unfinished block size with ruler and Rotary Cutter, turning it into a unique quilt block.
This week’s first patchwork block is the Log Cabin Block. (Refer BBOSQ Pg 131)
Sample Prep: This block is constructed with a Centre, one side of the block is ‘light’ fabrics and one side of the block is ‘dark’ fabric, strips vary in length, however they are all cut 2 ½” wide – Great Jelly Roll block/quilt! The strips also generally graduate from ‘lighest shade’ to ‘darkest shade’ as you move from the centre out to the last row of each side. Log Cabin has ALWAYS been a huge favourite of mine!
Step One: Choose your finish … When stitching on the overlocker with a Flatlock Stitch, it matters how you place the fabrics together, and then under the needle, as you have seen from the Flatlock Piecing Samples above.
Ladders on front of block = pieces are placed right sides together, newest strip on top as you piece the block …
Loops on front of block = pieces are placed wrong sides together, new strip underneath as you piece the block
I hope this is not too confusing … I often have a little note next to my machine to remind me!
TAKE NOTE … The photo on Page 131 of the Big Book of Serger Quilting shows the finished block with ‘loop’ side on top …
…however, the instructions in the book are for ‘ladder’ side on top. As I mentioned above, if you stitch with right sides together as they state, you will finish with ladders on the right side! Either is fine, it’s just a choice you make. I chose the ‘loop’ side for the front of my block, giving more colour to the ‘seam’.
Step Two: There is a diagram in the Big Book of Serger Quilting – however, it is a traditionally sewn block you may recognise, piecing ‘logs’ around a centre. Stitch the logs around your centre square, checking with a Patchwork Ruler how square your block is after each round, trimming if necessary – this is just a good habit to get into with Log Cabin blocks. The seams are always laying flat with the Flatlock stitch as well, so no wayward stitched/turned seams on the back!
I am also adding in a photo of the back of the block to show the ‘ladder’ side, and the lovely flat seams.
This week’s second patchwork block is the Log Cabin Corner Block. (Refer BBOSQ Pg 132)
Sample Prep: This block is constructed with a Corner piece, one side of the block is ‘light’ fabrics and one side of the block is ‘dark’ fabric, strips vary in length, however they are all cut 2 ½” wide – again another great Jelly Roll block/quilt! The strips also generally graduate from ‘lighest shade’ to ‘darkest shade’ as you move from the corner out to the last row of each side. The difference to the last block, is we work only on two sides to complete the block, rather than around the block as before.
Corner – Cut 1 square @ 2 ½”
Colour #1 – Cut 1 each @ 2 ½”, 4 ½”, 6 ½”, 8 ½” and 10 ½”
Colour #2 – Cut 1 each @ 4 ½”, 6 ½”, 8 ½”, 10 ½” and 12 ½”
Machine Setup: 4-Thread Overlock Stitch #1 SL 2.5 LN 5, CW 6 – rest are Default settings. Seracor Overlocking Thread in all thread paths. I tighten the LN thread to give a better firm seam that doesn’t pull apart and show the threads on the right side of the block.
Step Two: Stitch the logs out your corner square, checking with a Patchwork Ruler how square your block is after each row sewn, trimming if necessary – this is just a reminder of a good habit to get into with Log Cabin blocks. As this stitch really has no front and back you can stitch from either the strip side, or the block side, ensuring you have no twisted seams. (See photo of back of block)
... Not Just for Hemming ...
Blindstitch Foot #C19
The Blindstitch Foot is cleverly engineered to deliver accuracy with minimal effort. It has a blade that runs down the centre of the foot with an adjustable screw on the top. This guide helps position the folded fabric edge, so the needle catches just the right amount for that nearly invisible finish. Blindstitch Feet are for use in overlocking mode only.
Foot #C19 was used to stitch out samples showcasing ‘barely there’ hemming, weighted curtain hems, and Rolled Hem pintucks.
Here is a link to the Bernina International video for this foot.
Bernina L450 and L460 – foot is called the Blindstitch Foot and there are two sizes available – 0.5 for fine fabrics and 1.0 for medium weight fabrics.
Bernette Funlock 40 Series (b44, b48) and Airlock 60 Series (b64 and b68), machines with overlock function, the foot is called the Blindstitch Foot.
... This Week’s Foot Highlights or Challenges ...
Your Bernina #C19 Blindstitch Foot is more versatile than it first appears—it’s not just for invisible hems. With a few adjustments, you can use it for a range of clever finishing techniques.
Classic blind hems are the obvious go-to, giving you that barely visible finish on garments like trousers, skirts, and dresses. Matching threads are essential to ensure this finish.
‘Blind Hem’ – Big Book Of Serging Page 115 – Mid to heavy weight fabrics – this finish starts with a ‘Z’ or ‘S’ fold of the fabric depending on how you are looking at it, having the raw edge extending about ¼” past the folded hem edge.
How to make this fold: With wrong side of fabric up, fold up the hem allowance (to a depth of about 1 ½” in my case), and press. Then pick up the pressed edge and turn back to the underneath, right sides together. Leave about ¼” of the single layer with raw edge, extending past the new folded edge. Adjust the screw on the front of the foot to move the blade about 1 to 2mm to the right of the needle. This ensures a small ‘needle bite’ into the folded edge, achieving what I refer to as a ‘barely visible finish’.
Here’s a little video I made to show how to fold the edge …
I pin afterwards away from both the foot and the blade of course.
I stitched 4 samples with the same settings – the homespun I was aware would be too fine for this technique, and the results proved that. Stitches were only ‘blind’ due to the perfect match of the thread. The other three samples were on mid- to heavyweight denim and suiting fabrics – great results here!
‘Blindhemming’ on the overlocker is not my first choice on a woven garment. I usually use my sewing machine (after overlocking the edge), and the Blindhem Foot #5. However, these techniques on the overlocker mean both edge finishing and hemming are performed at the same time – winning!
‘Double Folded Hem’ – light to midweight curtain fabrics – Press up hem twice e.g. a 2” hem and then fold over another 2”. Have a small overhang of less than ¼” when you fold back into the ‘z’ fold. Change cutting width (I went to CW 9) so that the folded edge will not be cut off. This creates a very wide stitch, as changing the cutting width moves the Blade over and the Stitch Finger. Change the MTC (Micro Thread Control – Stitch Finger only moves) to -2 and you will get a better stitch. Complete as per original ‘Blind Hem’ sample, without cutting off any of the fold.
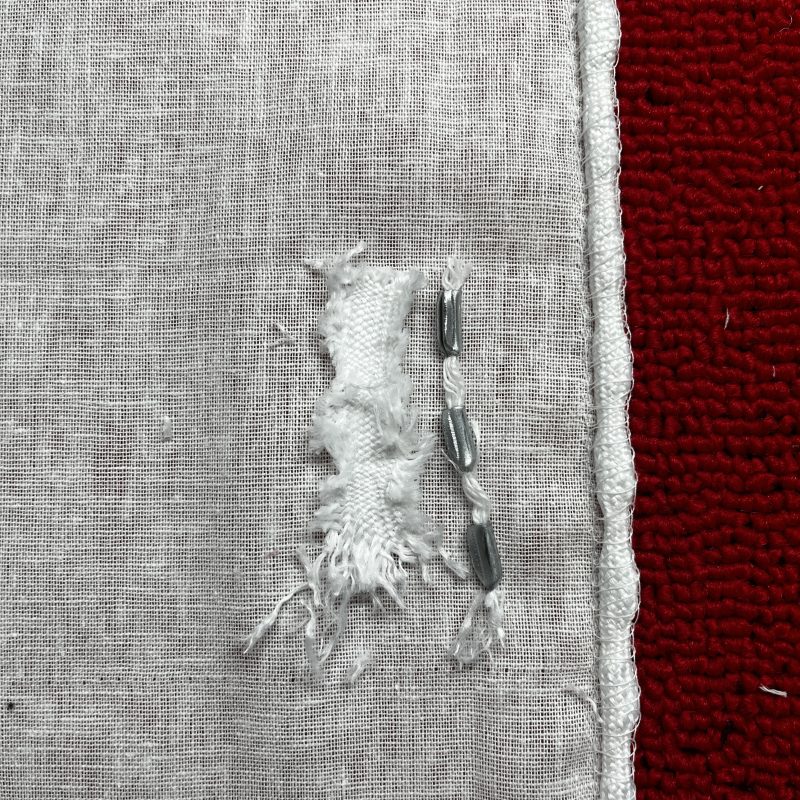
‘Drapery Hem’ – Big Book Of Serging Page 115 – sheer or lightweight curtain fabrics – Press up hem twice e.g. a 2” hem and then fold over another 2”. Unfold. With right side up, attach a length of lead or no-lead ‘sausage’ curtain weights to the raw edge of the hem using a #C15 Cording Foot. The weighted ‘rope’ should slide easily in the groove, depending on the thickness you have purchased. Mine was about 6mm thick.
Complete as per ‘Doubled Fold Hem’ sample, without cutting off any of the fold. A great weighted curtain technique that I’ve used many times over the years.
Machine Setup #1: 3-Thread Overlock Wide Stitch #3 SL 4.2 CW 9.0 DF 1.0 LN Tension 4 MTC -2 … Use a Cording Foot to attach weighted ‘rope’ to edge.
Machine Setup #2: 3-Thread Overlock Narrow Stitch #4 SL 4.0 CW 9.0 DF 1.0 RN Tension 3.5 MTC -2 … Fold up and complete the hem.
You can also create ladder (or decorative) stitches by slightly increasing the needle bite so the thread shows on the outside in a controlled, evenly spaced way—great for subtle design details. Change out to a variegated or other decorative thread.
‘Flatlock Hem’ – the ladder side of the stitch will show on the right side of the fabric. Good technique for curtains and knit garment hems. This is my ‘alternative method’ for t-shirt hems instead of Coverstitching. The Latlock stitch has lots of stretch built into it and you can create a nice feature with contrasting thread.
Machine Setup: 3-Thread Flatlock Narrow Stitch #6 SL 4.0 – rest were Default Settings – Contrasting thread in RN, and I moved the blade on the foot further to the right, to ‘bite’ into the folded edge more than on previous samples. Either side could be used, depending on which way you do the initial fold – right sides together will give you ‘ladders’ on the outside, and wrong sides together with be the ‘loops’ that show when finished. I used rayon machine embroidery thread in all three threading paths for these samples.
You can even use the Blindstitch Foot for delicate edge finishes such as Rolled Hem Pintucks on light to mid-weight fabrics, where the stitch lays on a folded edge, and a standard foot may feel less controlled.
‘Pintucks’ – first fold and press the lines into the fabric on the right side where you wish the pintucks to be. Consider how wide the foot is also when planning the width between the rows – the foot will ride over any previous line if they are too close. You can see in my finished sample the two outside rows did not stitch as well, as the previous pintuck was ‘riding’ underneath the foot.
Machine Setup: 3-Thread Rolled Hem Stitch #8 Default Settings except for LL and I increased that to 6.
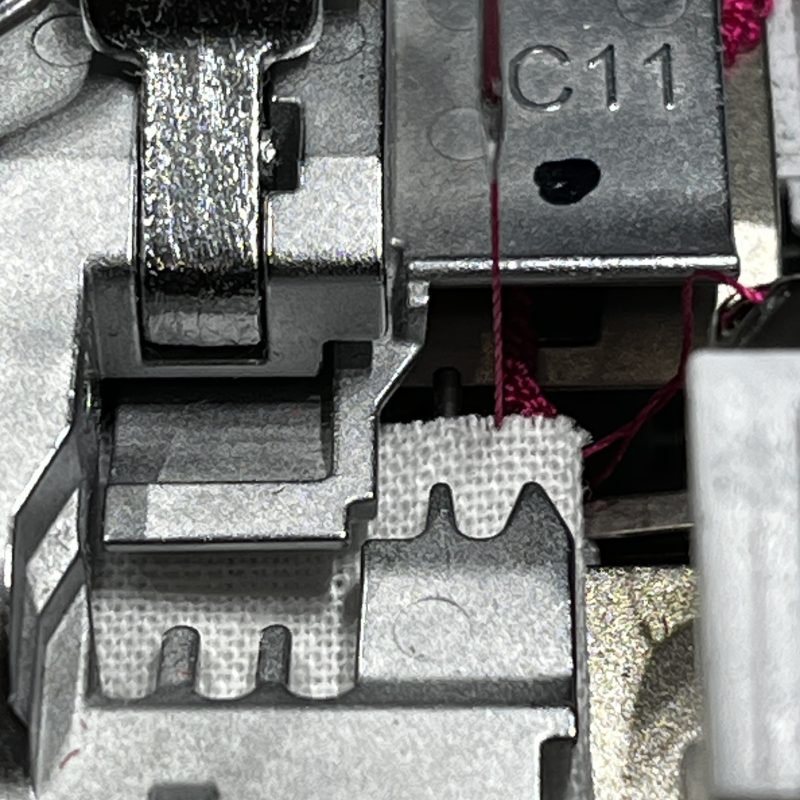
Now full disclosure on this one sample … I had quite the time getting the stitch to look good – changed needles and still not a lot better. I had a close look at the foot and saw there was one major difference in this foot, compared to all the other overlocking feet. The area where the needles penetrate, has a different profile on the right hand side. I’m unsure if this was why the machine was making the loopy stitches, however every other foot I used gave me beautiful pintucks with no loops! For many years, and many different Bernina overlockers I have used the Blindstitch Foot for pintucks – I am unsure why these current samples are not looking correct. Here’s the difference – Foot #C17 has a box shaped protrusion next to where the needles penetrate, #C11 and all the other feet have pointed shaped ones … I’ll have to do a little more research on this … Stay tuned for any results I may come up with – I’ll be sampling more over the next few week,s and … yes, I’m into details!
With a bit of experimentation—especially decorative threads, adjusting stitch width, length, and guide position—you can get far more out of this foot than just basic hemming.
... A Little Something Extra ...
Foot User Manuals
On the Bernina Website, you can download a User Manual for the Blindstitch Foot #C19.
is the Overlocker Cording Foot, used e.g. for sewing thin cord, wire, fishline, perle yarn or fine yarn into a rolled hem. Ideal for reinforced edges, decorative ruffles and shapeable knitted bands. Get a 20% discount at your preferred BERNINA dealer during the whole month!
*Australia and New Zealand Promotion Only – ends … 30th April, 2026 …