This past week I’ve been filling in my days up in the Studio with lots of gridded paper, pencils, rubbers, scissors, glue sticks, markers, rulers, a compass and a head full of ‘just what could be possible’ ideas! Have you ever had times like this? I should be doing so much other ‘stuff’ but this idea just won’t let go of me! Part of the ‘other stuff’ is stitching out the samples for the next 20 feet for the Blog! There are just not enough daylight hours in the day during Winter here in Brisbane. Bring on Spring I say …
I won’t ‘reveal’ exactly what I’m doing at the moment, as it truly is still in the ‘discovery/planning stage’ but I’m loving all the threads, texture and bright colours scattered about the room. My Bernina L890 Overlocker/Coverstitch Combo machine has been stitching away beautifully, and running so well after her last service! I can’t stress enough the importance of keeping our machines well maintained and regularly serviced, to ensure the really fun times of actually using them doesn’t get interrupted.
I met up with my friend Jenny K this week for morning tea at a beautiful Cafe and Plant Nursery (The Wild Canary) over her way, and we chatted for over 2 hours about our families, our sewing and the pure joy we both get out of guiding others along on their own sewing journeys.
I did show Jenny a few of my ‘samples in progress’ photos, and she commented she never knew overlockers could do ‘stuff like that’ … well, maybe a few more weeks and I’ll show you all what has been filling my days! Here’s a sneaky look at part of one of the sample bits …
Jenny has a lovely group of ladies who gather at her home to regularly sew together, and some years ago now I was invited along to share the day with them. I spoke to them of needles, threads and ‘all things Bernina’ of course! Jenny said they still refer to that time, whenever the subjects of needles or threads come up! Nearly all the ladies sew on a Bernina … and there’s quite a number in the group! Next visit was locked in, ideas thrown around about what I’d talk about, and I’m truly looking forward to another lovely day with them.
Somehow this ‘retirement gig’ has morphed again!
... Did You Know? ...
A Bit About Buttons
I’ve always been fascinated by buttons with all their different sizes, shapes, colours and designs. They are quite a practical item, used primarily as closures for garments. Buttons, can of course also be used purely as decorative features. I love all the history and stories around sewing things, so if you do as well, Google ‘button history’ … there’s lots of information around.
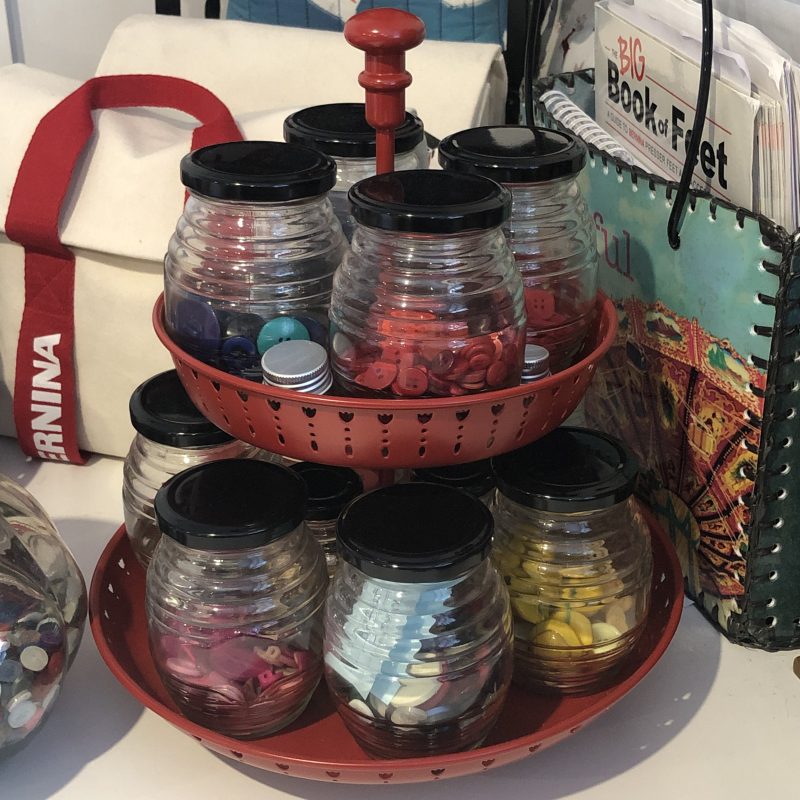
I have quite a good collection here in The Studio, along with my very fond memories of searching my Grandmother’s button box as a child. Here’s some of my ‘treasures’.
For the purpose of this Blog Post which covers sewing buttons on by machine, I’ll just mention the two ‘styles of button’ – that is whether it is a shank button, or a flat, sew-through button.
Shank buttons have a hollow piece on the back through which thread is hand sewn to attach the button. Button shanks may be made from a separate piece and added to the back of the button, or carved/moulded directly onto the back. This holds the button close to the top of the garment, once it is through the buttonhole.
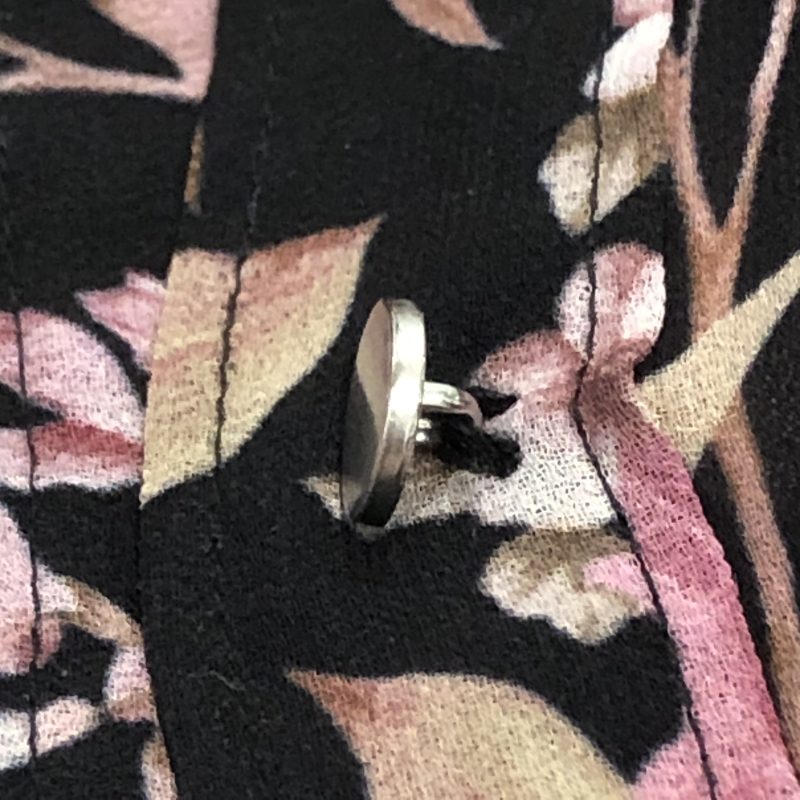
Here’s one from a blouse I have … a small metal shank button.
Sew through or Flat buttons have holes through which thread is sewn to attach them to a garment, by either sewing machine or hand sewing.
These are garments of mine that have either functional buttons or decorative ones.
It is essential to note that all functional buttons, which are fastened by a buttonhole or fabric/thread loop, must have a shank. The shank length (whether real or made of thread) should match the thickness of the fabric layers where the button will be attached. The button should rest above the fabric, and a thin shank would then be accommodated within the buttonhole.
A hand sewn thread shank can be created by actually stitching over an object like a toothpick for example, which would then taken out (A), the button snugged up to the top of the stitches (B) and excess threads wound around under the button itself, (C) and finally secured by tying off at the back of the button.
That’s how you would stitch it entirely by hand … let see now how to do it by machine!
... The Shortest Foot of All ...
Button Sew-On Foot #18
This little wonder has a short, stout sole, encased in a non-slip rubber covering allowing it to sit securely on a button when being sewn on by machine. The adjustable centre toe of the foot can be adjusted * to create thread shanks, and provides stability when sewing not just buttons, but hooks and eyes, charms or ribbons. * See Footnote
This foot is used with the feed dog in the lowered position.
To create a thread shank with the Button Sew-On Foot #18, stitch with the centre toe in the highest position for thick, heavy fabrics, medium position for lightweight fabrics, and lowest position for sewing on hooks and eyes, snaps, charms etc. (No need for a toothpick to create a shank!)
You could of course cut your threads once the button is sew on, as the excess thread will allow the button to sit higher than the base fabric anyway, and do without any handsewing of the shank. I’m just a fan of a ‘little bit extra special finish’ when making a garment. Here’s my process …
When finished stitching, remove from under machine and leave long thread tails before cutting. Pull the bobbin thread up to join the needle thread, and with a hand sewing needle, continue down through one hole to the underside of the button. Continue as per the hand sewing method mentioned before, creating a thread shank.
Options available for the foot – It’s available in a single versiononly, suitable for all models. Maximum stitch width possible is 5.5mm
Foot #18 had5 differenttechniques to stitch out, and I included buttons, ribbon, a charm, and a plastic roman blind ring.
... This Week’s Foot Highlights or Challenges ...
‘Sewing Flat Buttons/Attaching Snaps/Sewing on Hooks and Eyes/Attaching Jewels & Rings/Sewing on Ribbon’ – I sewed all these techniques and I tried all three of the suggested stitches.
Sewing on Buttons – I used the Button Sew-on ProgramStitch #60 … now I use this option a lot here in the Studio – rarely do I sew buttons on by hand. (Shank ones of course need hands ewing!)
Love this stitch, as it is an ‘automatic’ or programmed stitch, which means I use the stop/start button each time, after checking either with the hand wheel, or using the laser on the B70PRO that the needle goes into the centre of the hole of each side. I first hold the button in place with some Quilters Washaway Basting Tape. My sample was denim fabric with topstitching thread in a gridded pattern for button placement. I’ve used this ‘trim’ on quite a few things over the years for garments, quilts and home decorating items.
Attaching Snaps/Hooks & Eyes, Jewels, Rings and Ribbon – Universal Stitch #15 is a very secure stitch also, locking each time it sews the three side stitches. Best if 6 – 10 stitches are sewn, and you could engage pattern repeat so that it stops at the end of this number. More about this function in the Blog Post on Foot #7, back in April. Zigzag Stitch #2 could be programmed the same way with pattern repeat, or sew 6 – 10 stitches, if this option on your machine is not available. Pull threads through to the back and tie off.
Here are my points to remember about sewing on buttons/trims etc, using this foot.
Interface the area behind the button/trim, to support the stitches, and general wear and tear of the item, with some form of stabilizer/interfacing, or by stitching a second button sewn at the back.
Change stitch width of ‘default’ setting, if button is quite small or large. Check distance between the holes by measuring, or hand wheeling and adjusting once it is in place on the fabric.
If stitching a four hole button on, stitch the front ones first, and then the back. It could also be stitched on in a ‘cross’ pattern.
Sometimes on children’s clothing I will secure the stitches at the back with clear nail varnish. Back in the post on Foot #7 I showed you a little toy bag I’ve made many times, and all the little metal/plastic rings I sew around the edges were stitched on with Button Sew On Program #60, and further secured with clear nail polish. Just an extra precaution for little ones …
... A Little Something Extra ...
Bernina 'We All Sew' Blog Project
There are some great little projects around for you to really give your special feet a workout! Here’s one that combines Gathering Foot #16 from last week, and this week’s Button Sew-On Foot #18 … mine’s not finished yet … I’ve been too busy playing on my L890 ALL WEEK!
is Applique Foot # 23 – 20% off – contact your preferred Bernina Dealer for this fabulous offer. … and it’s not just for appliqué … This little foot is a true hero in the Studio when it comes to making piping!! I’ll be covering this foot later in the Blog, in the meantime there’s a great little video on the Bernina Australia Facebook and Instagram pages!
*Australia and New Zealand Promotion Only – ends … 31st July 2024 …
Chat again next Friday,
‘Foot’note: There has often been times when I have actually taken off the centre toe of the foot, so that the stitches lie completely flat on the item. The screw on the side can be adjusted to be raised or lowered, or taken off completely.